The note outlines in an accessible form simple steps for adapting a USB-to-SATA converter to a form suitable for use using available tools.
Preamble
One day, for some (still unclear) reason, one of the onboard SATA nipples on a self-assembled NAS on miniITX (also an AoE server for diskless clients) failed, and since it was in the evening (and even on a long weekend ) then this imposed certain restrictions on the availability of the solution (although you can fly like a bullet to a convenience store, but laziness, as you know, is the engine of savvy minds).So, the task is this: connect a SATA screw to a miniITX system in the absence of free SATA.
Part I
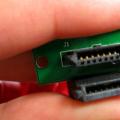
Having quickly carried out an audit of the junk around the computer, we discovered the following adapter, which had been gathering dust for many years without use, because it was ordered at the dawn of the popularity of foreign online stores:As it turned out, the board is not just a USB-to-SATA converter, but is intended for devices such as laptop DVD drives that have a mating connector on board slimSATA(features an additional non-standard power supply). Thus, it was not possible to connect the adapter to ordinary SATA devices and it was thrown into a dark corner of the box for a long time.
So, the adapter contains a slimSATA connector, which includes a standard SATA 7pin female connector (as on connecting cables):

Even if you remove an additional non-standard slimSATA power connector from the board, when inserted into the HDD, the adapter will block access to the HDD power connector (SATA 15pin). There is only one way out - a SATA 7pin connector extension, for which we carefully cut off one of the ends of the standard SATA cable:
Now you can completely remove the slimSATA connector from the adapter board and solder the end of the SATA cable (without mixing up the RX - TX differential pairs!):
To impart mechanical strength to the joint between the cable and the board, it was decided to use PVC electrical tape (I abandoned the original idea of filling it with silicone sealant - it is unknown how “non-conductive” it is at 1.5 GHz):

Now let's move on to USB: since we need a replacement for the internal SATA, a two-meter skein from USB-A to USB-B inside the case will obviously be superfluous. We get rid of USB-B - unsolder a piece of the board with connectors and electrolytes (they are only needed when powering a USB DVD drive).
We will connect the adapter to the internal USB socket on the motherboard. Why do we crimp/solder (for 480Mbit/s it is better to solder) the contacts of the PLS-4 connector (it is more convenient, of course, PLD-10, so that it covers the entire comb at once, but only PLS-4 is present in the household):

After checking the pinout of the comb on the motherboard and the pins of the USB converter chip SPIF225A, we assemble:
So, after spending some time searching for the necessary pinouts, we quickly built this type of adapter, which allowed us to pick up a fallen HDD without rebooting and, as a result, thanks to its dimensions and getting rid of atavisms, it fit quite harmoniously into the interior of NASa:

Part II
After solving the problems with the NAS and its upgrade, the itching craving for perfectionism prompted me to modify the adapter. Why were the necessary connectors ordered: SATA 7pin male SMD& . We mark the seat for the SATA connector, we do it in such a way that the holes for the holder pins do not go through the signal tracks on the back side of the board (as they say - try it on seven times, cut one drill):We strip the copper and solder the holder pins on the back side of the board:
The pitch of the pins of the footprint on the board and the SATA connector is the same, as a result we get a neatly sealed connector:
Let's deal with the USB part. We mark and prepare a place on the board for landing miniUSB-B:
We solder the connector, showing virtuosity when working with a 0.65mm pitch of the miniUSB-B connector:

Some explanations are needed here, so here is the sequence of actions with miniUSB-B:
- The GND contact, so as not to get in the way (the material of the legs is fragile - the leg of the first connector broke off when bent), bend it up and solder it to the body - then solder the body to the GND of the board;
- The ID pin is not used, so we simply pull it out of the connector with tweezers;
- Now it’s a little freer - there are three pins left - they need to be carefully moved apart with tweezers so that there is more space for maneuvering the soldering iron;
- We solder small extension conductors to the D- and Vbus pins, and slightly raise the inputs themselves so that they do not short-circuit to the board after installation;
- We leave pin D+ “as is” - physically, during installation, it falls on the corresponding polygon on the board;
- Now you can mount the connector on the board - we grab the housing diagonally, then carefully deal with D- and Vbus.
The second version of the adapter turned out to be much more aesthetically pleasing:

Small touch
Everything is fine. Both functionality and aesthetics, but lacking zest. Having looked through the documentation for the USB-to-SATA bridge SPIF225A, she was found: " pin 36 - HDD Activity LED output". Great:
We unsolder the 10K resistor (PullUp to suppress interference on the TriState-pin?) and solder in a chain of series-connected R and LED. A resistor with a value of hundreds of Ohms (I took 1 kOhm), an LED cathode to pin 36 of the microcircuit (determined by testing or documentation):
Bottom line
Using the example of adapting a USB-to-SATA converter, a method for quick modification using a minimum of available materials was shown (quickly restoring the functionality of diskless clients), and also demonstrated an approach to a more thoughtful and elegant solution.
09.07.2015
Greetings to you friends, readers and visitors of my blog. In this article I will talk about sata cable. As you know, all computer technology manufacturers have long switched to sata power supply.
This article will describe all the nuances of creating sata cable or else it is called sata adapter, with your own hands. And so let's begin the process.
To begin with, we need a non-working one. And you need to remove the longest one from the power supply sata cable.
The longest cable is desirable, but if this is not available, of course a short one is also possible.
In most cases it happens that sata There is some other connector attached to the cable. You can leave it on and remove it if you don’t need it or if for some reason it’s in the way.
In my case, two wires on the additional connector were cut off and in order to get rid of the unnecessary Molex connector I had to disassemble the sata adapter.
Sata cable disassembly
This connector is very easy to disassemble. All the wires on the sat are on plastic clips that need to be lifted with the tip of a pair of scissors.
Without letting go, pull the wire back; without force and without damage, the wire is carefully removed from the connector.

To cut off the excess wires from the Molex, I use a tool in the form of wire cutters from the women's manicure set. You can also use small electrical wire cutters.

Once all the excess wires are cut off, insert the wires into place. Be careful when removing wires, do not remove them all at once, otherwise you will get confused.
Remove one wire, cut off the excess and insert it back. And we clean the cut ends of the wires for soldering.
Molex disassembly
We will connect the cable made using sata to our computer power supply via a Molex connector

To do this you will have to disassemble the molex connector itself. We take the free Molex connector on the power supply and disassemble it. The lugs on the wires in Molex have tabs or tabs that hold them in the connector itself. To remove the four wires we need to find these tabs and bend them inside the tip. To find this ear, use a bright flashlight.
If the ear is not located, use a thin screwdriver or scissors around the tip

Once all the wires are removed, you need to solder the cleaned ends of the sata cable wires. Solder each wire by color. If for some reason you were unable to sing, you can do the following. We take the wires of the sata cable, clean their ends by about 1.5 cm and screw them onto the tip of the molex and twist them so that they do not slip.
As we said above, the tips of the Molex wires are held on the ears in the connector and therefore, before putting the wires in place, you need to bend the eye on each wire

We assemble the molex connector and connect it sata nutrition. All that's left to do is check sata adapter. In my case, everything works to this day.
How to quickly make a sata cable
There is another option to make a sata adapter. To do this, take a sata cable as usual, clean the ends by about 1.5 cm, twist the ends of the wires so that
Attention, this method is not safe since at any time the wire can jump out of the plug and short-circuit.
Do not use ordinary glues, otherwise it will be very difficult to disassemble the connector.
For what reason was the article written?
I once encountered cases where there was not enough power on my unit sata cable for power supply due to hard drives.
It would be an option to transfer the cable from one hard drive or go to the store and buy a sata adapter.
But since I like to create things with my own hands, I decided to make this cable myself. And step by step the process went along the flow.
You might be interested

The production of hard drives does not stand still. Technologies are actively developing: writing and reading speeds are increasing, service life is increasing, new standards and form factors are appearing, which is why many old devices are becoming incompatible with modern computers. Using IDE SATA adapters, you can make even an old machine work with new drives.
Differences between SATA and IDE
IDE (ATA) is a parallel interface for connecting storage devices or optical drives to the motherboard. Old standard from the 1990s. IDE technology uses a 40-pin connector to connect to the motherboard and a separate 4-pin power supply. Currently an almost obsolete class. The exception is old equipment, which is still in use for unknown reasons.
SATA - serial information exchange interface. Now used in all new devices. It has a number of advantages over the old system.
Main advantages of SATA:
- high speed of reading/writing information;
- increased storage capacity;
- ability to connect devices without restarting the system.
There is also a more recent variety - eSATA. The same SATA, but guarantees stable contact throughout the entire operating time. Applicable for external HDDs.
Why do you need an adapter?
There are several problems that can make you want to purchase an IDE SATA adapter. For example, you have an old 80 GB IDE hard drive at home, and you suddenly need to “pull” a photo out of it. It will not work to connect it to a new computer with SATA connectors.
- There was suddenly not enough memory on the computer, and I had an IDE hard drive of the required size at hand, which at first glance was useless.
- The situation can be the opposite: without upgrading IDE interfaces, you want to get more additional memory or restore files.
All situations have one solution - use a SATA/IDE or IDE SATA adapter. It is capable of converting data flow from one system to another, thus blurring the boundaries between different standards. The complexity of the application is nothing more than using an adapter for microSD cards.

How to choose?
The first step is to decide which adapter you need. There are as many as five options:
- IDE/SATA.
- SATA/IDE.
- IDE USB.
- SATA USB.
- IDE SATA USB.
The first two points are suitable for indoor installation. They will be useful if you want to place one or more hard drives or SSDs of different standards in a computer case. Usually these adapters do not even have a housing and are not protected in any way. They look like a regular board, where it is intuitively clear where and what to connect.
An important parameter of an adapter from IDE to SATA is the speed of reading and transferring information. In the case of a USB adapter, this may be version 2.0 or 3.0. The latter allows you to process information faster, but depends on the version of the computer ports, as well as on the capabilities of the hard drive itself.
IDE SATA with USB output
In addition to adapters for switching between IDE SATA standards, you can find IDE SATA USB adapters on the shelves. This device allows you to connect any hard drive directly to the USB port, regardless of the standard. So, it is allowed to use ordinary ones as a large flash drive. This is most useful for laptops or tablets.

There are both universal (SATA IDE adapter on one board, connecting several media of the same or different types at once) and separate (SATA or IDE only) adapters. The choice depends on your specific needs and price. An important parameter when choosing will be the presence of a built-in or additional power supply. Without it, the adapter will cost a little less, but will be less functional. It is possible to use the computer's central power supply, but this is not always convenient, and you will also have to unscrew the cover every time.
Nutrition
IDE series drives are powered by a regular Molex connector with 12v and 5v pins. It is available on all power supplies.
SATA drives require connections for 12v, 5v and 3.3v boards. To do this, you can find a regular 15-pin SATA IDE power adapter with a Molex connector. The problem is that standard Molex does not have a 3.3v wire, which means it is not able to power a certain board block. This feature was taken into account by disk manufacturers and, to some extent, resolved.

Connected via a drive powered by a Molex/Sata adapter, it will work adequately on all machines, but not all will be able to support hot-plugging technology (removing or attaching to the system during operation). Most modern power supplies have a separate output - a SATA connector, which is not Molex and includes 3.3v power. One way or another, modern SATA devices do not require a 3.3v voltage to operate.

Adapter or new drive?
There is no clear answer to this question. It all depends on your preferences and budget. Nowadays, memory prices have dropped significantly, but they are still not encouraging in some respects. Perhaps a more rational solution would be to purchase a new drive or docking station, which will allow you to quickly connect hard drives of different formats like a flash drive.
It is worth considering that buying a new hard drive may entail an upgrade of the entire system, while installing an adapter does not oblige you to anything.
Do it yourself
Most useful electronic devices can be assembled for just a few dollars with your own hands, without much electronics knowledge, but an IDE SATA adapter hardly falls into the category of easily reproducible devices. Ultimately, most likely, much more time and money will be spent than if you purchased a ready-made adapter, although it is easy to find many working diagrams on the Internet. But “technomonsters” should like this task.
A hard drive or hard drive is an integral part of any computer.
It is also one of the most expensive components, so incorrect selection, connection and use can lead to failure of both the hard drive itself and the computer. And this is very unpleasant and costly.
To prevent this from happening, this article will cover the main ways to connect hard drives to a PC.
Types of connectors for connecting hard drives
So, the main connectors for transferring data between the motherboard and the hard drive are SATA and IDE.IDE is an outdated version of connectors.


Now they are practically not used. Only if you are assembling a PC from used components, you can also purchase a disk with such a connector. It may cost a little less than SATA. Also older motherboards may only have an IDE connection. In this case, you need an appropriate disk.
Sometimes, of course, you can purchase different adapters, but this is an extra headache and additional expenses, and sometimes the equipment does not work correctly.
SATA connectors are more modern and therefore have a higher data transfer speed than IDE. It can reach 3 Gb per second.

The SATA data cable looks like this.

The cord is small in width. Connectors consist of a minimum number of contacts. The L-shaped connector connects to the hard drive. Direct - to the motherboard. Complete connection is accompanied by a loud click.

To pull out the cord, you need to press the metal lever on the connector and gently pull. When disconnecting, you should not use a lot of force, as you can tear the socket itself from the motherboard. You need to make sure that the latch is completely out.
The IDE cable has a wide cable and a large number of contacts.

To avoid connection errors, the connector has a side cutout.

Most often, cords have several connectors. One for the motherboard and two for IDE devices, - two hard drives or a disk and a CD/DVD drive.

As for motherboards, they may have:
1. IDE only;
2. IDE and SATA;
3. SATA only.
The latter is applicable in modern top-end motherboards. Having such a board, there is no point in buying a drive with an IDE connection, even if it is temptingly cheap.
Connecting the hard drive power cord
It is not difficult to guess that the power connectors in these two types of drives are different.For IDE it has this form

There are four contacts and they are quite powerful.
For SATA, the connector is wide and rotated at the edge.

Thanks to this twist, it is almost impossible to connect the cord incorrectly.
Much at this point depends on the power supply. Early ones may not have connectors for SATA devices at all. But it's not a problem. This is where a special adapter comes to the rescue. Its cost is cheap.


Modern power supplies already have several SATA cords.
All this needs to be kept in mind when assembling a PC, so that there are no problems with incompatibility and subsequently wasting money on different adapters.
Installing a Hard Drive
We select a “shelf” in the case where to install the hard drive. A setting that is too low will not dissipate heat well enough from the bottom of the drive. Overheating is not allowed.Mounting too high can be difficult due to RAM strips and other hardware. It all depends on the features of the motherboard and the connectors on it.

Avoid static electricity, which can damage not only the hard drive but also other PC components. To do this, remove synthetics and woolen items. Also, before each manipulation, touch a grounded object - this could be a heating radiator or a water tap. This way you can remove static from yourself.
Carefully insert the disk with the open part down, and try to align the holes on the case with the threads on the hard drive. When everything matches, tighten the screws.

It is very important that the screws are not too long, otherwise the drive may be damaged. Typically a 3mm screw length is recommended.
Be careful when handling the hard drive. Excessive shaking, shocks, falls, etc. can damage an expensive device.
When the screws are tightened and the hard drive is tightly secured in the case, connect the cable. First to the motherboard, then to the hard drive.
Connection of SATA connectors.
If you are going to purchase accessories for computer repair, then a SATA USB adapter is the first thing you need to pay attention to. Such a device allows communication between the two most common interfaces. The SATA standard is used on almost all internal drives of personal computers and laptops. All modern PCs are equipped with USB ports.
What can this adapter be used for? This is exactly the tool you will need in case of hard drive failure. If things go wrong with the HDD, there is a high chance that the computer will become unbootable. In this case, you will have to replace the disk, but the information that was stored on the previous drive will be lost.
If the HDD is partially damaged, this does not mean that all files on it are lost forever. By using a USB to SATA adapter, you will likely be able to recover most of your data. Even if the disk does not initialize, there are many free programs that will allow you to scan partitions and detect any information that can be recovered.
Hardware failure is not the only reason to use an adapter. For example, a user may want to upgrade to a larger and faster SSD drive. Using the adapter, you will be able to transfer all the old data to the new disk yourself, without turning to specialists for help. In addition, HDDs have become incredibly cheap. Any user who regularly updates their computer usually has at least 1 drive with a capacity of more than 500 GB. With this simple adapter you can turn your HDD into an external drive to access your old files.
Anker USB 3 to SATA Converter
Not all SATA USB devices are created equal. Some use an outdated standard that negatively impacts throughput. Others may not be compatible with newer drive types. There are varieties of adapters that stand out from the rest. First of all, you should pay attention to Anker USB 3 to SATA Converter Adapter Cable.
Studying Anker products, one can come to the conclusion that the company has no shortage of components and peripherals for computers. Judging by numerous reviews, users rate everything from chargers to cables or adapters very highly. You may not have seen the products of this company in local retail outlets, but you can easily find them in online stores.
Anker's USB to SATA adapter is a simple device that gets the job done. The adapter is equipped with only the most necessary equipment, and there are no unnecessary components. The developers have done everything possible to ensure that the device copes perfectly with the task assigned to it. The USB SATA adapter is a black rectangular box. This allows you to place it on a flat surface, preventing the drive from detaching during use.
There are 2 cables that can be connected to the back of the device: USB 3 for data transfer and an optional power cord for use with high-power drives. The cables are reliable and durable, making this adapter useful even if the distance between the computer and the SATA 2 device is short (causing the cables to be bent). Thanks to its impeccable design, the device will look great in an office or digital repair shop.
Adapter capabilities from Anker
Unlike some other adapters on the market, Anker comes with a hardware SATA 3 controller. If the device relies on software to convert the signals, this can lead to performance and compatibility issues. Luckily, the Anker hardware controller used is standard and has been thoroughly tested with a variety of devices. This means that almost any computer or drive that can be physically connected to this adapter will work. Thanks to the built-in power adapter, the device supports both 2.5- and 3.5-inch drives.
The USB 3 port is only capable of delivering a relatively small amount of power. This is enough to power compact 2.5-inch drives and SSD drives. But 3.5-inch devices will require a little more power, and a power adapter will help in such a situation. In terms of compatibility, you can use hard drives, SSDs, Blu-Ray drives, DVD recorders, and combo drives. The adapter works with almost all operating systems from Microsoft, from Windows 98 to Windows 10. Mac OS is also supported. Theoretically, there is no reason to think that a SATA to USB adapter will refuse to work with Linux, but this system is not officially supported.
Thanks to the USB 3 interface, data transfer occurs according to an accelerated procedure. The theoretical limit is 5 Gbps, but this is quite difficult to achieve in practice. When using an SSD, read speeds are typically around 350 Mbps and write speeds are around 250 Mbps. Record data transfer rates can only be achieved if you use the fastest SSDs available on the market. In cases with regular PC hard drives, the maximum speed is 120 Mbps for reading and 100 Mbps for writing. In this case, the reduction in USB throughput is not due to the adapter, but to outdated HDD technology.
There are not many additional functions on this adapter, because simplicity is its main advantage. The operating system does not recognize it as an adapter, but simply sees a standard external drive via USB. This means that all built-in backup software will work without interruption. You can use any data recovery program or create images without any special drivers or settings. Due to the lack of drivers, the SATA USB adapter will operate in safe mode, making it ideal for diagnostics and repairs.
Inateck USB 3 to IDE/SATA Converter
The Inateck Universal USB 3 to IDE/SATA Converter was created by a popular peripheral device manufacturer that develops not only consumer, but also professional devices. Many of Inatek's products offer advanced functionality, while its prices are comparable to its competitors.
Despite the large number of options, the adapter is compatible with all types of operating systems and drives via USB. The only major difference between the adapter and other similar devices is its support for IDE drives. Such drives have long gone out of fashion, but they are still used by some users. This connection standard is used for PCs, laptops, CD and DVD drives, as well as devices that read floppy disks.
Many adapters are only compatible with small IDE drives because they don't have a power connection. But in this case, thanks to a special power cable, you can easily use not only 3.5-inch, but also 5.25-inch drives. The adapter works with OSX, as well as operating systems from Microsoft, from Windows XP to Windows 10.