Hello, I came across a situation - when I connect LogMeIn Hamachi, which is installed on Windows 7, to the network, the computers on the network are not accessible, and a yellow triangle with an exclamation mark is drawn against them. I want to show how you can fix this error.
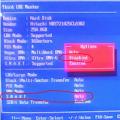
If you go into the node connection details, an error will be written next to the VPN status parameter.

If you go to the settings, in the VPN domain the status information shows an error - Failed to connect to the network adapter. The peer is not reachable via VPN.

In my case the problem was with the installation network driver Hamachi. If you go to the device manager (computer properties - device manager), you can see an exclamation mark in a yellow triangle for the Hamachi Network Interface driver. If you go to the properties of this driver it will be written that the driver does not have a digital signature.

Because of this, the system does not have a Hamachi network interface, and Hamachi cannot connect to computers on the network.
To fix this, you can take a difficult and simple route.
Difficult - put the system into test mode and turn it off group policies mandatory verification of the digital signature of drivers. But I didn’t do that, and I don’t advise you to.
Simple - download Hamachi version 2.2.0.328 - Hamachi 2.2.0.328
After Hamachi 2.2.0.328 is downloaded, you need to remove the version that you have installed. And just install the version that was downloaded. In this version everything is fine with digital signature driver, and after installing it everything worked for me.
After starting the program, you can update it from the program itself (help - check for updates), or you can download latest version from the developers site. When you run the installer, the program will be updated. And there should be no problems with the driver and connecting to computers.

By the way, I installed the latest version of the program on Windows 10, it worked fine for me, but if suddenly you have the same problem that I wrote about above, then you can try installing version 2.2.0.328.
With it, I had a situation where the driver in the device manager works fine, there are no exclamation marks, but there is no network interface in the network and sharing center. A simple reinstallation of LogMeIn Hamachi helped, meaning this version needs to be installed 2 times. After which everything works fine.
802.11g Wireless USB Adapter User Guide
Troubleshooting
IN Windows system Cannot find 802.11g Wireless USB Adapter drivers.
Possible way elimination
Software must be installed before the 802.11g Wireless USB Adapter can be connected to your computer. Click Cancel on the screen Windows drivers, disconnect the 802.11g Wireless USB Adapter from the computer and follow the installation procedure again (this requires that you install software and drivers).
Internet connection cannot be established.
Possible solution
Using the Configuration Utility icon in the taskbar, check the connection status. If the connection to an access point or wireless router set, the icon will appear in green. If the icon appears red, open the Configuration Utility and scan the area to be able to connect to the correct wireless network.
Possible solution
Make sure your computer is using an IP address that is within the default range of your access point or wireless router. For example, if the default gateway for the access point is 192.168.123.254, then the IP address should be in the range 192.168.123.xxx. To check all these parameters, follow these steps:
Windows users 98 or Me: Start and select Execute. Enter winipcfg and press OK. Select the 802.11g Wireless USB Adapter and verify that the IP Address, Subnet Mask, Default Gateway, and DNS server. If the information is incorrect, click Free everything, and then Update all.
Windows 2000 or XP users: On Windows, click Start and select Execute. Enter cmd and press OK. IN command line DOS enter ipconfig /all. Check that the information for the IP address, subnet mask, default gateway, and DNS server is correct. If the information is incorrect, enter ipconfig /release and press ENTER. Then enter ipconfig /renew and press ENTER.
Possible solution
Try the ping test procedure to ensure that you can connect to different areas wireless network and the Internet. If at any time during the ping test procedure no response message is returned to a successfully sent request, it means that it is impossible to establish a connection to this IP address. After making the corrections, continue with the ping test procedure.
- On Windows, click Start and select Execute. In the Run a Program dialog box in Windows 98 and Me, you must enter command and press the button OK. Windows 2000 and XP users must enter cmd and press OK.
- At the command prompt, enter Ping 127.0.0.1. This is the host local address providing correct installation and operation of the TCP/IP protocol. If you cannot receive a response to the request, reinstall the TCP/IP protocol on your computer. For instructions, see your operating system documentation.
- Enter Ping and then your IP address. To determine the IP address, see the previous "Possible Solution." This way you can be sure that your computer will respond and that the 802.11g Wireless USB Adapter is installed correctly. If you cannot receive a response to the request, remove the 802.11g Wireless USB Adapter and repeat the installation procedure.
- Enter Ping and then your gateway address to ping the gateway. The default gateway address is the IP address of the wireless router or access point. Check this address in your wireless router or access point. If this is the case, you should be able to connect to the wireless network. If you can't get a response to your request, make sure the values are network parameters the cable is indicated correctly USB adapter The 802.11g Wireless USB Adapter has power and is properly connected to the computer.
- Enter Ping and then the external Internet address provided by your Internet provider. This procedure will allow your wireless network to communicate with the Internet. If you cannot receive a response to your request, check the Internet connection between your modem and your wireless router or access point.
- Enter Ping and then the DNS server address you know. This will allow you to assign the correct Internet hostnames to IP addresses and check whether Internet access is available.
The wireless network security feature is enabled and the 802.11g Wireless USB Adapter cannot establish a connection.
Possible solution
The 802.11g Wireless USB Adapter supports 64- and 128-bit encryption. Make sure your wireless network does not use a higher bit encryption key, such as 256 bits. Make sure that all security features entered for the 802.11g Wireless USB Adapter profile match the settings for the wireless network. For more information about setting up connection profiles and security features, see the section in this User Guide.
Possible solution
If you created a profile setting, you may need to restart your computer for the profile to become active.
Cannot establish a connection with another wireless device in Ad hoc mode.
Possible solution
To establish a connection with another wireless device in Ad hoc mode, you must create a profile setting and provide the necessary network information depending on the wireless device with which you plan to connect. Open the Configuration Utility, select the Profile tab and click the button Add(Add). Enter your profile name and click Next(Further). Enter Network Name, select Ad Hoc as Network Type, select the corresponding channel and click the button Next(Further). If you need to enable any security settings, select the appropriate options depending on your wireless devices and click Next(Further). To finish setting up your profile, click the button Complete(Complete). On the Profile screen, select the profile you just created and click Connect(Connect). Select the Site Survey tab, find the correct network name and click Connect(Connect). If the correct network name is not displayed, click Refresh(Update) to scan network connection Ad hoc.
The 802.11g Wireless USB Adapter cannot establish a connection with other computers on the wireless network.
Possible solution
Make sure all computers on your wireless network are turned on.
Possible solution
Make sure that each 802.11g Wireless USB Adapter is configured with the same settings.
Possible solution
Make sure that each 802.11g Wireless USB Adapter is configured with the same security settings.
Possible solution
For each channel with an 802.11g Wireless USB Adapter installed, ensure that the SSID (Service Area ID) and Network Name are the same. The SSID (Service Area ID) and Network Name input fields are case-sensitive, so be careful when entering values in these fields.
Possible solution
Make sure the TCP/IP protocol is installed. Make sure you are part of the same domain or working group, like the 802.11g Wireless USB Adapter. Make sure you obtain an IP address automatically, or that you are using the correct IP address and subnet mask for your wireless network. Restart the computer that is having trouble connecting. Make sure you have multiple files for public access, and file and printer sharing is enabled on the computers. To enable file and printer sharing, see your operating system documentation.
The USRobotics installation CD-ROM does not start automatically when inserted into the drive.
Possible solution
Some programs may prevent the Autorun feature of the Installation CD-ROM from working. Close everything open applications, and then remove and reinsert the Installation CD-ROM. If CD-ROM does not start automatically on the panel Windows tasks click the button Start, select Execute and enter D:\setup(If CD-ROM drive marked with a different letter, enter it instead of "D"), and then press the button OK.
During the installation procedure, the Cancel button was accidentally pressed.
Possible solution
Remove and reinsert the USRobotics Installation CD-ROM into the CD-ROM drive. Repeat the software installation procedure before installing devices.
The computer does not recognize the 802.11g Wireless USB Adapter.
Possible solution
The 802.11g Wireless USB Adapter may not be connected correctly. Check the connection is correct USB cable to the 802.11g Wireless USB Adapter and USB port computer.
The 802.11g Wireless USB Adapter is not receiving power.
Possible solution
If the 802.11g Wireless USB Adapter is connected to a peripheral device, such as a USB hub or keyboard, power may not be supplied to the 802.11g Wireless USB Adapter. Connect the 802.11g Wireless USB Adapter directly to a USB port on your computer.
The 802.11g Wireless USB Adapter is not working properly and you may need to remove the device.
Possible solution
Check and make sure that the 802.11g Wireless USB Adapter is not in use before removing it. Your computer may stop working if the 802.11g Wireless USB Adapter is removed while it is running. If the 802.11g Wireless USB Adapter does not work properly, follow the steps below.
Windows XP users: On Windows, select Start, All programs, , and then Delete.
Windows 2000 users: On Windows, select Start, Programs, USRobotics 802.11g USB Adapter, and then Delete.
The configuration utility was uninstalled, and when I tried to reinstall it, the computer did not detect the 802.11g Wireless USB Adapter.
Possible solution
If the configuration utility was uninstalled and then reinstalled, you will need to disable and re-enable the 802.11g Wireless USB Adapter. The computer will then detect the 802.11g Wireless USB Adapter.
When you perform a Site Survey, you are unable to find the wireless network you are planning to connect to.
Possible solution
If you can't find the wireless network you want, click Refresh(Update).
If you still can't find the wireless network you want when performing a Site Survey, try creating a profile: use the required connection information for the appropriate wireless network, select a profile, and then click Connect(Connect) on the Profile tab. For getting additional information To create a profile, see Profile in the section Navigating the Wireless Configuration Utility given User manuals.
Are there any unresolved problems?
– special software that allows you to build your own secure networks via the Internet. Many gamers download the program to play Minecraft, Counter Strike, etc. Despite the simplicity of the settings, sometimes the application has a connection problem with network adapter, which can be fixed fairly quickly, but requires certain actions on the part of the user. Let's look at how this is done.
Now we will go to network settings and make some adjustments to them. Let's check if the problem is still there, if so, we'll update Hamachi to the latest version.
Network connection settings on your computer
1. Go to “Control Panel” – “Network and Internet” – “Network and Sharing Center”.
2. On the left side of the window, select from the list "Change adapter settings".

3. Click tab "Additionally" and let's go to "Extra options".

If you are missing a tab "Additionally", let's go to "Arrange" - "View" and click on "Menu Bar".
4. We are interested "Adapters and Bindings". At the top of the window, we see a list of network connections, among them is Hamachi. Move it to the beginning of the list using special arrows and click "OK".

5. Restart the program.
As a rule, at this stage the problem disappears for most users. Otherwise, move on to the next method.
Update problem
1. Hamachi provides auto mode updates. Very often, connection problems arise due to incorrect settings in this part of the program. In order to fix it, find the tab in the main window “System” – “Parameters”.

2. In the window that opens, on the left side, also go to “Options” – “Advanced settings”.

3. And then in "Basic settings".

4. Here you need to check the box next to « Automatic update» . Restart your computer. Make sure the Internet is connected and working. Once started, Hamachi should automatically detect if there are updates and install them.

5. If the checkmark is present and a new version was never loaded, go to the tab in the main window “Help” – “Check for updates”. If updates are available, update manually.

If this does not help, then most likely the problem is in the program itself. In this case, it makes sense to delete it and download the latest version from the official website.
6. Please note that standard removal through "Control Panel" not enough. Such uninstallation leaves behind various “tails” that can interfere with the installation and use of a newly installed Hamachi. You must use third party software to complete removal programs such as Revo Uninstaller.
7. Open it and select our program, then click "Delete".

8. It will start first standard master uninstallation, after which the program will offer to scan for the remaining files on the system. The user needs to select a mode, in this case it is "Moderate", and press "Scan"

After this, Hamachi will be completely removed from the computer. Now you can start installing the latest version.
Often, after the steps taken, the connection is made without problems and no longer bothers the user. If things are still going wrong, you can write a letter to support or reinstall the operating system.