Introduction
As everyone already knows, smartphones based on Android OS are distinguished by their dislike for batteries. Or, on the contrary, increased love, which sometimes makes you wonder where so much battery power could have gone if the smartphone was just lying on the table. It would be understandable, and even to some extent forgivable, if we were talking about devouring battery power when the user performs some “heavy”, energy-intensive tasks on a smartphone. But it’s no good at all when a lonely gadget secretly kills the battery from you, and when it is needed for work, it warns you about the need to connect the charger. Such increased attention to the battery in standby mode on the part of the smartphone is usually caused by software or system processes that do not allow the processor to calm down and go into hibernation.
In order not to rack your brains over which of the hundreds of installed programs suddenly began to show an unhealthy interest in your battery, forcing the gadget to idle when you naively believe that the smartphone is sleeping, you should use a special program to monitor the installed software and processes. And in order to do this quite simply, without even understanding incomprehensible graphs, terms and other specific nonsense that has little to do with the average user, it is worth using a program that is easier to find for such purposes.
Appearance and functionality
Our sleep detector for a smartphone is a modest one. It looks quite simple and was intuitive even at a time when the program language was purely English.
When we launch the program, we are taken to the main tab, which is a list of programs that often or not often wake up your smartphone. On the top panel on the left there is a program icon in the form of a battery with the head of the famous Android, a little to the right there are icons for selecting preferences. The very first icon (it changes depending on the selected sorting of programs and processes) opens us a menu in which you can select criteria for sorting the list of programs below.
As can be seen from the screenshot, in total we can identify programs or processes that most often cause the processor or smartphone screen to wake up, or programs that prevent the smartphone from going into the so-called deep sleep mode. In a nutshell about this mode especially for those who are not yet in the know. It is the ability of an Android smartphone to reduce the processor frequency in standby mode, not to respond to background applications that do not require your attention (such as various instant messengers), that is essentially deep sleep.
Well-optimized firmware and programs, which together with it are no less well optimized, should ideally reduce the consumption of a smartphone in sleep mode to no more than 1-2 percent of the battery in 8 hours or more. I have tested this repeatedly on a variety of firmware and with different installed software, so I can confidently say that an Android smartphone can not consume a single percent of the battery in standby mode in 8-9 hours.
But what can you do, you’re not always so lucky, and you have to look for the “hero of the occasion,” funnyly called a “wake-up program” in our detector. As you already understand, the translation in the program is most likely machine-made, in places it can make you smile, but for some reason it is not at all annoying. Perhaps because you don’t pay much attention to the text, but immediately begin to look for problematic software and processes in the constructed list.
But I got a little distracted, let's go study the program further.
The second icon on the right side of the top bar allows you to sort the list of applications and processes alphabetically, by the number of times the program or process has been launched, or by its usage. To be honest, I still don’t understand how the last two sorting methods differ significantly.
Anticipating the question - why is this program needed, I explain that after identifying a program or process that prevents the smartphone from going into deep sleep, the user will have to decide for himself what to do about it. There are not many options, either deleting the program and installing its analogue, or trying various cleanings and optimizations of the system, or reinstalling the program. In short, you can never say what exactly will help in each specific case; you should try less radical measures first, but if you still see that the program is interfering with your smartphone’s sleep, feel free to delete it.
Settings and other little things in the program
Actually, the program doesn’t have very many settings, as such. Why, there are almost none there. At first I thought about not highlighting this item separately, but then I decided that it would be more convenient, since in addition to the settings there are several other interesting points.
The very first setting available is the ability to enable the display of system processes that use your smartphone’s battery in sleep mode. It would seem, why is it needed? And here we need it. Sometimes, rarely, but it happens, after a while the user begins to have problems with the battery, which literally melts before our eyes. Moreover, according to his assurances, he did not install any third-party programs or removed everything he installed from untested software. But the battery is still heavily consumed. This is where this setting in the program comes in handy. It just so happens that for all its advantages, the Android OS is seriously lacking in stability. And one of the manifestations of this is the sudden failure of any system process in the firmware. The results can be very different, from interface stutters and slowdowns when performing tasks to the already mentioned increased battery consumption. You can’t determine this on your own, which is why the function in the program is very useful. And since the process is systemic and there is nothing to delete to solve the problem, all that remains is to flash or reset the system to its original settings. The procedures are not complicated, but who would do them at random simply out of suspicion. And so we turned on the display of system processes in our detector, saw that one of them suddenly began to simply kill the battery, and made a decision.
The next setting concerns the statistics of the smartphone's operating time after charging is turned off. As you can see from the screenshot above, you cannot enable it in the translated version of the program, since there are no checkboxes opposite. Fortunately, the experience of translating programs helps out, and suspecting that due to the length of the words the author simply did not have enough space in vertical mode for this checkbox, we turn the smartphone over into a landscape.
And the setting immediately appears, fortunately this long phrase fits on the screen (although the question is whether it will even fit in the landscape on a device with a smaller screen than mine). Coupled with the frankly low quality of the translation, which can still be forgiven, this plays against the program. If the author had left the English version or asked someone to prepare a competent translation, it would have been much better.
The last setting available to the user relates purely to the appearance of the program and does not provide anything useful. If only for users of Amoled displays, for whom a lot of white tones on the screen are contraindicated.
Using the "Change Theme" button you can change the theme of the program to dark or light, according to your taste.
What else can you find in Settings? Yes, strictly speaking, nothing else particularly interesting.
If you need a widget for the program, you can buy it from this section. You can also buy some kind of Solution Base for it. I don’t know what kind of database this is, I can only assume that it’s a collection of tips on energy saving or something like that. Whether it’s worth spending your money on it is up to you to decide, but I would think a hundred times about something, and the Internet is already full of free advice and solutions to this issue. But I liked the FAQ item with explanations about how the program works.
Even if the translation, as in the whole program, is simply lacking, relatively everything is clear and can be very useful to a beginner who picks up an Android smartphone for the first time. At least as informational material, to make it clearer which direction to dig in case of problems with increased battery consumption, and not immediately rush to take the smartphone to the store as not working properly.
Here you can also rate the program, find out its version and write to the developer. That's all. In principle, the program fulfills its main purpose perfectly, so you don’t need anything else. Rather, in my opinion, there is something superfluous in the form of the possibility of changing the theme or purchasing a widget with the base.
Competitors
I won’t write anything about competitors here. Simply because I don't see the point. The program copes with its purpose perfectly, is free, does not load RAM and practically does not consume the battery itself. It’s hardly worth looking for good from good, but if you still feel itchy, you can try BetterBatteryStats. True, it is paid and requires root access for its full operation. In general, Google Play is full of programs similar to Wakelock detector, but very few of them are really worth considering. And there is no point in checking everything when there is a simple and quite working program.
Grade
10 points. It would be possible to reduce the score by a point because of the shoddy translation (which also caught the inclusion of the settings), but I will not do this, since in this case the translation is the tenth thing in the program, it does not affect its work in any way and does not interfere, but the settings You can turn it on by turning the screen to landscape. Although I would like to hope that the translation will be corrected in future versions, the author should not forget about the aesthetic side of the issue. And considering that the program is often updated, I think this is not such a long question. So 10 out of 10 rightfully, of all those previously tried, this program is the most convenient and user-friendly, so I can safely recommend it for installation even to a novice user.
![]()
Android defaults to a minimum amount of inactivity before your device goes into sleep mode. The standard timer is 2 minutes. This is not enough, since you can be distracted from work for a while.
In this material we will examine two main questions:
- How to completely disable sleep mode.
- How to increase waiting time.
Disabling sleep mode completely
Standard Android tools do not allow you to completely disable sleep mode, so we will use third-party applications for this. Go to Google Play, enter “Stay Alive!” in the search bar. Keep screen awake." It is not recommended to download such programs from other sources. The application is free and simple, which is why we chose it among more functional paid analogues.
Unfortunately, there is no Russian version yet.
When you open the application, you will see that opposite the inscription “ Always keep screen Alive" is already marked. The translation here is simple: the device always remains active. If you need to remain active only when working with certain programs, then select them from the list.
Click on the section “ Keep screen Alive! for selected apps" Below there will be a button “ Select apps that..." All applications installed on your tablet will be displayed here. Check the boxes next to the programs you need.
Done, now sleep mode will not interfere with your work. You can disable the permanently active device mode using the same procedure - just uncheck the “ Always keep screen Alive».
Increasing the time the device remains in active mode
This action can be performed using standard Android services:
- Open the main tablet settings and go to the section Screen.
- In the list of settings you will find a section Sleep mode.
- Here you can only change the time, although there are exceptions: on some versions of Android, you can disable the timeout in this menu. Most likely, this item will not be active for you.
- If necessary, you can set it for half an hour.
As for Apple tablets, here you can reduce the delay or turn it off completely. To do this, you need to go to the settings on the desktop. Go to the section Basic.
Here you should select Auto-lock, which is responsible for the sleep mode. You can specify the interval from the list or just click Never, then the gadget will not go into sleep mode at all..
There are universal methods for increasing the operating time of mobile devices
Phones are constantly being improved, losing weight, becoming thinner, their processors becoming more powerful, and their screens becoming larger. And with all this technological progress, the load on batteries increases.
Phone manufacturers are constantly trying to extend the battery life of their devices. But with everyday use, the batteries also last an average of one to two days without recharging. Moreover, the functionality of devices, the resource intensity of programs, and the frequency of phone use are also increasing. This all leads to even faster battery depletion. It is enough to launch some program on your phone, surf the Internet for several hours, and the battery will remind you of itself by asking for recharging.
At the same time, there are certain universal methods for increasing the battery life of mobile devices. Let's look at these methods in more detail.
1. Disabling the Auto Brightness option. When in Auto Brightness mode, the phone adjusts the screen brightness to the light level of the place where you are at a particular moment. At the same time, such a useful function in general is in demand only if you move around a lot, and accordingly, the lighting intensity changes (street - transport - office, and so on). In the case when you spend most of the time in a room with a stable level of lighting, it will be beneficial for you to turn off the “Auto-Brightness” mode. Set the brightness mode that is most suitable and convenient for you; you will probably have to significantly reduce the brightness mode set automatically by your phone. And all because the standard light control sensor changes the screen backlight mode even when it is not necessary to do so. The light sensor in real mode reacts to shadows falling on the phone screen, glare of light, light from a computer monitor, and lighting fixtures. And this effect occurs constantly until the phone’s screen is on and it does not automatically go into sleep mode or auto-lock mode. And this, of course, is the work of sensors, energy consumption, premature, accelerated discharge of the phone battery.
2. Disable "Automatic screen rotation" mode. This useful function will also not be in demand all the time; at the same time, the accelerometer - a sensor in the phone that responds to turning the phone from horizontal to vertical and back, will consume significant amounts of energy, which could be spent on more necessary, often necessary telephone conversations.
3. Reduce automatic screen lock time(there may be a “screen timeout” item in the settings). By default, a phone from a store usually has a timeout of one minute. That is, after one minute of inactivity, the phone goes into sleep mode, standby mode, and the screen automatically turns off and locks. It is important to understand that the shorter the interval between entering sleep mode, the more economical the phone's energy consumption.
4. Clean the phone's RAM. After working in any phone application, do not forget to close it. Remaining in the phone's RAM, applications continue to constantly use the device's system resources, thereby consuming battery power and reducing the battery life of the device. A similar remark applies to the so-called installed “live wallpapers”.
5. When working on devices with an Amoled display It is beneficial to install completely plain black wallpaper on your screen. In Amoled, power consumption directly depends on the brightness level of the screen. Such screens require more energy; if bright, light wallpapers are installed, they consume even more energy than liquid crystal options. Reduce screen brightness and use a dark screensaver background.
6. Change the reader mode in the device to “night”(or inversion). Reading books or any other text directly from the phone screen is very energy-intensive. However, here you can use a little trick. Inversion will replace the screen background with black, while the font will turn white. Thus, we will fulfill the condition from the previous paragraph. A dark screen will end up using less power than a white screen, like a sheet of paper.
7. Disable Bluetooth and Wi-Fi modules. Modern devices have a function to automatically turn off these modules, but they are turned off only when the device goes into sleep mode. Therefore, it is safer to disable them manually. Similarly, when not using the device, turn off all online services and email. It is also beneficial to save battery power by disabling all system reminders and messages. Disconnect the device from 3G networks. Such simple operations will extend the phone's operation without recharging for several hours.
8. Turn off vibration and vibration feedback on your phone. The vibration motor that sets the phone in motion consumes quite a bit of battery power; turning off vibration will not cause much inconvenience for the user, but at the same time it will allow you to use the phone for a longer time.
9. Follow the temperature conditions recommended by the phone manufacturer. A comfortable temperature, and for a phone this is around 15 - 25 degrees, will extend the life of the battery, reduce the rate of its random discharge, and prevent malfunctions in the device.
10. Install additional applications, allowing for a full cycle of recharging the battery with low current. This is, for example, BatteryDoctor, the program implements careful control over battery consumption, and this has a positive effect on the battery life of the phone on a single charge.
Thus, the proposed tips, accessible to everyone, will guarantee to extend the phone’s operation without recharging to four or even six hours.
Modern smartphones and tablets are much more like a full-fledged PC than a simple device for communicating and receiving information. Now they are equipped with quad-core processors with a frequency of 2 GHz, gigabytes of RAM and Full HD screens. The only problem is that to power all this power, it is not a cable from the outlet that is used, but a small battery, the capacity of which is rarely enough for more than a day. Well, let's see how to fix this.
In this article I will try to figure out whether modern smartphones really consume too much energy and in fact they need much less. First, let's look at the energy saving methods that are already used in the Android operating system and how much they can reduce overall energy waste. Then we will try to apply popular energy saving methods, which are often discussed on forums and written in blogs, and look at the result. In the end, we will use heavy artillery in the form of methods such as undervolting and downclocking. Go.
Standard Energy Savings
There is a myth among smartphone users that, in fact, mobile devices should live much longer than they do now, and the real problem is not in capacity, but in the bungling of Android and iOS developers - supposedly they simply do not want to optimize the OS due to laziness or collusion with hardware manufacturers who need to sell gigahertz and gigabytes. OK, let's take our time to read the documentation and try to figure it out. So, four myths about why Android eats up so much energy.
- Java is a slowdown that eats up the processor and memory. The first thing to remember is that Android doesn't have Java. It uses the Dalvik register virtual machine, designed specifically for embedded devices. The developers of Plan9/Inferno already wrote about the advantage of a registered VM, and a link to their article is at the end. In short, a registered VM differs from classic stacked Java in that it has lower RAM requirements and less redundancy, that is, it allows you to execute code quickly without wasting memory. Second: most of the “heavy” code (multimedia codecs, graphics processing algorithms, cryptography, etc.) in Android is written in C, which allows it to be executed as quickly as in any other OS. Dalvik code is used primarily to define application logic, and thanks to HotSpot JIT, code inside Dalvik does not run much slower than C code.
- Android doesn't know how to work with hardware efficiently. This is complete nonsense. Android is based on the Linux kernel, in which the hardware support code is polished, if not polished, then close to it. The OS implements many techniques for optimizing the operation of equipment and energy saving, such as delayed flushing of buffers to disk with merging, a competent task scheduler and a processor energy saving algorithm, effective energy saving algorithms for Wi-Fi, 3G, LTE and Bluetooth modules (4.0 Low Energy), batch method for polling sensors (implemented in 4.4 KitKat). Without all this, an Android smartphone would not last even five hours.
- The Linux kernel is redundant in mobile technology. The Linux kernel has a very flexible build system, which allows you to include in the resulting image only what is really needed in a particular device. The key subsystems of the kernel, of course, will not become simpler (at least the base layer), in many ways they are too redundant for the conditions of mobile technology, but this is the price that you have to pay for the fact that Android exists at all.
- **Android is too complex and heavy.** It is likely that many components of the OS could be seriously optimized or even removed altogether (there is a lot of duplicate code in the source code), and Google did do this work with the release of 4.4, but you should not expect that all these optimizations will be as much as - will seriously extend the life of your smartphone. After all, one day of gadget life was a reality even during the very simple and lightweight version 1.5.
The main “problem” not only of Android, but also of all modern mobile operating systems is not at all that they are heavy and unoptimized, but that a modern smartphone is no longer a static gadget like the Nokia N95, which allows you to launch ICQ and play Sokoban, but a system , living her own life. Regardless of whether the device is sleeping or not, it continues to collect mail, receive notifications from the calendar, Facebook, Instagram, wait for calls on Skype and synchronize files with the cloud (as, for example, the Dropsync application does). All this work cannot but affect battery life, and this is where you should look when talking about extending battery life.
Automation
To save battery power, it is highly recommended to use automation apps such as Tasker or Locale. With their help, you can configure automatic activation of airplane mode at night, disabling data transfer when a certain battery level is reached, reducing brightness to a minimum in the evening, and much more. Almost any energy saving software from the market can be replaced with these tools, while you will have full control over what is happening.
Insomnia
Before moving on to stories about optimization techniques, I should pour a little more water and talk about what wakelock and suspend are. Like any mobile OS, Android works on the principle of “save as much energy as possible” and therefore strives to put the processor and other components of the device into energy-saving mode at any time. This operating mechanism allows the device to allocate processor resources to applications as needed, and the rest of the time to be in low power consumption mode. When the user presses the power button and the screen goes dark, Android puts the smartphone into suspend mode, turning off the processor and leaving voltage only on the RAM (analogous to ACPI S3). In this way, it is possible to achieve even greater savings, which under certain conditions can reach 99%.
To ensure that already running applications that should continue to work even after the screen is turned off (music player, file synchronization, etc.) are not frozen when they go into suspend, a mechanism called “partial wakelock” is used. It works very simply: as long as there are applications that have set wakelock, the device will not go into suspend and applications will be able to work normally. In addition, applications can use AlarmManager, which allows you to wake the device from suspend at the right moments in order to perform certain work (this is what widgets do, for example). AlarmManager also uses a wakelock to keep the processor awake.
Abuse of these mechanisms can lead to excessive energy consumption, regardless of what operating mode the gadget is in. Fortunately, if you are root, it is quite easy to get information about wakelock usage statistics. The most convenient way is using Wakelock Detector. This is a free application that shows the total number of wakelocks sorted by application.
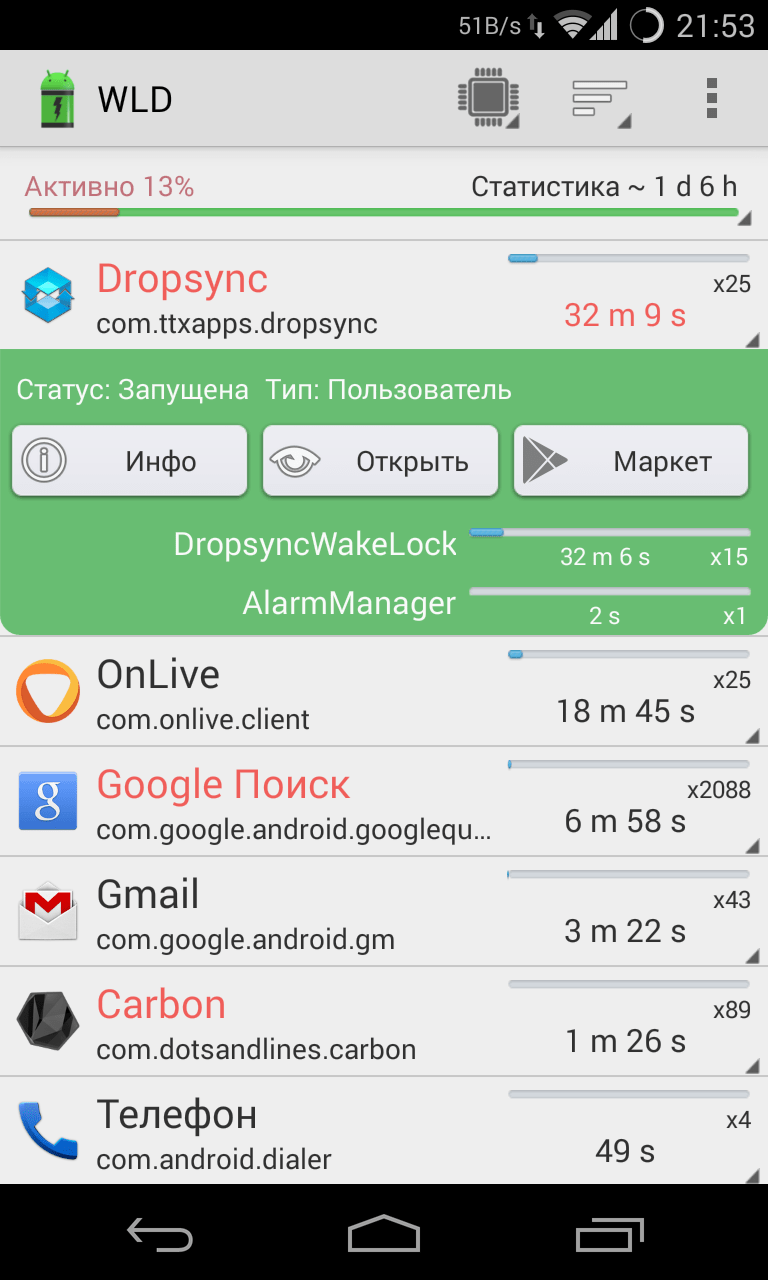
Let's take a look, for example, at what Wakelock Detector shows on my Nexus 4 (Wakelock Detector screenshot). The very first line of the screen is the total waking time of the device for one day and six hours (from the moment it is fully charged). The five most power-hungry apps are Dropsync, OnLive, Google Search, Gmail and Carbon. Together they kept the smartphone in wake mode for almost an hour, which is a lot.

Unfortunately, I don't want to uninstall any of these apps, so I'll have to figure out what exactly they were using wakelock for and try to fix the problem through the settings of the apps themselves. We click on Dropsync and see that it set a wakelock with the DropsyncWakeLock tag 15 times (which resulted in a total of 32 minutes of wakefulness) and AlarmManager once (2 seconds). We already know what AlarmManager is, but DropsyncWakelock is more interesting. The programmer has the right to give arbitrary names to wakelocks, but it is easy to assume that this one is used to perform automatic synchronization with Dropbox (Dropsync is intended for this purpose). I don't really need constant synchronization, and I can run it myself. So I just go to Dropsync settings and turn off automatic sync. Voila, the phone wakes up less often and not for such long periods of time.
You can skip OnLive, since 18 minutes of wakefulness were caused by incorrectly closing the application (you must exit it according to all the rules). Next up is Google Search, an app that, among other things, includes Google Now. We tap on it and see that the two most actively used wakelocks are NlpWakeLock and EntriesRefresh_wakelock. This is already more complicated, and figuring out what actually happens when installing them is quite difficult. Therefore, hold your finger on the wakelock’s name for a long time, select “Search” and see what the browser finds. Already on the second page found there is an explanation that NlpWakeLock is installed at the moment when the position of the smartphone relative to the network (3G, Wi-Fi) changes, after which Google Now sends location information to the server. The second wakelock appears to be used to update cards in Google Now. You can simultaneously solve the problem of gluttony in both cases by simply turning off “Google Search” in “Settings -> Applications -> All”. To solve the first one, turn off location detection in Android settings.
Gmail keeps your smartphone awake with self-explanatory wakelock sync/gmail-ls/com.google/ [email protected]. Obviously, it is installed for the duration of automatic mail synchronization, so you can reduce energy costs by simply disabling Gmail synchronization in “Settings -> Accounts -> Google -> [email protected]" On the other hand, I don’t want to do this and would rather tolerate three minutes of wakefulness in a day and a half.

Having gone through the list of the most energy-consuming applications using Wakelock Detector, it is easy to understand that the main reasons for waking up the device are different types of synchronization and regular updating of location information. This means that by disabling these features completely, you can get rid of most wake-ups and save a lot of battery.
I would recommend first going to your Google account settings (“Settings -> Accounts -> Google -> [email protected]") and accounts of other applications and disable all unnecessary types of synchronization. For example, I don't need synchronization of the calendar, the standard browser, Google+ contacts and "app data", so I can safely get rid of them. You should do the same with all other accounts registered on your smartphone, and disable automatic synchronization in the settings of third-party applications (do you really need auto-sync for Twitter and RSS?). It is better to remove rarely used applications altogether.
The latest versions of Android do not allow you to disable location detection completely, but they can use a very conservative and almost no impact on the life of the smartphone mode called (surprise!) “Battery Saver”, which updates information only when connected to Wi-Fi. networks or switching to another cell tower.
If an application drains your battery, but you can’t delete it and there are no synchronization or auto-update options in the settings, then you can simply freeze it. This is done using a great app called Greenify. It suppresses the ability of the application to wake up on its own and forces it to work only when you want it. It's very easy to use. Launch Greenify, click on the + button in the lower left corner and see which applications are running in the background for the longest time. The screenshot shows that the most voracious are OTransfer Target, used to remotely enable forwarding (it is generally constantly awake), as well as Beautiful Widgets and Carbon, which periodically wake up for various types of synchronization. I set OTransfer Target for testing, so I can safely delete it (by the way, it is also among the “leaders” in Wakelock Detector). Beautiful Widgets wakes up to update the desktop widget, so I'll leave that one alone. But Carbon, ranked fifth by Wakelock Detector, can be frozen. To do this, just tap on the name and click the checkmark in the upper right corner.
- Killing background processes using a task killer. One of the stupidest ideas anyone can come up with. You just need to remember: background processes do not consume energy, it is usually consumed by the service services they launch, which either are not killed by task killers at all, or have the ability to self-resurrect. But killing the background applications themselves leads to the need to restart them, which wastes energy.
- Disabling Wi-Fi at home. In energy-saving mode (when the smartphone is sleeping), the Wi-Fi module consumes very little energy, so little that turning the module on and off often requires much more. It makes sense only on a tablet, which you pick up two or three times a day to read the news or a book.
- Automatic switching between 2G and 3G. Similar story. When jumping between network types, the towers are searched again and the connection is re-connected, and at this time the radio module operates at full power. Apps that automatically turn on 2G while you sleep almost always waste more power.
- Apps with names like Ultimate Battery Saver. In 99% (if not a hundred) of cases, this is either a placebo or the same task killer, equipped with a mechanism that turns off various components of the smartphone when a certain charge level is reached. First, there is a transfer to 2G and the GPS is turned off, then the Internet is turned off, and at the very end the phone is switched to airplane mode. The problem here is that the described operating mechanism is rather annoying and it is more convenient to do all this yourself at the right time.
- Battery calibration using recovery. There has long been a myth that deleting the /data/system/batterystats.bin file using CWM resets the battery so that it starts showing a “more correct” charge level. The myth is so ingrained in the minds that some individuals began to “calibrate” every day, claiming that this way they can extend the life of the battery and even increase its capacity. In fact, the file is needed to save energy use statistics (the same information from “Settings -> Battery”) between reboots and does not affect anything.
Undervolting
Now let's talk about heavy artillery. It's no secret that one of the most power-hungry components of a smartphone is the processor. Its power consumption can be even greater than that of the screen (or rather, its backlight), and all because it operates at very high frequencies, which require high voltages. At first, it may seem that you can save battery life in this case by simply lowering the maximum processor frequency and disabling “extra” cores. However, this will most likely lead to nothing: despite the reduced power consumption, the processor will take longer to execute code, and ultimately power consumption may even increase.
Instead, an undervolting operation should be performed, that is, simply lowering the maximum applied voltage for all possible frequencies. To do this, you need to install a custom kernel that supports this function. I talked in detail about how to do this and which kernel to choose in one of the previous issues of the magazine, so I will not repeat myself, but will simply say that if you have one of the nexuses, then you just need to install franco.Kernel updater and from it help download and install the kernel. Everything happens automatically.
Next, install the paid version of Trickster MOD (the free version does not save voltage settings) or CPU Adjuster; For franco kernels, the paid franco.Kernel updater is also suitable. We go to the voltage adjustment page (in Trickster MOD the necessary settings are at the bottom of the fourth page) and begin to carefully reduce 25 mV for each of the possible processor frequencies. After turning it down, we minimize the application and test the smartphone for a while, launching heavy applications, then turn it down again and test it again.
In 90% of cases, the processor will withstand a decrease of 100 mV without any consequences, and this will give us an additional hour or two in active use mode. If you are lucky, the processor will be able to withstand -150, and in especially lucky cases even -200, it all depends on the batch of the processor and the specific instance. Lowering the voltage too much will lead to a reboot, after which it will be enough to raise the voltage by 25 mV and save the value in the default profile (in Trickster MOD this is the “Profile” button immediately above the values).
INFO
A smartphone with an AMOLED screen will work longer if you use applications with a black background. To make system applications dark, you can use the AOKP firmware or one of the Xposed modules.
Often the screen's automatic brightness adjustment mechanism sets the values too high. If you control the brightness manually, you can extend the life of your smartphone by another couple of hours.
Advanced firmware features of some smartphone manufacturers, such as gesture control, voice control or automatic screen turn-on, lead to excessive battery consumption. If possible, they should be disabled.
Instead of conclusions
In general, the methods described in the article can extend battery life by at least half a day (with average intensity of use), and even more if you completely disable all types of synchronization and remove unnecessary applications. It is not difficult to follow the recommendations, but the effect is significant.
Many people are used to connecting their smartphones to a charger every evening. Today this is the norm. Technologies are developing, Android is being optimized, manufacturers stuff their devices with hi-end stuffing, but at the same time, as if by agreement, they are very reluctant to increase the battery capacity, mockingly balancing at the same level of autonomy in one daylight hours. But we won’t raise the topic of a conspiracy among marketers; in this article we will talk about optimizing what we have and all the most effective and safe ways to improve the energy saving of a smartphone by at least 50%.
PART 1. IRON
Wireless networks and GPS
Remember: if you want to save energy, turn off unnecessary consumers, things that you are not currently using. For example, Wi-Fi and Bluetooth wireless networks left turned on constantly scan the area and look for available connection points or devices for sparring; enabled “data transfer” (mobile Internet) allows numerous applications to constantly “break” the network to update their data and send requests, additionally loading the processor and emptying paid traffic or wallet; enabled geolocation (GPS, GLONASS, determination of coordinates via wireless networks) helps to constantly track your position, fulfilling requests from curious applications. All this can consume a significant part of the battery charge, so I “washed my hands, turned off the tap,” well, in the sense of pressing the button and turning off the consumer.
Mobile network
The level of mobile network reception has a strong impact on battery conservation. The weaker the level of the received signal (fewer bars of the antenna indicator on the screen), the more energy the device spends on strengthening and maintaining this signal. Therefore, in areas of poor signal reception (on a train, for example), it is better to turn on the “Airplane” mode, thereby turning off the device’s radio module. You can do the same in the evening, turning off the radio module at night.
The problem of choosing: 2G or 3G When considering the characteristics of any phone, you probably noticed that manufacturers always indicate that the battery life in 3G networks is less than in 2G networks. This is explained by the fact that 3G networks are multi-channel and provide higher quality and reliability of the connection (seamless transition from one station to another). Therefore, if you are not afraid of short-term signal losses and slightly worse call quality when leaving an underground passage (although this depends on many other factors), you can select “2G only” in the network mode settings (Settings → More → Mobile networks → Network type) » (GSM only) and save up to 20% on network connections.
In addition, if you are in an area of poor 3G network reception, and the automatic “2G/3G” mode is selected on the device, the device will constantly try to connect to the 3G network, even if its signal is several times weaker than the 2G signal. Needless to say, such constant jumps require significant energy consumption, which can also be avoided.
However, when it comes to data transfer (internet connection), the situation is reversed. For more or less significant traffic, it is preferable to use 3G or Wi-Fi networks instead of 2G. At first glance, this seems like a controversial statement, but the devil is in the details: firstly, data transmission on a 2G network (using EDGE technology) requires 30% more energy than on a 3G network, and only 10% less than Wi-Fi. -Fi; secondly, the data transfer speed on the 3G network (HSPA) is up to 170 times higher than the speed on the 2G network (EDGE), not to mention Wi-Fi, where the difference will be 600 times. This means that the device will require less time to download this or that information, and therefore less energy.
A simple example: you want to download several songs with a total size of 30 MB. Using EDGE it will take 30 MB * 8 / 0.08 Mbit/s / 60 = 50 minutes, using HSPA - 30 MB * 8 / 14 Mbit/s = 17 s, but using Wi-Fi - only 30 MB * 8 / 50 Mbit/s = 5 s. Now, multiplying the download time by the average consumption of a particular mode, we get: for EDGE - 300 mA * 50 min / 60 = 250 mA h; for HSPA - 210 mA * 17 s / 60 / 60 = 1 mA h; for Wi-Fi - 330 mA * 5 s / 60 / 60 = 0.5 mAh. Ultimately, everything will depend on the amount of data: the larger it is, the greater the savings will be when using a faster network.
Conclusion.
If you focus on voice calls and rarely access the Internet (for example, only updating the weather and reading the news), it is preferable to use the 2G mode; it will provide the greatest energy savings. If you frequently use the Internet with a large amount of traffic (viewing pages with pictures, working with email attachments, downloading files), it is preferable to use 3G mode. As a compromise solution, if necessary, you can change the 2G/3G network settings using the quick access panel or widgets.
Sensors
Modern phones are stuffed with all sorts of sensors, which, naturally, require energy to operate. It’s very easy to see what sensors your phone has and how much they consume, just install the Android System info application, go to the System tab and select Sensor. In the first Android devices, a regular accelerometer (a sensor that determines the position of the device) consumed up to 15 mAh; in modern devices, this value is usually 100 times less, so there is little point in disabling “automatic screen orientation” or “automatic brightness” ( light sensor), this will not significantly affect the overall power consumption of the device.
However, it should be remembered that many applications that involve controlling the tilt of the device can use several sensors at once (accelerometer, gyroscope, rotation sensor, acceleration sensor, orientation sensor, gravity sensor and others), which in total can result in consumption of up to 100 mAh .
Screen
The screen of any modern device is the main consumer of energy, and there are a number of main factors influencing its power consumption:
- Screen size. The larger the screen, the more energy is needed to backlight it.
- Brightness and backlight time. The higher the screen brightness and sleep timeout values specified in the settings, the more energy the device consumes. I recommend setting automatic brightness control (based on the light sensor) and the backlight timeout to no more than 30 s.
- Screen resolution. The higher it is, the more energy the device’s video accelerator, which is responsible for displaying the image on the screen, consumes.
- Screen manufacturing technology. Roughly all screens can be divided into two categories:
- liquid crystal (LCD) displays, consisting of an LCD matrix and a light source (backlight). These include LCD, TFT-LCD, SCLCD, IPS, TFT screens;
- organic light-emitting diode (OLED) displays, which consist of an active matrix that emits light. These include AMOLED, Super AMOLED and similar screens.
Let me give you a simple example to explain the difference in their work. If you want to read text on a piece of paper at night, you have two options: either turn on the main light in the room, or illuminate the sheet with a small flashlight. The result is ultimately the same, but it will be obtained with different energy costs.
In our example, the main light is the LCD screen, which only has a general light source that illuminates all the pixels at once, regardless of whether they are displaying any image or not. The energy consumption of such a screen is constant and depends only on the set brightness.
In AMOLED screens, light is emitted only by those pixels that are involved in forming the image; if a pixel is not involved in it (if the color in the picture is black), it does not emit anything and, accordingly, does not consume energy. Thus, the total consumption of the screen will depend not only on the set brightness, but also on the image: the more black and dark shades there are in it, the lower the energy consumption of the screen. However, there is also the opposite rule: the more white areas in the picture, the more such a screen consumes energy, and in certain cases, an AMOLED screen can be even more “gluttonous” than an LCD screen.
 Comparison of power consumption of LCD and AMOLED screens depending on the displayed image
 Let's look at the table...
Thus, all the benefits of the efficiency of AMOLED screens can be obtained only by following some simple rules, namely: try not to use a white background, install dark themes in applications; Use dark pictures with a color temperature of no more than 6500K as desktop wallpaper. Only in this case, an AMOLED screen can be up to two times more economical than an LCD screen.
CPU
There are three main parameters that affect processor power consumption that can be changed: frequency, frequency control mode, voltage.
Frequency.
All modern devices can control the frequency of their processor, reducing it under light loads, thereby reducing power consumption. A properly optimized device should go into power saving mode when the screen turns off, reduce the processor frequency to 15-30% of the maximum value and remain at this frequency until the user wakes up again. Therefore, you can evaluate the optimization of device power consumption by looking at the statistics of processor operation at a particular frequency. To do this, open the Android System info application, select the System tab and the CPU item.
If the processor runs at maximum frequency most of the time, then there is a problem with optimization. To solve this, install the SetCPU application (root is required), with which you can not only set the operating frequency of the processor (or specify the range of operating frequencies), but also create frequency profiles that are activated by any event (launching an application, reducing the charge, turning off the screen , time), that is, optimize the frequency control process for yourself. For example, the frequency in operating mode can be set to no more than 1000–1200 MHz; for the event “screen is off” and “charge less than 15%”, limit the maximum frequency to half the operating frequency, and set the minimum frequency to a minimum; set profiles for frequently launched applications, limiting their maximum operating frequency to the value at which the interface responsiveness is comfortable for you (for example, 800 MHz may be enough for games, and 500 MHz for watching movies and listening to music). This approach will help save up to 50% of the charge consumed by the processor.

However, it should be understood that the lower the frequency, the less responsive the interface may become and the lower the overall operating speed. Processor frequency control modes. These modes (algorithms) determine how the processor frequency will change, within what limits and how quickly, depending on the load experienced by the processor, its duration, and other things. Frequency control modes and frequency change steps are built into the kernel, and their set may differ for different firmware. I will not give a description of these modes; if necessary, you can easily find them yourself.

I’ll just say that for multi-core devices it is preferable to use the hotplug mode (if you don’t have such a mode in the SetCPU list, use interactive, or ondemand, it is available by default on most cores), which disables unused processor cores during idle time and is the most effective in terms of productivity/efficiency.
Reducing processor voltage (undervolting).
This option for optimizing processor power consumption has already been discussed in the article, so we will not dwell on it.
PART 2. SOFTWARE
After turning off the screen, the device must go into power saving mode (the so-called suspend mode), while the processor frequency is reduced, “extra” cores are disabled, and application activity is minimized. The purpose of this mode is clear - to minimize energy consumption when the user does not need the device, and since the phone is in this mode most of the time, the overall operating time of the device significantly depends on its efficiency.
Unfortunately, this mode does not always work correctly, as a result of which the charge continues to decrease when the screen is off. This is usually due to applications waking up (using wakelocks), which continue to load the processor with their requests and tasks running in the background.
The topic of combating such awakenings has already been touched upon in the article “,” but now we will dwell on this in more detail.
First, you need to check whether the device has problems with the power saving mode in sleep mode. This can be done even without installing third-party applications using the standard settings menu item “Battery Usage” (or “Battery”), preferably after a long period of inactivity of the phone, for example in the morning. You don’t have to linger on the first screen, showing which tasks have already used up the charge, there is little interesting for us here, it’s better to tap on the graph and go to the “Detailed Log”, which displays a graph of battery discharge and five bars. You can determine the presence of waking applications by comparing the “screen on” and “working mode” bars.
If the “screen on” bar is empty, and the “operating mode” bar is filled for the same period of time, it means that something was waking up the device at that time and it came out of the energy saving mode, which, in turn, reduced the charge. In a properly optimized device, such awakenings should not occur at all.
What actually wakes up the device and why? For the normal functioning of many applications, it is necessary to periodically update data or even work in the background (for example, for a music player), so the most common alarms are applications with configured auto-update or auto-sync, social network clients, email programs, various instant messengers, system status and weather widgets.
To reduce battery consumption in these applications, you can disable auto-sync and reduce their update interval. However, often in the list of waking programs there are other applications or processes, including system ones, that do not have “sleep” options in the settings.
 Disable Service: blue - processes running in the background, red - disabled, white - total number of application processes
 You can deal with such applications and processes in one of the following ways:
- Delete if it is not a particularly useful user suggestion.
- Disable autorun using Autorun Manager. I advise you to disable not only suspicious and alarming programs, but also other rarely used applications that often hang in RAM and cache (settings tab “Applications → Running”). This way, really frequently launched programs will appear in memory.
- Temporarily freeze using Titanium Backup or the same Autorun Manager. This is in case you need the application in the future or if it is a system application that you do not want to delete (if, for example, you want to maintain the ability to update over the air). When frozen, the application will disappear from the list of programs, but will not be physically deleted. However, you should remember that freezing some system applications can lead to system failure, so proceed with caution.
- Disable a specific waking application process using the Disable Service program, without disabling the entire application.
- Force wake-up apps into deep sleep using the Greenify app. But it should be taken into account that the “greenified” application will no longer be launched by events, update its data, receive push notifications, etc. until the next manual launch. Another useful feature is that Greenify is built into Wakelock Detector, and its functionality is available directly from there.
Sometimes third-party applications can influence the device’s sleep through system processes that turn out to be “extreme” and are displayed in the list of wakelocks as the culprits for not falling asleep (for example, processes suspend, events/0). In this case, you can find the real culprits for not sleeping by sequentially freezing/deleting suspicious applications (starting with recently installed ones) and monitoring the leaders in the list of wakelocks.
The device may not go to sleep if one or more hard buttons are pressed. When the screen is turned off, the “operating mode” bar will be completely filled. This problem has existed since the days of the first Android devices and should already be fixed in modern firmware, but in case of high battery consumption, do not be lazy and check, especially if the smartphone is “transported” in a case.
- Buy batteries and chargers only from the official manufacturer. As experience shows, the actual capacity of cheap batteries is much less than indicated, and cheap chargers, at best, will not deliver the maximum current stated on them, and at worst, they will damage the battery with increased voltage or pulsating current.
- Try to charge the device not from the computer’s USB port, but from the mains charger. At the start, the battery is charged with a higher current, which the USB port cannot provide, as a result, the charging time increases and the battery life decreases (primarily this applies to powerful batteries with a high charging current of 1 A).
- Charge devices in full cycles, try to avoid deep discharge (before turning off) and partial recharges in the middle of the cycle, all this affects the battery life, gradually reducing its capacity.
- SD and SIM cards can affect power consumption. If you encounter a high battery, try going for a day without an SD card. If the assumptions are confirmed, format the card in the phone itself or, if necessary, replace it. It’s also better to replace SIM cards with new ones every 3–4 years (fortunately, it’s free).
- Once every six months (and more often if the discharge is suspiciously rapid), check the external condition of the battery for swelling and deformation (the beginning of swelling can be noticed by placing the battery on a flat surface); if they are found, it is better to replace the battery.
- Also periodically blow and clean the USB contacts of the device.