Nowadays, in almost every organization, an accountant’s computer has CIPF- system cryptographic protection information. We use it as such. In our case, CryptoPro is necessary for the operation of the Client Bank and the VLSI++ program (through this program, the accounting department prepares and submits reports to the tax office, pension fund, and Rosstat).
The main functions of CryptoPro CIPF are:
— checking the payer’s secret keys when sending electronic documents via communication channels;
— encryption of payer documents when sending reports;
— deciphering the responses received from inspections.
When working with both Client-Bank and VLSI++, key media are used on which secret keys and certificates are stored. Such media can be a floppy disk, a flash drive, a secure flash drive (Rutoken, eToken), as well as a registry.
So, one day our accountant got tired of inserting a floppy disk into the computer every time he sent reports. Besides, this medium quite unreliable and failed a couple of times (had to). Therefore it was decided copy the keys from the floppy disk to the registry.
Storing keys in the registry is of course convenient. But keep this point in mind: when reinstalling operating system on your computer, information about your keys will be irretrievably lost. So after you copy the keys to the registry, be sure to save the media with the original of these keys.
So, how can you copy keys from a floppy disk to the registry in CryptoPro CSP 3.6?
1. Go to “Start” – “Control Panel” – “CryptoPro CSP”.
2. In the window that opens, go to the “Service” tab.
3. Insert the key floppy disk into the floppy drive of the computer and click the “Copy container” button. 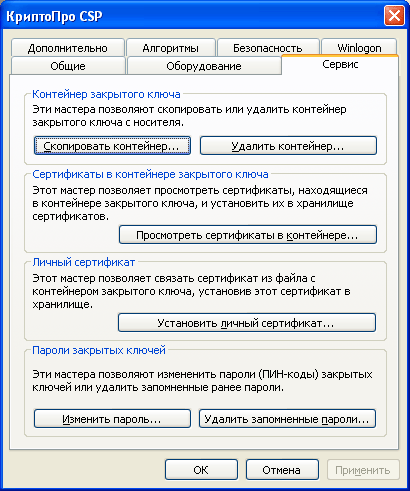 4. Next, click “Browse” and in the window that appears, select the container that you want to copy (click on it once with the mouse and click “OK”).
 The name of the selected container will appear in the “Name” field key container" Click “Next”.
 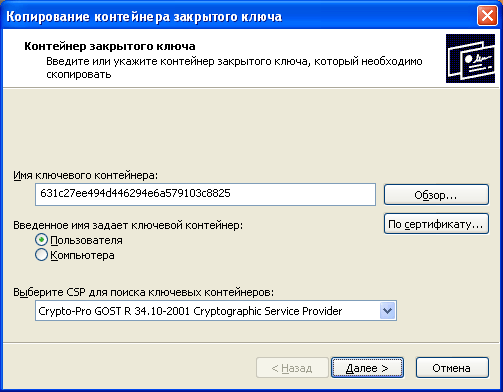 5. In the next window, write any name - this will be the name of the copy. Click “Done.”
  6. Next, select the “Registry” media and click “OK”.
  A window will appear asking you to set a password. If you don’t need this, don’t enter anything, just click “OK” here.
  That's all - we copied the key to the registry. To check this, in the “Service” tab, click the “View certificates in the container” button – “Browse” - here the registry and the container name that you specified will be displayed in the list of key containers.
As a rule, an electronic digital signature is recorded on a USB drive. However, if you need to install a digital signature from a flash drive to a computer, that is, copy the digital signature to a computer, find out in this article how to do it quickly and easily.
Copy digital signature to computer
Of course, carrying a flash drive with you all the time is not always convenient. It may either become unusable, or it may simply not be available at the right time. In this case, the method in which we copy digital signature certificate to the computer itself, which will subsequently allow you to do without a USB drive.
In order to copy digital signature to computer, please follow the following instructions:
Insert the USB drive with digital signature into the computer and run the program CryptoPro CSP, go to the tab Service and press Copy….
In the window that opens, select the key container by clicking the button Review.

In the list of user key containers that opens, select a container and click OK.

After selecting a container, its name will appear in the line Key container name. In the next window just click Further.

In the next step you need to specify information about the new container, for which enter Certificate name (think of any name for the key certificate). After that, click the button Ready.


For a newly created container, it is possible to set New Password. If you want to set a password, enter it twice in the appropriate fields. If you do not plan to use a password, leave the fields blank and click OK.

So, we have selected the object to copy and indicated the location where the certificate will be stored. Now you need to install this certificate.
In the tab Service click View certificates in container...

Clicking the button Review, in the window that opens, if you noticed, another key container has appeared. Select the newly created container and click OK.

After selecting a new container, click Further.

The window that opens will indicate the certificate to view. Click Install.


As a result, after your actions, a message about the successful installation of the certificate will appear. Click OK.

Ready. The digital signature is installed on the computer.
To do this, you need to do the following: Select menu “Start” / “Control Panel” / “CryptoPro CSP”. Go to tab "Service" and press the button "View certificates in container"(see Fig. 1). Rice. 1. “CryptoPro CSP Properties” window. In the window that opens, click on the button "Review" to select a container to view. After selecting the container, click on the button  "OK" (see Fig. 2). Rice. 2. Window for selecting a container to view. In the next window, click on the button"Further" . In the window
  "Certificate for installation" you need to press a button"Properties" (see Fig. 3). Rice. 3. Certificate viewing window In the certificate file that opens, go to the tab
  "Compound" and press the button"Copy to file" (see Fig. 2).(see Fig. 4). Rice. 4. “Composition” tab. In the window that opens (see Fig. 2)."Certificate Export Wizard"
  press the button . Then mark the item Rice. 2. Window for selecting a container to view. "No, do not export the private key" and choose (see Fig. 5). and press the button (see Fig. 2). Rice. 5. Export options
  private key Rice. 1. “CryptoPro CSP Properties” window."Export file format" choose"X.509 (.CER) files encoded with DER"
  (see Fig. 6). (see Fig. 2). Rice. 6. Exported file format. In the next window you need to click on the button, manually specify the name (full name of the certificate owner) and directory to save the file. Then click on the button
"Save" (see Fig. 7). Rice. 7. Save the file.
In the next window click on the button
, then
"Ready"
. Wait for a message about successful export. Close all CryptoPro program windows.

- Often people who use electronic devices for their needs digital signatures, you need to copy the CryptoPro certificate to a flash drive. In this lesson we will look at various options for performing this procedure.
- By and large, the procedure for copying a certificate to a USB drive can be organized in two groups of ways: using the internal tools of the operating system and using the functions of the CryptoPro CSP program. Next we will look at both options in detail. Method 1: CryptoPro CSP.
- First of all, let's look at the copying method using the CryptoPro CSP application itself. All actions will be described using the Windows 7 operating system as an example, but in general the presented algorithm can be used for other operating systems of the Windows family. The main condition under which it is possible to copy a container with a key is the need for it to be marked as exportable when created on the CryptoPro website. Otherwise, the transfer will not be possible. Before you begin, connect the USB flash drive to your computer and go to
- "Control Panel" "Service".
- systems. "Copy...".
- A window for copying the container will appear, where you need to click on the button "Review…".
- A container selection window will open. Select from the list the name of the one from which you want to copy the certificate to a USB drive, and click "OK".
- The authentication window will then be displayed, where in the field "Enter password" you need to enter a key expression that is used to password the selected container. After filling out the specified field, click "OK".
- After this, you return to the main window for copying the private key container. Please note that in the key container name field the expression will be automatically added to the original name "-Copy". But if you wish, you can change the name to any other, although this is not necessary. Then click the button In the next window you need to click on the button.
- Next, a window for selecting a new key media will open. In the list presented, select the drive with the letter that corresponds to the desired flash drive. After that press "OK".
- In the authentication window that appears, you will need to enter the same random password for the container twice. It can either correspond to the key expression of the source code or be completely new. There are no restrictions on this. After entering, click "OK".
- After this, an information window will be displayed with a message that the container with the key was successfully copied to the selected media, that is, in this case, to a flash drive.


Method 2: Windows Tools
You can also transfer the CryptoPro certificate to a flash drive only using the operating system. Windows systems by simple copying through "Conductor". This method This will only work if the header.key file contains a public certificate. However, as a rule, its weight is at least 1 KB.

As in previous method, descriptions will be given using the example of actions in the operating room Windows system 7, but in general they are also suitable for other OSes in this line.


At first glance, transferring a CryptoPro certificate to a flash drive using operating system tools is much simpler and more intuitive than actions through CryptoPro CSP. But it should be noted that this method is only suitable when copying an open certificate. Otherwise, you will have to use the program for this purpose.
If a floppy disk or flash drive is used for work, copying can be performed using Windows(this method is suitable for CryptoPro CSP versions not lower than 3.0). The folder with the private key (and the certificate file, if any) must be placed in the root of the floppy disk (flash drive). It is recommended not to change the folder name when copying.
The folder with the private key should contain 6 files with the extension .key. As a rule, the private key contains a public key (the header.key file in this case will weigh more than 1 KB). In this case, it is not necessary to copy the public key. An example of a private key is a folder with six files and public key- file with extension .cer.

Private key Public key
Copying using CryptoPro CSP
Select Start > Control Panel > CryptoPro CSP. Go to the “Service” tab and click on the “Copy” button.

In the “Copy private key container” window, click on the “Browse” button .

Select the container you want to copy and click on the “Ok” button, then “Next”. If you copy from a root token, an input window will appear in which you should enter a pin code. If you have not changed the pin code on the carrier, the standard pin code is 12345678.

Create and manually specify a name for the new container. Russian layout and spaces are allowed in the container name. Then click "Done".

In the "Insert blank" window key carrier» Select the media on which the new container will be placed.

You will be prompted to set a password for the new container. We recommend that you set a password that is easy for you to remember, but that others cannot guess or guess. If you do not want to set a password, you can leave the field blank and click OK.
Do not store your password/pin code in places where others have access. If you lose your password/pin code, using the container will become impossible.

If you copy the container to a ruToken smart card, the message will sound different. In the input window, enter your pin code. If you have not changed the pin code on the carrier, the standard pin code is 12345678.

After copying, the system will return to the “Service” tab of CryptoPro CSP. Copying is complete.