Installing different operating systems on the same computer can have different purposes: from purely educational to purely professional. Windows users who want to learn Linux do not want to leave their familiar Windows environment. It is important for them to organize their work on the computer in such a way as to alternately use one or the other “Axis”.
This can be done either by installing an emulator of one system in the system environment of another, or using multiboot, when the choice of the system to be launched is carried out on the computer’s stratum.
Until some time, we all believed that the only carrier of system files could be a hard drive or, in extreme cases, floppy drives that are now out of fashion. The advent of flash drives shattered these notions. Today you can install and run the OS directly from a flash drive. It wasn't always like this. USB drives have recently acquired the technical characteristics that allow this to happen.
The first models of such media had too few read-write cycles before they failed. Therefore, installing them on a flash drive was practically pointless. The only area of application for such bootable flash drives was to install MS-DOS on them in order to gain access to the resources of a computer with a more powerful operating system.
Modern USB drives have become truly long-lived. Their large memory and high performance allow them to be used as an alternative to hard drives. In the BIOS of modern PCs, you can set to boot not only from a hard disk or floppy, but also from a flash drive.
Further, as we go along, we will look at all these possibilities and find out how to create a multiboot flash drive. That is, one that combines the two technologies discussed above. The subject of our note is not only the creation of a multiboot Windows 7 flash drive, but also some similar tasks.
Creating multiboot media: method one
First, let's answer the question: why might this be needed? Several answers can be given. Well, for example, if you want to have a universal installer on hand for several operating systems at once. On such media you can simultaneously place MS-DOS (several varieties), a Windows installer, a Linux installer, and so on. Then you don’t have to dig around looking for the right distribution - everything is at hand at any time.
 Another reason: you want to have a portable OS with your favorite programs. This is very convenient: just plug the flash drive into any computer, set the correct boot order in the BIOS, and now you are in your usual working environment. The third reason: to create a recovery flash drive, that is, one that is used to restore a “crashed” machine.
In each of the described cases, the procedure for creating and configuring the media will be different. Therefore, we will begin our story with how to create a multiboot flash drive of the installation type. That is, one with which you can install or restore several systems of the Windows family at once. Let's say we want to include distributions of the following operating systems:
- ISO image of the "seven".
- WinXP ISO image.
- An image of a recovery disk, for example, an RBCD 8.0 disk, which can be easily found on torrent storage sites.
In theory, all this can be done manually using multi-booters like GRUB4DOS. But this will require studying its rather extensive specification. The average user is somehow not comfortable plunging into these jungles.
Although this may seem interesting to an advanced user, most will want to achieve the result, so to speak, with little expense. Moreover, the result will be essentially the same. To solve our problem, we will use one useful utility: the WinSetupFromUSB program.
You can download the utility from here: http://www.winsetupfromusb.com/downloads/ - that is, from the website of the manufacturer of this program. Those who wish to familiarize themselves with the instructions in Russian can visit the following address: http://remontka.pro/winsetupfromusb/. We will create a multiboot flash drive like this:

This concludes the description of how the WinSetupFromUSB utility works.
We have succeeded in creating a multi-boot flash drive; we can begin to consider related issues.
Windows 7 on USB
LiveCD technology has long made its way into the hearts of users. Among Linux-oids, this approach is common. It is enough to carry a disc with your favorite Linux distribution with you everywhere so as not to have problems with its absence on your computer. True, writing to a disc is excluded, but for many purposes the reading function is sufficient. The system boots from the CD into the PC's memory, and most of the functions of a full-fledged OS become available.
Until recently, Windows users practically did not do this. But with the advent of fast and bulky USB sticks, their turn has come. Live USB professes the same paradigm as LiveCD, only the storage medium is not a blank, but a flash drive. We will tell you below how to prepare a Windows 7 flash drive with a full-fledged “axis” on board.
 The first Windows that allowed installation on media other than a hard drive was a version of XP called WinPE (Windows Preinstallation Environment) - it was an extremely minimal, although quite fast, version of Windows.
This version was distributed by Microsoft itself, and therefore no claims were made against it as some kind of inferior product. Moreover, it was this “distro” that became the basis for a wide variety of portable homemade products. In order to expand WinPE to the limits determined by the developer - that is, to include in LiveCD drivers, Windows components or external programs missing in WinPE, it was proposed to use special software, like the BartPE utility and others of the same kind.
BartPE, which has not been developed for a long time, is not suitable for illustrative purposes. Moreover, we intend to deal not with XP at all, but with the seventh version. A modern alternative to BartPE is the WinBuilder program, which we now turn to.
LiveUSB using WinBuilder
Win7PE will serve as the source material for building a mobile Windows 7 distribution, but for now we’ll tell you where to get WinBuilder itself. You can download it from the home page on the Internet: http://winbuilder.net/.
By delving into the depths of the site, you can find any information on the practical use of this program, but you won’t need it, since we will describe the process of working with it in sufficient detail. Before you start, here's what you need to do:

Next we need the Windows Automated Installation Kit (WAIK). This almost 2 GB image can be downloaded here: http://www.microsoft.com/download/en/details.aspx?displaylang=en&id=5753. Then run the package installer under the name StartCD.exe. We don't need all this product. We only need its individual files from the \Windows AIK\Tools\x86\ folder. Here is a list of these files:
- bcdboot.exe
- imagex.exe
- wimgapi.dll
- wimmount.inf
- wimmount.sys
- wimserv.exe
All these files need to be copied to the WinBuilder subdirectory (in our case, to the C:\WB\Projects\Tools\Win7PE_SE\x86\ folder). You should also copy the bcdedit.exe file from the \Windows\System32 folder there. Drivers for the future system need to be downloaded from this address: http://driverpacks.net/driverpacks/latest.
Additionally, we install VirtualBox - we will need this virtual machine to test the assembly. At this point, the preparatory procedures are completed, and you can begin generating the system.
Generation of a portable version of the "seven"
Details of further actions:

As a result, we will get a “bare” axis with the most reduced functionality and the complete absence of “spillies” like “Aero”.
You can fill the assembly with content using the recommendations of the next paragraph of our story.
Assembly modification
The large number of nodes in the tree on the left allows for very flexible configuration of the resulting product. You can change almost everything, from the default screen resolution, bootloader theme, to including plugins in the future Windows Explorer.
To add documents and media content, you can use the interface of the “Additional files” node, however, you will not be able to include the user program in the distribution package this way. Aero, wallpaper and a panel with gadgets can be connected in a Tweeks connection.
Enabling applications is possible, but more labor intensive. To make this task easier, the developers have released many scripts for implementing a wide variety of programs into the assembly. You can download these scripts at the following address: http://reboot.pro/forum/65/. The finished script is placed in the C:\WB\Projects\Win7PE_SE\Apps folder or in any of its subdirectories.
If a ready-made script is not found on the site, you can make it yourself using the MakeScript tool located on the site http://reboot.pro/508/. You shouldn’t give this program installers; it’s better to let it eat the portable version of the software:
 Otherwise, an unimaginable amount of garbage will be generated in the registry. The MakeScript program has quite flexible settings. Check them out in the documentation or look for a description on the Internet.
In the simplest case, it all comes down to specifying the exe file of the portable version of the desired program, indicating its name and clicking on the large “Make It” button on the left of the screen.
Transfer everything to USB
So far, we haven't said anything about how to transfer all this to a flash drive. In general, the program generates a ready-made ISO image of the system directly in the C:\WB folder.
We already know how to transfer such images to a USB drive. For this, we will need the knowledge gained in the first paragraphs of our story.
So, the circle is closed, and we essentially have nothing more to discuss.
16.04.2017
It is quite convenient to keep a USB drive with several OS and programs for working with a computer from the BIOS (Dr. Web, Acronis, Windows 10, Ubuntu, etc.). Most computer technicians carry a device like this with them to quickly analyze a damaged PC or laptop and begin repairing the operating system on the spot. To create a multiboot flash drive it will take about 30-60 minutes and some software.
Creating a multiboot flash drive
Most computer technicians periodically have to work with Linux, Acronis, Kaspersky, Dr. Web, etc. software via boot drive. It is inconvenient to buy a dozen flash drives for such purposes. It is much more practical to install all the software on one multiboot drive and use it while repairing your PC.
To create such a device, the user will need to install some programs. The task of the software is to copy the boot loader (Grub4dos or Syslinux) to the storage device, mount the ISO image into the desired folder and enter the necessary paths to the files in the menu.
Method 1: WinSetupFromUSB
The most popular software for creating a multiboot drive is WinSetupFromUSB. This utility has a simple interface and allows you to write not only third-party operating systems, but also ISO images of programs to the drive.
After downloading, you need to unpack the archive:
- Run the .EXE file.
- In the window that appears, click on the button «…» .
- Select the installation folder and click "OK".
- Click "Extract".

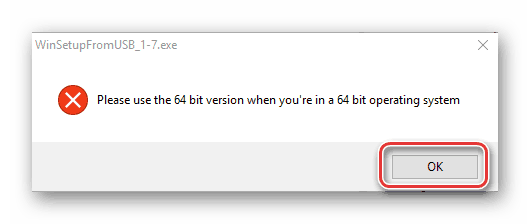
Next, go to the previously designated folder, it will contain two applications of 32 and 64 bit versions. Select the one that matches the processor size of the device you are using. Run first "WinSetupFromUSB_1-7_x64". The file name may differ depending on the software version. If you opened the wrong version of the program, a warning window will appear.
To create a multiboot drive, you must follow the instructions:


More details about menu items:
- Windows 2000/XP/2003 Setup – used to record older versions of Windows.
- Windows Vista/7/8/Server 2008/2012 – used to record modern versions of Windows OS.
- UBCD4Win/WinBuilder/Windows FLPC/Bart PE – partition created for recording bootable disks under WInPE (Windows Preinstallation Environment, loaded into RAM). Used among specialists, WinPE allows you to boot Windows and use the OS in Live mode without installing it to disk.
- LinuxISO/Other Grub4dos compatible ISO - created for recording Linux systems, as well as program images. For example, through this section you can install Dr. Web, Victoria, Kaspersky Rescue Disk, Ubuntu, Kali linux and other software.
- SysLinux bootsector – used for Linux systems with pre-installed Syslinux bootloaders. As a rule, it is used by specialists to test various versions of Linux.
After burning the first ISO file, you can begin installing other OSes and utilities. For this purpose, the instructions remain almost unchanged. Except you don't have to do any formatting.
For example, let's install Kali Linux as the second OS. For this:

If you wish, you can not install the files separately, but immediately select several images for installation at the first stage. Also, if desired, you can open additional settings for formatting, system boot, menu interface, etc. There is no particular need to change the parameters.
Please note that when working through WinSetupFromUSB, problems may arise when recording Windows 7, 8 and 10 versions simultaneously. A similar error was observed on older versions of WinSetupFromUSB.
Method 2: YUMI Multiboot USB Creator
This program has a simple and intuitive interface. A distinctive feature from WinSetupFromUSB is a more detailed classification of programs when recording. This allows you to create a bootloader with additional auxiliary settings at startup.
After downloading, run the utility. To create a multiboot drive you need to follow a few simple steps:
- In chapter "Step 1" select the desired device.
- IN "Step 2". Choose what type of system you will be installing. The drop-down list contains many different names; select the program you need from among them. If you don’t want to select a specific utility, then at the end of the list, find the item "Try an Unlisted ISO". In this case, the image will launch without additional boot settings.
- Select the system image you want to burn. To do this in "Step 3" click the button "Browse" and in the window that appears "Conductor" find the required ISO file.
- If you are using the drive for the first time, it is recommended that you format it first. To do this, you can use standard Windows tools or check the box "FAT32 Format". This section may not be present in the utility.
- To begin installation, click "Create". After this, the installation of the image will begin. In this case, archivers will periodically open, as well as Windows windows with information about copying will pop up.

After the software has finished running, you can test the flash drive directly through the computer’s BIOS. Or run the QEMU test in WinSetupFromUSB. The loader interface is minimalistic and distributes the installed software into folders automatically.

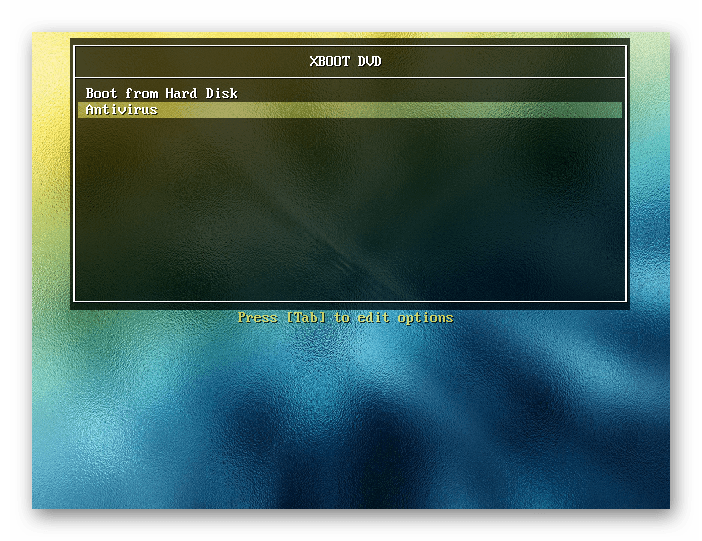
Method 3: Xboot
This utility is another type of software for creating multiboot flash drives.
To use XBoot on a PC, you must have the .NET Framework version 4. To create a multiboot flash drive, follow the instructions:


When you launch the created flash drive, a pleasant interface with a beautiful background and an attractive menu appears in front of the user.
Every user can create a multiboot drive. This will require a little time and some software. You can use such a device to repair computers. You need to insert a flash drive with installed utilities into your computer and run the boot loader on the media through the BIOS. After this, you can use all installed software and use them to begin treating or restoring your computer.
This instruction was written a relatively long time ago and is currently (2016) not entirely relevant. If you are interested in other ways to create bootable and multiboot flash drives, I recommend this material:.

We connect the experimental flash drive and run WinSetupFromUSB. We make sure that the required USB drive is indicated in the list of media at the top. And press the Bootice button.

In the window that appears, click “Perform Format”; before turning the flash drive into a multiboot one, it must be formatted. Naturally, all data from it will be lost, I hope you understand this.

For our purposes, the USB-HDD mode (Single Partition) item is suitable. Select this item and click “Next Step”, specify the NTFS format and, if desired, write a label for the flash drive. After that - “Ok”. When warnings appear that the flash drive will be formatted, click “Ok”. After the second such dialog box, nothing will happen visually for some time - this is the formatting itself. We wait for the message “The partition has been formatted successfully...” and click “OK”.

Now in the Bootice window you should click the “Process MBR” button. In the window that appears, select “GRUB for DOS”, and then click “Install/Config”. In the next window you don’t need to change anything, just click the “Save to Disk” button. Ready. Close the Process MBR and Bootice window, returning to the main window of the WinDetupFromUSB program.

Selecting sources for multi-download
In the main window of the program you can see fields for specifying the path to distribution kits with operating systems and recovery utilities. For Windows distributions, you need to specify the folder path - i.e. not just an ISO file. Therefore, before you begin, mount Windows distribution images on the system, or simply unpack the ISO images into a folder on your computer using any archiver (archivers can open ISO files as an archive).

Check the box next to Windows 2000/XP/2003, click the button with the ellipsis right there, and specify the path to the disk or folder with the Windows XP installation (this folder contains the I386/AMD64 subfolders). We do the same with Windows 7 (next field).
For a LiveCD, you don't need to specify anything. In my case, it uses the G4D bootloader, and therefore in the PartedMagic/Ubuntu Desktop variants/Other G4D field we simply indicate the path to the .iso file

Click “Go”. And we wait until everything we need is copied to the flash drive.
Upon completion of copying, the program issues some kind of license agreement... I always refuse, because... in my opinion, it has nothing to do with the newly created flash drive.

And here is the result - Job Done. The multiboot flash drive is ready for use. On the remaining 9 gigabytes, I usually record everything else that I need for work - codecs, Driver Pack Solution, sets of free programs and other information. As a result, for most of the tasks for which I am called, this single flash drive is quite enough for me, but for the sake of solidity, I, of course, take with me a backpack containing screwdrivers, thermal paste, an unlocked 3G USB modem, a set of CDs for various goals and other belongings. Sometimes they come in handy.
You can read about how to install booting from a flash drive in the BIOS.
Hello, today I’ll tell you what a cool multiboot flash drive I have, which has saved me more than once. With the advent of large-capacity flash drives (from 8 GB), it became possible to make multiboot flash drives with a huge range of software and operating systems. Now you don’t need to carry around a bunch of disks with drivers and installers for Windows/Linux.
In my case, a multiboot flash drive is a whole “combine” with two operating systems, software for checking and testing computer hardware, and even a completely ready-to-use operating system (LiveCD).
First, let me tell you what we will end up with:
- Ability to install Windows 7 SP1 x86-x64
- Ability to install Ubuntu (any version)
- Ability to run LiveCD
- Program for working with HDD – Acronis Disk Director
- Program for testing RAM MemTest
Preparing the flash drive for use
Now let's look at everything in more detail. First you need to download the archive with the files you will need:
Now you need to prepare your flash drive for further work. Format it using standard Windows tools
Ready! Now you need to install the bootloader on the flash drive using grub4dos. Launch the program grubinst_gui.exe from the archive, select our flash drive in it and click “ Install”
 If after clicking the Install button you see a window like this, then everything was successful:
 Let's move on. Now there is nothing on your flash drive, it is completely empty, in order for it to become bootable, you need to copy the bootloader files and the boot menu itself to it. They are located in the root of the archive
grldr– bootloader
menu.lst– menu setup file
Open the copied file menu.lst in a notepad. As you can see, it is completely empty. We will set it up together with you now.
To start, add this line:
Title Turn off PC halt
At this stage, we have a bootable flash drive ready, but it can’t do anything other than turn off the computer (this is the command we added). Now let's check if the flash drive is working. To do this, you don’t need to restart your computer at all, just copy the file MobaLiveUSB_0.2.exe to the root of the flash drive and run it, click the “ button Non”
 An emulator window will open, in which you will see everything the same as if you booted your computer from a bootable USB flash drive.
As you can see, “krakozyabry” are displayed on the screen instead of Russian letters
 We will fix this issue by connecting one of the templates to the bootloader (in my case, winlin.gz). Copy the file to the root of the flash drive winlin.gz and write the following lines in menu.lst at the very beginning
Gfxmenu/winlin.gz
Now run the emulator again and see what your bootloader screen will look like. If everything was done correctly, you will see the following screen:
 As you can see, the “Turn off PC” message is now displayed normally. Great, now let's move on.
Adding the Windows 7 SP1 x86-x64 installer
Now let's add the Windows 7 SP1 x86-x64 installer to be able to install windows from your multiboot flash drive.
To do this, download the Windows 7 image you like and extract all the files to the root of the flash drive.
After extracting the files, add the following lines to the menu.lst file:
Title Installing Windows 7 SP1 x86-x64 RU map --unmap=0:0xff map --unhook root chainloader /bootmgr
Download the emulator and check what you get. As you can see, the “Install Windows” item has appeared.
 When you select this item, Windows installation begins. Let's move on...
Adding the Ubuntu installer
I often have to use Linux, so I decided to add the Ubuntu distribution to the flash drive. Download the latest distribution from the official website. Create a folder on the flash drive /ubuntu and copy the downloaded image into it (as is, in one file).
Now open the ubuntu image in UltraISO and from the directory /casper copy two files: vmlinuz And initrd.lz to a folder /ubuntu on a flash drive. The name of the ubuntu disk image should be ubuntu.iso.
Now write the following in the menu.lst file:
Title Installing ubuntu-10.04.4-desktop-i386 kernel /ubuntu/vmlinuz iso-scan/filename=/ubuntu/ubuntu.iso boot=casper only-ubiquity initrd=/casper/initrd.lz locale=ru_RU quiet splash -- initrd /ubuntu/initrd.lz
Restart the emulator and check what you got

When you select the “Install Ubuntu” menu item, the installation of the distribution will begin
Adding LiveCD launch
A very useful thing! It happens when the system doesn’t boot, and before reinstalling you need to save the contents of your desktop, doesn’t it happen? This has happened to me, and in such moments, LiveCD will help.
I downloaded the first assembly I came across (if you want to find it, search by name), it contains both Windows 7 and Windows XP. For every taste, as they say.
So, I downloaded the image and put it in a folder /os, V menu.lst added the following:
Title Run Windows LiveCD map /os/LiveCD_Seven+LEX.ISO (hd32) map --hook root (hd32) chainloader (hd32) boot
Now I have one more point
 I would like to note right away that when launched from the emulator, the version with Windows 7 will not start, but the version with Windows XP will start without problems.
Now we have two operating systems and a LiveCD. Let's add some software.
Adding programs for a bootable flash drive
1. To work with hard drives, I downloaded the image Acronis Disk Director(available on torrents). I put it in a folder /program and added the following entry to the menu:
Title Working with hard drives Acronis Disc Director map /program/acronis.iso (hd32) map --hook root (hd32) chainloader (hd32) boot
Now I have a good tool for working with disks in my arsenal
 2. To test RAM, I will use the “MemTest” program
I downloaded it from . Unpacked and put the image in a folder /program , added the following to the menu:
Title Check RAM MemTest 4.10 map /program/mt410.iso (hd32) map --hook root (hd32) chainloader (hd32) boot
Trying to run from the emulator...
 Works! Let's move on.
3. A huge set of different tools can be found in Hiren`s BootCD. You can download it. Unzip and copy the image to a folder /program , you also need to copy the firadisk.IMA file from my archive into it.
firadisk.IMA is a driver that allows you to load a disk image into RAM and work with it as with a regular disk.
We enter the following in the menu:
Title Hiren`s BootCD v9.3 map --mem /program/firadisk.ima (fd0) map --mem /program/hbcd.iso (hd32) map --hook chainloader (hd32)
When loading Hiren's BootCD, you need to wait a little while the disk is loaded into RAM, after which it will start.
4. Add a utility to the flash drive to reset the administrator password. You can download it and copy the ISO image to a folder /program. Added the following entry to the menu:
Title Reset Administrator password map /program/BOOT-DSK.ISO (hd32) map --hook root (hd32) chainloader (hd32) boot
The image contains several utilities, we are interested in the one highlighted with an arrow:
 5. I will add the Victoria program for diagnosing the hard drive. You can download it. I throw the image into /program
I write the following in the menu:
5. I will add the Victoria program for diagnosing the hard drive. You can download it. I throw the image into /program
I write the following in the menu:
Title Victoria 3.5 hard drive diagnostics map /program/vcr35r.iso (hd32) map --hook root (hd32) chainloader (hd32) boot
 In principle, you can add a bunch more things, you can only be limited by your imagination and the size of the flash drive. For me, this toolkit is quite enough.
Here is a screenshot of my bootable USB flash drive

And here is my menu.lst file:
Gfxmenu /winlin.gz title Installing Windows 7 SP1 x86-x64 RU map --unmap=0:0xff map --unhook root chainloader /bootmgr title Installing ubuntu-10.04.4-desktop-i386 kernel /ubuntu/vmlinuz iso-scan/ filename=/ubuntu/ubuntu.iso boot=casper only-ubiquity initrd=/casper/initrd.lz locale=ru_RU quiet splash -- initrd /ubuntu/initrd.lz title Run Windows LiveCD map /os/LiveCD_Seven+LEX.ISO ( hd32) map --hook root (hd32) chainloader (hd32) boot title Working with hard drives Acronis Disc Director map /program/acronis.iso (hd32) map --hook root (hd32) chainloader (hd32) boot title Check RAM MemTest 4.10 map /program/mt410.iso (hd32) map --hook root (hd32) chainloader (hd32) boot title Hiren`s BootCD v9.3 map --mem /program/firadisk.ima (fd0) map --mem /program/hbcd.iso (hd32) map --hook chainloader (hd32) title Reset Administrator password map /program/BOOT-DSK.ISO (hd32) map --hook root (hd32) chainloader (hd32) boot title Hard drive diagnostics Victoria 3.5 map /program/vcr35r.iso (hd32) map --hook root (hd32) chainloader (hd32) boot title Shut down PC halt
If you have any questions, welcome to the discussions!
There are now more than a billion computers in the world. Each computer runs on a specific OS, be it a system Linux or system Windows. Many system administrators and advanced users are faced with replacing the OS with a large number of computers. Therefore, each system administrator has at hand several disks and bootable flash drives with different operating systems.
In this material we will try to simplify the life of a system administrator or an experienced user. We will describe the installation process multiple OS images on one bootable USB flash drive. That is, after reading the article you will be able to do bootable USB flash drive with different operating systems.
The first way to create a multiboot drive
For the first method we will need two utilities RMPrepUSB And Easy2Boot. You can find them on their official websites www.rmprepusb.com and www.easy2boot.com. Immediately after downloading, install the utility RMPrepUSB. To do this, run the installer.

Now click the main button Install, after which the program will install and immediately notify you about this in the final installation window.
Close the installer window and paste USB drive. Then launch the utility from a shortcut on the Desktop.
Before creating a bootable USB flash drive, we will need ISO system images for example. Window 7, Windows 10 And Windows XP. You can make them from licensed disks using utilities Alcohol 120% or CloneCD. If the iso images are ready, you can immediately begin directly preparing the multiboot drive. To do this, check all the radio buttons as shown in the figure and specify the path to the archive with Easy2Boot.
Having placed all the switches correctly, feel free to press the button Prepare disk. The process of writing the necessary data to the drive should begin.
Now let’s go to the USB drive in the “_ISO\WINDOWS” folder and write iso images of our systems to the appropriate folders:
- Windows XP in "_ISO\WINDOWS\XP";
- Window 10 in "_ISO\WINDOWS\WIN10";
- Window 7 in "_ISO\WINDOWS\WIN7".
After the images are written to USB drive, you need to do the last operation by pressing the key combination Ctrl + F2. In a couple of minutes, your multiboot drive will be ready. You can check its performance in the built-in emulator RMPrepUSB. To launch it, press the F11 key. After pressing the button, the emulator will start loading with your drive and after a few minutes you will see the bootloader menu.
As you can see from the example, this method of creating a multiboot USB drive may seem a little complicated. But if you follow the instructions, then after just a few tests of this method it will be very simple for you, like any other. In addition, with its help you can make a boot menu with different pictures. For example, like in the picture below.
You can also find ready-made pictures on the website www.rmprepusb.com.
The second way to create a multiboot drive
For this method we need the utility WinSetupFromUSB. You can download it from the official website www.winsetupfromusb.com. The utility is distributed as a self-extracting archive. Therefore, you just need to download it and unpack it to a place convenient for you. If we compare this method with the previous example, this one will be much simpler and especially suitable for beginners. Before creating, also prepare two OS images of Window 7 and Ubuntu 14. Install the formatted flash drive into your computer and run the utility.
Now select the OS ISO images as shown in the image below.

At this point, all the settings for creating a bootable drive are ready and you can press the GO button, after which the recording of a multiboot USB drive will begin.
If you want the created multi-boot USB flash drive to boot into a virtual machine, then before pressing the GO button, check the “ Test in QEMU».
The example shows that any user can handle this application. But in WinSetupFromUSB There are also options for advanced users. To use them, check the box " Advanced options».
If you want to burn another similar operating system onto the media, for example, Windows 7, then do the same operation with the image Windows 7 in the considered example on the same flash drive. After completing these steps when booting from a drive, you will receive two versions of the system Windows 7.
An example of launching a multiboot flash drive in a laptop
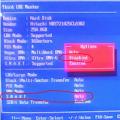
For example, we will use the disk we just created using the utility WinSetupFromUSB and laptop Lenovo IdeaPad Z570. In order for our laptop to see the bootable USB flash drive, we need to boot from it. To do this, before booting the laptop, press the F11 key, which will launch the bootable media selection utility.

Select our media and press Enter. This will launch our drive menu.
For example, let's choose to install Ubuntu 14 and press Enter. The installation process will begin Ubuntu 14.
The seven installation process is similar Ubuntu 14.
As you can see, launching the media on a laptop is quite simple and even a novice user can handle it. The process for starting the drive on other laptops and desktop computers may be slightly different. You can find out how to load the boot media selection menu in the manual that came with your laptop or motherboard.
Summarize
In our material, we looked at the most popular utilities for creating multiboot drives. In addition to the two programs RMPrepUSB and WinSetupFromUSB, there are also such utilities as:
- SARDU;
- YUMI;
- XBoot.
Each of these utilities has both pros and cons. These utilities are not as popular as RMPrepUSB and WinSetupFromUSB, so we did not include them in the review. If you have a desire, you can always familiarize yourself with them, since there are a lot of materials on the Internet with reviews of these programs. Another advantage of these utilities is the ability to install images boot antiviruses or program images backup. Therefore, using a multiboot flash drive, you can always scan your hard drive for viruses and make backup copies before installing the OS.
I would also like to note that we have described only part of the functionality. RMPrepUSB And WinSetupFromUSB. Therefore, if you want to gain advanced skills in the functionality of these utilities, we recommend visiting their official websites. Here you will find all the necessary manuals that will help you create a multiboot flash drive that meets your requirements.
We hope that this article has helped resolve any issues that have arisen.
Video on the topic