Before launching a site on a big voyage across the Internet, it is necessary to create and test it on local server. How to deploy a working site on a home computer? The local OpenServer server will help us with this. This article describes step-by-step steps for installing OpenServer on a local computer. In essence, OpenServer is an analogue of Denwer, but installing Denwer you can read in this article.
What is better Denwer or OpenServer? Personally, I worked with two, and I give preference to OpenServer, I'll tell you why:
- This local server is portable and does not require installation, you can put it on a USB flash drive and always carry it with you.
- By past standard features local server, it contains a bunch of useful utilities, from which it’s just a headache, about 40 portable programs(PHPMyAdmin, Notpad++, FTP clients, and that's not the whole list).
- It is very convenient to change the server settings, and in general it is very easy to use.
But where there are pros, there are cons. Minus one, this is the volume, the most basic version (Basic) takes about 303 MB when downloading and 2.79 GB when unpacked. The maximum version (Ultimate) in unpacked form weighs 6.54GB.
InstallationOpenServer step by step.

- Ultimate
- Prenium
- Basic
Actually, for normal work, the basic version will be enough, but if you want "full stuffing", then download the Ultimate version with all possible bells and whistles.
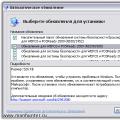
- After you have decided on the version, enter the code from the picture, select our version, click "Download"

- Then we will be offered to make a voluntary donation to the project, this is at your discretion (the minimum contribution is 100 rubles). We press “No, thanks, I just want to download”, then another attempt will follow to receive donations, but the minimum amount is 79 rubles, we press again “No, thanks, I just want to download”, after which we are given the opportunity to download the file.

- We launch the downloaded file (it was called “open_server_5_2_6_ultimate.exe” for me), we will be prompted to choose the unpacking path. We indicate the path convenient for us. After installation, you will need to restart your computer.

- We go to the folder that was indicated earlier and run the file depending on the bitness of your system (I have x64, respectively, the file “Open Server x64.exe”).

- An icon in the form of a red flag will appear in the tray (in the lower right corner, where the clock is).
Click on it with the mouse, the program menu will open. At the top, click on the option with the green flag “Run”, the red flag should change to green.
- Next, you need to check the operation of OpenServer. There are two ways, in fact they are the same:

As a result, we should see a greeting and a message that everything is working.

openserver-running
Actually, that's all, congratulations on installing OpenServer. If something went wrong, read on.
"Something went wrong…"
Everything seems to be installed, but the icon remains red? It doesn't matter, we click on our checkbox and select the "View logs" option.

In most cases, the answer to the question "what's wrong?" will be in the logs.
Here are some of the errors you may encounter:
- File C:\Windows\system32\drivers\etc\hosts unavailable for recording.
Most likely, there are not enough rights to change the “hosts” file, possibly blocking the antivirus or firewall. Try to allow editing the file or disable your antivirus.
File permissions can be given by opening "CMD" (win + r buttons) and running the command: attrib.exe -s -r -h -a C:\Windows\system32\drivers\etc\hosts
- Apache failed to start or the port is busy.
Most likely some other program is sitting on the port, it can be Skype or VMware, usually it is written in the log what process is occupying this port, try disabling it.
That's all. Good luck in your endeavors!
From the article you will learn: what is OpenServer for, where to download it from and how to install it (I will show it using windows 10 as an example)
Open Server allows you to use a local server on your computer. This means that you can work on your site on your home computer, and when the site is ready, transfer it ready and working to the Internet.
Click Download. On the loaded page, select the Basic version. Enter the numeric code from the image and click the Download button.

A page will open where you will be offered two options to download the program.
The first method is paid (Minimum donation amount is 60 rubles) - this method will provide a fast download.
The second method is free and therefore very slow))

This is the file that will be downloaded (on the day the article was written, it looked like this, now it may be different). This is a program archive.

Double click on the file. A window will open asking you to choose a location where to unpack the files from the archive. I chose drive D.
Click the OK button. The unzipping process will begin.
We go to the folder that we chose in the 3rd step. We see that the OpenServer folder has appeared. We enter it.
We see two shortcuts for launching the program (there can be only one shortcut, it depends on the bitness of Windows).
Double click on the Open Server x64 icon.
Since this is the first launch of OpenServer, the process of installing components (MicrosoftVC ++) will begin for the correct operation of the program.
After the installation is complete, the program will prompt you to restart your computer. Reboot.
We go through the fourth step again - that is, we go to the OpenServer folder and run the program.
In the tray (the area in the lower right corner where the clock is) we see a new icon - a red flag.
We click on it, and the program menu will open. Click on the green checkbox labeled Run.

We are waiting a little. The red flag will change to yellow and then change to green. The server is running.
If the open server does not start - a window appears with the inscription "Startup failed!", then go down the article to the description of the open server settings.
Verifying that OpenSever is working
Click on the green checkbox. In the menu that opens, point the arrow at My Sites. A submenu will appear with a single item localhost. We click on it.
A page will open in the browser with a message that OpenServer is running.
Hooray! We made it))
As you can see openserver installation the job is not difficult at all. I like this local server more than Denver, so I use it in my projects and advise you.
Now it needs to be configured.
Open server setup
Click on the checkbox. → In the menu that opens, click on the Settings item.
In the window that opens, on the General tab, check the box next to Run with Windows. I left the delay as suggested 20 seconds. The delay is needed so as not to slow down the loading of Windows. First, all the components necessary for the operation of the computer will be loaded, and then the Open Server will start.
Also check the box Require account administrator. Some functions work only with administrator rights, so be sure to check the box.
For those whose open server gives a Startup failure at startup - you need to go to the Server tab in the settings and check the box “Do not make changes to HOST file”, if openserver initially starts up normally, then do not check the box here.

2. Project files.
I'll name the domain "myshop" (You can choose your own name if you wish). Unpack the downloaded archive with the project to the folder C:\OpenServer\domains\myshop\

It should look like this: (pay attention to the path to the folder)

3. Adding a local domain to Open Server.
Let's go to settings:

Then go to the "Domains" tab. In the drop-down list, select the menu item "Manual control":


The program will require a server restart, confirm:

4. Let's check the website.
Hooray! The site works, although it shows an error. The error text states that the site cannot connect to the database. Now we will set it up.

5. Database setup.
At the beginning of the lesson, we downloaded the db_export.zip archive. Unpack it. The db_export.sql file is a "copy" of the database, keep it handy.
The phpMyAdmin tool comes with Open Server. Let's use it to work with the database:

We go to the panel with the login "root", leave the password blank

Go to the Import tab, Choose File, select the db_export.sql file, click Open.

After a moment, the database will be imported, you can see the contents of its tables:

6. Setting the database connection parameters.
The last step is to configure the settings. To do this, we need to edit the db_params.php file in our project. To do this, open it with notepad:

And enter the required information. We leave the name of the database unchanged - "phpshop". In our case (with standard installation Open Server) the user is "root", the password is an empty string.

Openserver php setting is configured in modules and is a priority setting when using different cms-systems, scripts and applications. It will not be possible to install a system that supports php 5.6 if the server itself is configured with more powerful options, such as joomla, for which you need to install a php version of at least 7.
For the same reason, ready-made sites located on the local openserver server, when changing the settings of the modules, may not be available. It is difficult to lose data, unless of course there are many such sites. For one cms-system, you can set it up once and not pay attention to everything else.
But let's consider the option when on the local openserver server, several site options are installed, with different system requirements. For example, I took osticket, with support for php version 5.6 and a popular engine that requires a php version of at least 7.0.
Hosting both of these sites on openserver will not work unless you create special profiles that specify the necessary parameters for each site separately.
Openserver config php with profiles
When you enter the settings, a window will appear with many different tabs (13) in the form of a menu.

For our particular case, the main ones will be "Basic" and "Modules". In the main parameters, profiles are configured, and in the modules, the server configuration for each profile separately.
Being in the "Basic" menu, in the "Profile name" field, you must enter the desired name and click the "Create profile" button so that the invented profile appears in the list of all other profiles, which, by the way, can be very numerous.
Then, simply select a new profile with the cursor and go to the "Modules" menu, where you can configure the necessary parameters for the new profile and save. After that, to save the new settings, the server will be restarted.

Having thus created the required number of profiles, with the necessary http, php and MySQL parameters, you can quickly select the desired set of settings in the form of profiles and easily switch between them.

In practice, everything looks very simple. After selecting the desired profile, you must click on the "Load profile" button. The selected settings will be available after the server is restarted.
It's that simple, using openserver profiles, you can quickly select desired settings php of any version.
Openserver php setup practical use.
Program description
Open Server is portable software package, created to help webmasters develop, debug and test sites directly on a computer (even if it does not have the Internet) running Windows. You can read in more detail about what Open Server is, what is the difference in its assemblies (maximum, extended and basic) and what components they include, you can read at the office. project website: ospanel.io.
Personally, I use the extended edition (premium)
Where to download open server?
- On the developer's site www.ospanel.io/download/- without donation, the download speed is very small (3 hours to download)
- From my Yandex disk, here: https://yadi.sk/d/qDuNKrWUhkHvo- I usually throw all the updates there
Installing OpenServer
Before installation, I recommend to disable antivirus program. In my case, this is Kaspersky Anti-Virus, it is disabled as follows: we find the anti-virus icon in the tray, click on it with the mouse (right-click) and select: pause protection, then select for how long to pause and confirm the action in the window that opens.
We launch the downloaded distribution of Open Server (preferably on behalf of the administrator). 
Specify the path to install the distribution. 
We are waiting for unpacking, after which we follow the path that you specified during unpacking and see the OpenServer folder there, inside which the installed Open Server is located

This completes the installation!
Open Server - first launch
To do this, go to the folder with the installed Open Server distribution (in my case, it is located on local disk D). We right-click on the Open Server icon (x64 or x86, depending on the bit depth of your OS) and select "Run as administrator" in the window that opens.

In the window that opens, select the server interface language (in my case it is Russian):


They will be installed for quite a long time, you will have time to drink coffee freely at that time. or something else to do)
After installing all the necessary libraries in the tray (lower right corner, where the clock is), the Open Server icon will appear in the form of a red flag, click on it and select run.
If a window appears: System notification Windows Security, put both checkboxes against the items Private and Public networks and click on the "Allow access" button.

After that, the server should start successfully and the red flag in the tray should turn green, click on it and select "My Sites" - "localhost".
A page will open in the browser, in which a greeting will be written.

Congratulations on the successful launch of Open Server.
Configuring OpenServer
To do this, launch it, then right-click on its icon in the lower tray and select the settings tab.

A settings window will open in front of you, we are primarily interested in the Modules tab, here I recommend setting the modules you need (based on software hosting, in my case the hosting will run, it supports latest versions Apache , Ngins , PHP etc. Accordingly, I choose the latest versions).
In doctor web, it is disabled in the settings parental control if I am not mistaken.
You can also try to open as administrator command line and run the command:
attrib.exe -s -r -h -a C:\Windows\system32\drivers\etc\hosts
Common Error 2: Failed to start Apache
Or some other component or just writes the port (port number) is busy. This usually indicates that your port is occupied by some other program.
Solution:
If you have Skype running, make sure that it does not occupy ports 80 and 443, to do this, in Skype, go to the Tools -> Settings -> Connection tab and uncheck Use ports 80 and 443.
If it doesn't help or something else is blocking the ports. Then download, install and run the Port Explorer program (or similar), then go to the ALL tab, sort the list of processes in the Local Port tab, find the processes occupying the port indicated in the logs and end them. PS this action After each reboot of the system, you will most likely have to repeat.
After that, restart Open Server and work!
If this does not help, then turn off the firewall (firewall) and antivirus!
Well, if all of the above does not help, then go to the office. forum open-server.ru/forum/ look for your problem, or write to the developers through the same forum what kind of problem you have and they will help you solve it. Well, or you can write about it in the comments, I will try to help you!