In the last article, we sorted it out. Consider a more practical question, how do you install an amplifier? Most often, amplifiers with 2 and 4 channels are installed in their cars.
First of all, you need to determine where you are going to install the amplifier, and depending on this, stock up on a ground wire longer than in the kit. The fact is that most often amplifiers are installed in the trunk, where a 1 meter long wire does not reach. In order to avoid such problems, you need a wire 4-5 meters long. Next, you need wires from the amplifier to the front speakers, also longer than in the kit - 3-4 meters.
It is necessary to lay the wires in the same place where the rest of the cables were laid; in many models, insulated conduits for wires are provided.
The amplifier needs a place where free air circulation is ensured, otherwise the amplifier will warm up. It is worth remembering about the fuse. Its rating must not be less than the total sum of the fuse ratings of the amplifier and radio. It is important to observe the polarity. There can be many options for what is written on the amplifier and radio, so you need to rely on the above terms and carefully read the instructions.
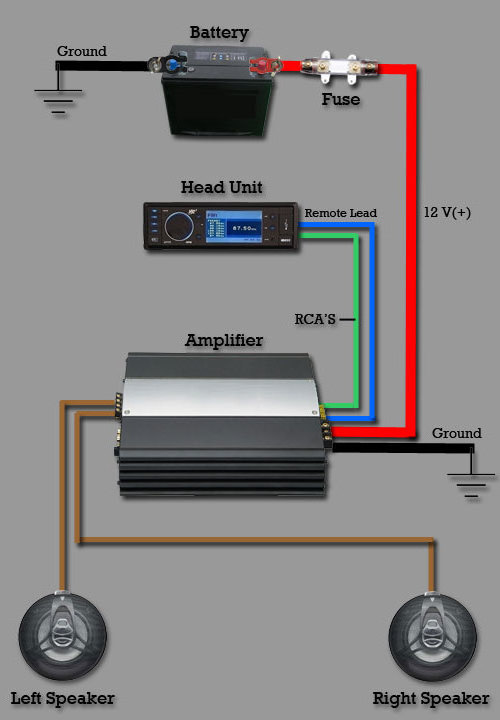
The radio tape recorder is connected to the amplifier using an RCA wire. Usually it is blue, but anything can happen, so you need to trust not the colors, but the signatures. This is a signal wire with a tulip plug. It must be connected in the amplifier to the Input connector, and in the radio tape recorder - to the Output connector, which may have other names, such as Front, SUB, SUBWOOFER, Real.
Signal wires and power wires must be routed on opposite sides of the body, otherwise noise may be interfered with.
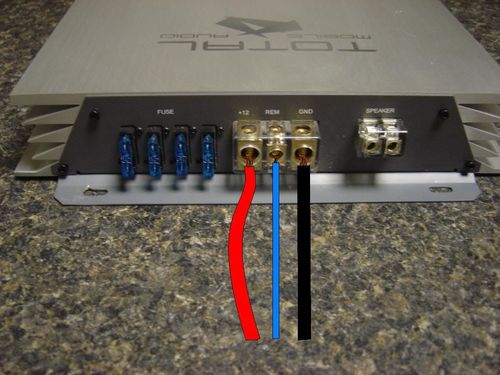
The remote turn-on wire must be connected to the REM terminal. Ground - to GND, + 12V wire - to power supply.
Connecting a four-channel amplifier
The four-channel is connected to the radio tape recorder in the same way as a two-channel amplifier.
It is worth noting that in this case there are more fuses, so the general fuse must have a higher rating. The diagram shows how to connect two speakers. It will be useful to pay attention to how the subwoofer is connected - in a bridge way, the plugs cannot be stuck into any connectors - be sure to the extreme ones. 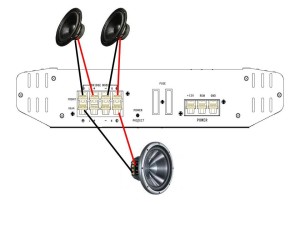
Connecting a car amplifier in the car, many people are afraid. Of course, for a person, even with a secondary technical education, it can be easy. But for many others it can turn out to be a daunting task. In this case, people turn to car services, in a car studio or to folk craftsmen.
In this article I will try to tell and show in an accessible and simple language that car amplifier connection actually a simple task.
Where do you start? There is a car, the desire to enjoy good sound in it and the desire to do everything yourself is the most important thing.
First you need to decide what we want to get. There are a great many options for building a car audio system, and of course, since we decided to equip our iron horse with a car amplifier, it means that we are not satisfied with the sound quality or insufficient volume.
A few words about what a car amplifier is.
Amplifier - from the word amplify, a device for amplifying the signal level, in our case - sound signal... Many houses have an amplifier as part of a music center or home theater - but these are stationary amplifiers and they are powered from a 220 volt network. There is no such voltage in a car, there is only 12 volts of the on-board network, and the car amplifier is therefore called car amplifier, because designed for this small voltage in the car.
How does it give us more power at low voltage? Everything is very simple and very complicated at the same time. What is difficult, I will not tell, this is a huge and boring lecture on electronics and radio physics, I will explain in a simple way. The car amplifier has a pulse voltage converter - it increases the available 12 volts, to a bipolar voltage, with an amplitude of 30 to 100 volts (depending on the power of the amplifier). Thus, the amplifier itself provides the required voltage from the available one. If someone was very interested and he looked inside the car amplifier - he saw there a transformer wound on a ring of ferromagnets - this is the main part of the step-up pulse voltage converter.
Otherwise, this is an ordinary sound amplifier, almost the same as a home one.
Choosing a car amplifier.
The most common reason for installing a car amplifier is a subwoofer. For a subwoofer, we need at least a two-channel amplifier, you can use one of its channels or combine two in a bridged mode, i.e. when the left and right channels work on the same load - the subwoofer speaker.
Another variant. I do not like that the speakers start wheezing at high power. This happens when the speakers are connected to a car radio amplifier. Of course, the car radio also has its own amplifier, but it is low-power and the maximum that it can give out is up to 25-27 W per channel and do not believe the inscriptions 40-50 W or more - this is not musical power, but peak noise power, when instead of sound we get distortion with wheezing and crackling.
In this case, all speakers are connected to a car amplifier with 2 or 4 channels.
When you need the first and second options at the same time, either a five-channel amplifier or two separate ones will help.
Another important point is the presence of line outputs on the car radio for car amplifier connections... These are RCA connectors ("Tulip") located on the back of it. If you do not know if you have them and how many of them - look in the documentation or look for the name of the radio on the Internet, we are interested in the item - line outputs. They may not exist at all, maybe 2, 4, 5, etc. for more advanced instances.
If they are not there, then this is not a reason to despair, there is a way out - the car amplifier can be connected directly to the speaker output of the car radio. But of course not directly, but through a special attenuator (a device for decreasing the amplitude). Its design is elementarily simple, all that is required is 4 resistors, two with a resistance of 100 Ohm and two of 1 kOhm (kilo Ohm). You can buy them on the radio market, in a radio store, pick them out from an old TV, receiver, etc. In general, this is the cheapest and most common part of all the existing ones.
Marking: on the case of a 1 kΩ resistor there will be an inscription - 1k, or color stripes - brown, black, red, silver. On the case of a 100 Ohm resistor - k10, or 100, or colored stripes - brown, black, brown, silver. There may be resistors with European markings, in this case a 1 kOhm resistor will be labeled 102, and a 100 Ohm resistor - 101. Here the first two digits are nominal, and the third is a multiplier. The resistor connection diagram will look like this:
If there are line outputs, then everything is much simpler. For a two-channel amplifier for a subwoofer, you need two RCA for the front or rear. The same amount is enough if you want to connect rear acoustics (pancakes) to the car amplifier. If you need to separate the front and rear, you will need 4 RCA connectors (front and rear outputs, respectively). On some models of car radios, the output to the subwoofer is made in the form of 1 RCA connector. For a two-channel amplifier in bridged mode, it will have to be split into left + right.
So, a little trick if there is only one RCA line-out, but you need to connect two amplifiers or branch it to the front and rear. RCA splitters will come to the rescue. There are a lot of options for their execution, but the essence is the same - one "tulip" at the entrance and two at the exit.
 We figured out what to connect to, now we turn to the choice of a car amplifier.
It is actually not easy to choose a car amplifier among the many on sale. There are both inexpensive and very expensive. By manufacturers - well-known Hyundai, Prology, etc. and more expensive ones - Rockford, Poweramper, Kicker, Lanzar, etc. The choice of the manufacturer is yours, or what the seller will persuade you to do).
If we have decided on the number of channels, then next parameter will be - power per channel. For front / rear acoustics, it is advisable to take the channel power slightly less than the nominal speaker power, this will save it from overload and there will be no nasty wheezing. For a subwoofer - we look at the parameter connection in bridged mode, again, it is desirable that it be slightly less than the rated power of the subwoofer speaker.
The next parameter is load resistance. The load is the speaker, it has a coil resistance, the value can be 2, 4, 6 or 8 ohms. The load resistance for which the car amplifier is designed should not be less than the nominal, more can be, but not less. For example, your speakers are for 2 Ohms, and the amplifier is designed for 4. In this case, there is a great chance to "burn" both the amplifier and the speakers. Select equal values or higher speaker impedance.
SOI - or coefficient of nonlinear distortion. The sound quality directly depends on this parameter, the THD parameter shows how the signal at the output of the amplifier is distorted from that supplied to its input. For quality and premium systems, this parameter can be from 0.1% to 0.0001%. For a subwoofer, a parameter of 1% is also acceptable, because for the bass it is not critical, but for the rest of the sound range, there will already be noticeable distortions.
Frequency range. The human ear ideally hears a frequency range of 20 Hz to 20,000 Hz (20 kHz), preferably the same or wider car amplifier.
The presence of a crossover. The crossover in the amplifier has already become a familiar element. It allows you to work in different modes, subwoofer, midrange or full range.
Choice of wires.
No less important element than the car amplifier itself. We will need wires: a power supply (thick) and interconnect cable, as well as one additional wiring, later I will explain why.
The supply wire is selected based on the maximum total power of all channels of the car amplifier, and if there are several of them, then the sum of the powers of all amplifiers. For example, we have two amplifiers of 2 channels each with a power of 50 watts per channel. In total, we get 4 channels of 50 W = 200 W in total. To this number it is necessary to add another 30% - these are losses due to low efficiency and a margin. We get 260 watts, this is the power that the amplifiers will consume at maximum volume. Based on this value, it is necessary to choose the cross-section of the wire. The cross-section of the wire is selected according to the current that will flow through it. The current is also calculated simply, according to Ohm's law I = P / U, the current is equal to the power divided by the voltage. The voltage in our case is 12 volts of the on-board network. Substituting the values, we get the consumed maximum current - 21.6 A.
For a current of 10A, we need a copper wire with a cross section of 0.5 mm 2, for 15A - 0.75 mm 2, for 20A - 1.2 mm 2, for 30A - 2.5 mm 2, for 40A - 4 mm 2. Commercial wires are marked by international standard and are designated as xxAWG (where xx is a numerical designation). For our current of 21.6A, we choose a wire with a cross section of about 1.2mm 2, according to the international standard - 16AWG. never spare and take with a margin, let it be twice as much - 10AWG, in case we want to connect more amplifiers or another, more powerful one.

The interconnect cable provides the audio signal from the car radio to the car amplifier. It depends on it in what form it comes from the source, with or without distortion. Cheap cables will not bring much joy, they are thin, with poor insulation and poor shielding from interference. The wire should be well insulated, solidly shielded, with good center conductor, plus a good RCA connector.
 When choosing it is worth remembering - a good cable cannot be cheap!
Naturally, all the wiring must be taken of the length that would be enough for you to lay it freely throughout the car interior. Interconnect from the car radio to the amplifier and power supply - from the battery to the amplifier, plus about a meter.
To complete the wire epic - we purchase a fuse with a current higher than the maximum consumed (in our case - 21.6A) - i.e. the closest in value is 30A. For him, you can purchase a beautiful flask-holder, here it is no longer very important which company, the main thing is that the wire is securely connected to it.
Additional wiring must be taken of the same length as the inter-unit, any cross-section is possible, in my opinion, 0.5 mm is optimal.
Car amplifier - connection.
Usually the car amplifier is located in the trunk, in fact, you can fix it in any place you like, the main thing is that there is no moisture and high temperature there. Moisture will disable it and create short circuit, and from high temperatures it will quickly overheat, and the car amplifier itself emits a lot of heat during operation.
After we have chosen a place for the amplifier, we proceed to laying the wires.
We lay the interunit (signal) cable from the car radio to the amplifier under the car skin. There are many options and depends on the design of your car, the only desirable remark is to lay it away from the wires of the automobile on-board network. This wiring usually runs along the left side of the vehicle, so the interconnect cable is best routed to the right. Together with the interconnect cable, it is necessary to "throw" the same additional leash.
The power cable can be pulled close to the vehicle's wiring harness. It is laid from the battery to the amplifier. We place the flask with the fuse as close to the battery as possible, and the piece of wire between it and the flask should be made as short as possible, or even better - take it with a larger cross-section. Another important point, it is advisable to throw an additional wire from the battery minus to the car body. It is on the body that the standard wiring is hardly designed for the additional current consumed by the amplifier. We take the same wire that was thrown on the plus of the amplifier and duplicate the mass with it. Moreover, it is advisable to connect it to a bare metal area for good and reliable contact.
So, all the wires are stretched, you can connect. The interconnect is connected to the Line-in of the car amplifier and the Line-Out on the car radio. The supply wire to + on the amplifier, and from - (gnd) to the body, in the trunk, we also look for a section with bare metal and connect it with the same supply wire. And by the way, the time has come for that additional wiring, which I spoke about earlier. It is connected on the amplifier to the Remote contact, and on the car radio - to the blue wire marked as B + Ant. The Remote contact turns on the amplifier when + 12V is applied to it. And in the car radio - on the blue soil, when turned on, + 12V appears, although they are conceived as power for the antenna of the radio receiver, but it will also work for the amplifier. If you want to control the car amplifier yourself, connect the Remote to constant + 12V via the switch. You can take constant + 12V, for example, on a cigarette lighter.
The final connection step is to connect to the speaker terminals. Note that when bridging - plus goes to the speaker from the first channel, and minus - from the second channel. However, in the instructions for the amplifier everything is shown in detail.
Well, everything is connected, it remains to configure, check and enjoy the sound!
To adjust the car amplifier, on the front of it there are controls - switches and regulators. I'll try to briefly tell you what is what for using the example of Blaupunkt GTA-475.

Since the amplifier is 4-channel, the top row is Front and the bottom row is Rear are absolutely identical.
I'll start from left to right.
Power and Protection - two LEDs, the first one signals the amplifier is turned on, the second about the protection operation (from overheating, from short circuit in the load, from polarity reversal, etc.)
The "Bass Boost" knob - adjusts the gain at low frequencies, turn it if there is a lot or a little bass.
The "Low Pass" knob - sets the cutoff frequency at low frequencies, ie. sets boundaries. For example, you can limit the upper frequency to the subwoofer to 100 Hz.
The "HI Pass" knob - sets the lower frequency in the MF + HF mode. You can set the beginning of the range in the range from 50Hz to 250Hz.
Switch "Crossover Selector" - sets the crossover mode. "LP" - for subwoofer, "HP" - for all frequencies except LF, "Flat" - turns off all filters and the amplifier reproduces the entire frequency range, from LF to HF.
Knob "Level" - sets the gain for the input signal. If the signal is too weak, you can increase it, if it is too strong, weaken it.
"Hi Input" connector - a special input for connecting directly to the speakers of the car radio. This connector is used if the car radio does not have line outputs, in principle, the same circuit is implemented that I gave earlier with resistors. Only in this case - nothing is needed, just connect.
"AUX In" connector - 3.5 "Jack" connector for connection to signal sources.
Connectors "Line In" - two tulips, left and right channels, for connection to a car radio or other sound source.
For some amplifiers, the Bass Boost and Level controls can be made in the form of an external unit - a remote control, it is located next to the driver's seat.
Hopefully not confused. To put it simply, when you use a subwoofer - set the "Crossover selector" switch to "LP" and adjust the bass level using the "Bass boost" and "Level" controls, set the upper frequency of the subwoofer with the "Low Pass" control (usually 100 Hz is enough) ...
If the subwoofer is already installed and you connect all the other speakers, then they no longer need to play bass, set the "Crossover selector" switch to "HP" and adjust the volume level with the "Level" knob, set the cutoff frequency "Hi Pass", ie "cut off" the bass that we do not need to reproduce.
If there is no subwoofer, but just broadband (or multiband) speakers that can reproduce the entire frequency range - set the "Crossover selector" switch to "Flat" and adjust the volume level with the "Level" knob. Also, this mode can be selected when the car radio has its own crossover and can be controlled directly from the menu. This is more convenient, you will not need to touch the amplifier at all. Many car radios such as Pioneer, Alpine, etc. you can adjust the cutoff frequency for the subwoofer and the signal level and bass boost from the menu. So just turn on Flat mode.
Storage capacitor.
The accumulated capacitor is not a ponty little thing-cylinder hanging next to the car amplifier - it is an auxiliary device that helps the on-board network to more easily cope with the increased load from the car amplifier, but also a tool for improving the quality of the reproduced sound. At high powers, the voltage of the on-board network drops, this is due to the fact that the amplifier, giving high power to the speakers, consumes it in the same amount from the battery, at this moment the voltage from 12 volts can drop to 9-10 volts and below, distortions, wheezing appear , besides, the bulbs in the car can also start to "blink". The storage capacitor holds a charge equal to the voltage in the car and, at moments of voltage drop, feeds the car amplifier with its own accumulated charge, thereby stabilizing the voltage of the on-board network. It connects directly to the power terminals on the car amplifier, and again, it is zhlatno, that its wires were as short as possible and of the same cross-section.
And very important! - observe the polarity, plus to plus, minus to minus !!!

Storage capacitors for car audio differ in capacitance - 0.5, 1.0, 2.0 ... etc. Farad. Accordingly, the more powerful your system is, the more its capacity should be. A 1.0 Farad capacitor should be enough for amplifiers with a power of about 1 kW (1000 W), but a value with a margin will only be a plus.
That's it, turn on your favorite track and enjoy.
The desire to improve what you have and the pursuit of a non-existent ideal are a characteristic feature of a person. It is these qualities that allowed the human species to take a leading position in the evolutionary process, for a long time intercepting the leader's yellow jersey from primates and other mammals.
Goal setting
About car audio, good and different, connoisseurs can talk for days, and chickens will get it too. At the same time, it is far from always that the speakers really understand what they argue about with such fervor on the forums. Development modern technologies allows you to assemble in your car any speaker system of any quality - there would be a desire, and most importantly, opportunities.

In this case, it is completely unnecessary to spend long thousands to achieve a completely acceptable sound - the quality of modern devices allows you to connect an amplifier without a radio, using a phone as a Head Unit.
Car audio owners are conventionally divided into four categories:
- "Plays and okay." This is a very large category of users. They do not chase "bass" and "treble", and other bells and whistles. The speaker system in their car usually consists of a car radio, most often a standard one, and a standard set of speakers.
- Music lovers. With music lovers, everything is clear - people with manias are usually treated, sometimes with radical methods, or left alone if their manias are not dangerous for others. Fans " good sound»Understand the difference not only between high and low frequencies, but they can also distinguish by ear (or say they can) the numerical difference in harmonic distortion.
 Approximate scheme
 You can calmly grumble on this topic, because this article is unlikely to be seen by a true connoisseur of sound. Those who understand, communicate in a narrow circle of their own, and do not clog the Internet with requests with the desire to see how to connect the amplifier to the head unit on video.

- Real cool guys. A good sound in a car can be a sign of a connoisseur-music lover or a demonstration of the level of "cool". Competition in this field is actively supported by manufacturers of acoustic components and service centers offering installation services for all these audio gates, supplemented by LED backlights... It turns out very cool and expensive. True, often in order to assess the "quality" of sound at the level of "butz, butz, butz", one does not need to be even remotely understanding in this matter.
- Just people who know the price of quality things. These are those who understand that to get the right high-quality sound it is not enough to buy a fancy "head" and hang a garland of speakers in the car.
In order to get what you want, you must first determine what you want, and then set a financial bar.
Ways to achieve the goal
 It seems that it is difficult ...
 Most good way sound upgrade in the car - find those who understand this issue by virtue of their professional skills. Then the question will be only in the stress resistance of the owner and the degree of crumpledness of the haberdashery product called "wallet". If the world was so simple, it would be boring. The world would never know how to connect a four-channel amplifier to a radio if it only has one output. This is a very common occurrence in OEM systems installed in vehicles.
 Installation process
 Different connection schemes are possible depending on the radio and amplifier model. One of the possible options is to increase the line of outputs. The fact is that there are often these outputs on the radio board, but the manufacturer did not bring the connectors to the device panel.
 What and where
 Another way to solve the problem is to use adapters. There are splitters (Y-connectors) on sale that allow you to divide one line-out from the radio. Some modern amplifier models have built-in ability to connect inputs in parallel. In this case, additional purchases of splitters are not required.
 Location option under the driver's seat
 In a more neglected case, if there are no line outputs at all, the circuit that allows you to connect a 4-channel amplifier to a radio tape recorder will be as follows: you can use the signal high level by taking it directly from the speaker outputs. In the amplifier, connect to the input labeled "Hi Level Input" using regular speaker cables.
One of the most common options for car acoustics is to connect a two-channel amplifier to a radio tape recorder. This set already differs from the "play, okay" scheme implemented by head unit without an amplifier, but still far from the "bells and whistles" and really high-quality sound.
If you connect a 2-channel amplifier to the radio, you can connect tweeters and midbasses through the GU, and the rear through the amplifier. True, there are limitations in the implementation of this option: the radio tape recorder must have filters or the system will need a passive crossover for the tweeters. The advantage of such a system is that it can later be expanded by changing the GU (Head Unit) and purchasing another amplifier. Therefore, if the plans include the development of a car speaker system, then it is better to buy a separate 2-channel amplifier than a monoblock.
Outcomes
Before trying to connect anything to a low-level radio tape recorder, think about whether the device will cope with its responsibilities? Of course, you want good sound, but there is a golden rule: all components of the speaker system must match each other in terms of the quality of the sound produced. What's the use of expensive rear speakers if the "head" produces little sound. They will reproduce what reaches them, and supplement the lacking range with various “grunts”.
In contact with