A large number of users not only Windows 10, but also . Disk D simply disappears and does not appear in the list of local drives. And since in most cases the main part of the necessary and important information, there is a huge need to restore the D drive.
In this article we will tell you what you can try to return drive D to “My Computer” yourself.
Why does drive D disappear after installing Windows?
If you did not format or delete drive D during installation, then most likely the problem is the “leaving” of the local drive letter, which for some reason was not assigned to it when the OS was first loaded. This may occur due to file table corruption or an error encountered during system installation.
The best part about this is this problem easily removed.
How to get back drive D that was missing after installing Windows?
To do this, right-click on the “Computer” icon on the desktop and select “Manage”.
You can also right-click the Start menu and select Computer Management.
Go to computer management
In the window that opens, select “Disk Management” at the top left.
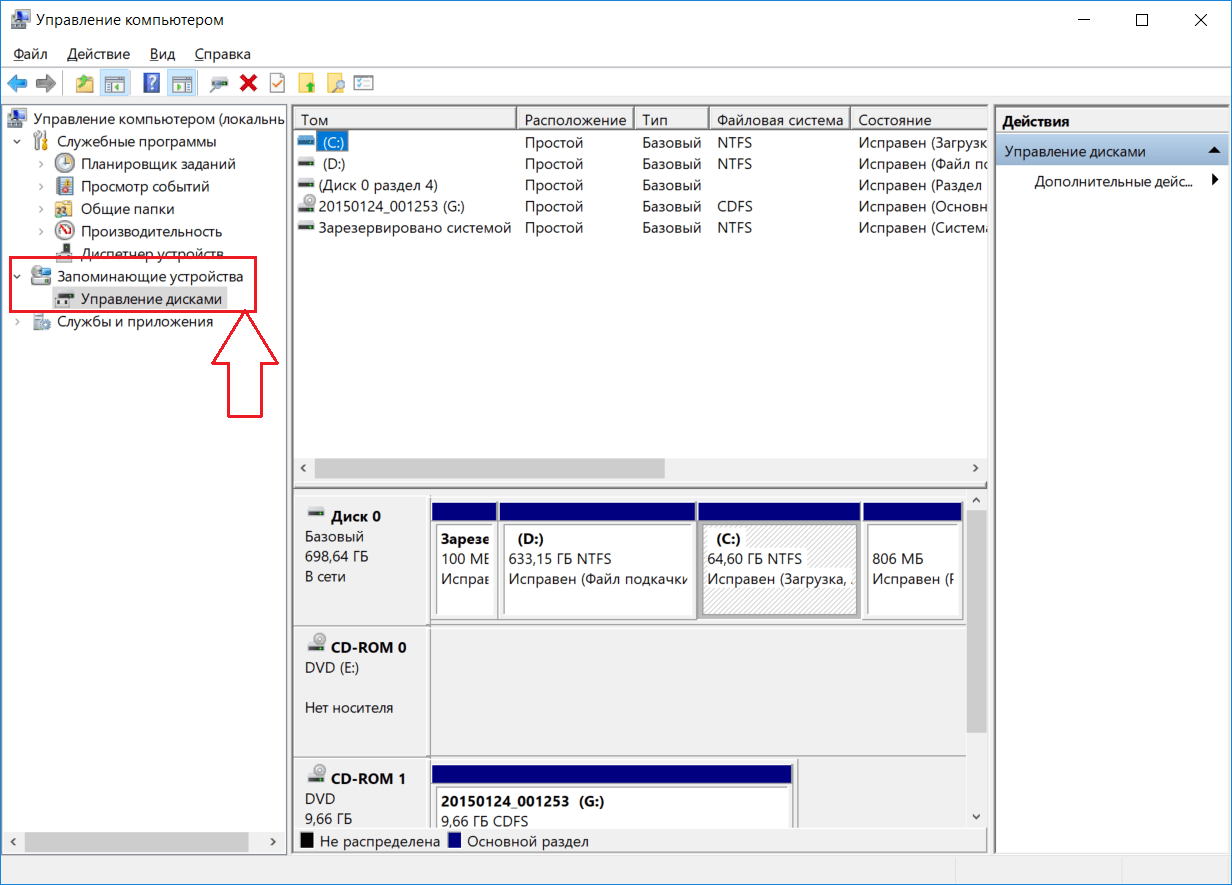
Disk management
At the bottom of this window, in the “Disk 0” line, pay attention to see if there is a partition without a letter. It looks something like this:

Finding a drive without a letter
Right-click on it and select “Change drive letter or drive path.”

Selecting a drive without a letter
Then click the “Add” button.

Adding a drive letter
And select any available letter from the disk. And it doesn’t have to be D at all, since it may already be occupied.

Selecting a local drive letter
All you have to do is click the “Ok” button, after which your missing local disk will appear in the My Computer list of local drives.
Let us note once again that this procedure is relevant for any Windows versions, including windows 10.
The best way thank the author of the article - repost it on your page
It is not surprising that Windows 10 often surprises its users with various glitches. The system was released recently, which is why the computer cannot always respond to it correctly. With a huge number of components on the market, the computer may not contain required applications, which help to interact with him competently. But what to do if Windows 10 refuses to even perform this standard function, how to determine the disk drive? Well, first of all, there is no need to panic. Any problem can be solved.
Typical reasons
Windows 10 usually does not see the drive at level software. That is, if you try to identify the drive in the BIOS, you can do this without much difficulty. The DVD may disappear from visibility for the following reasons:
- Driver failure when the computer does not see the drive due to lack of correct instructions work with him.
- Application failure when the program itself does not see the drive due to its incompatibility.
- Damage to the drive itself.
It is not difficult to guess that the first two cases can be cured on your own.
If the DVD drive itself has died, then it is easier to buy a new one than to try to revive an obsolete device.
Command line solution
You can write a solution via the command line. To do this, you need to open a special window with combinations Win keys and X. The command line can also be opened through the Start menu:
- As soon as a black window opens, you need to write the code in it:
reg.exe add "HKLM\System\CurrentControlSet\Services\atapi\Controller0" /f /v EnumDevice1 /t REG_DWORD /d 0x00000001

- Click Enter.
- We reboot the computer.
As soon as the reboot is completed, the computer will see the DVD drive again.
Using the utility
You can solve the problem with Windows 10 using a special DVD programs Drive (Icon) Repair. We do a number of actions:
- Download the program from the network.
- Once the utility is launched, you will need to click on the Repair DVD Drive Icon button.

- We expect a window of this type to appear:

- Reboot the computer as the last step.
If all else fails
What to do if the above methods do not help, and Windows 10 still does not see the DVD drive? You can safely contact the developers themselves operating system. Since Windows 10 is a product that is delivered to users, it has its own service. You can ask questions about performance on the official Microsoft website. There is also a forum in Russian, which is already full of such unfortunate users whose disk drive refuses to work normally.
And finally. You should check whether the drive is connected to the power board and communication lines at all. Perhaps the cable came loose, or during installation I had to forget about the drive altogether. Modern computer filled with a huge number of connections. It is not surprising to forget any wires during the installation of components. In most cases, the user can create problems for himself that a computer can only dream of. Therefore, it is worth checking the drive one more time before making a final fatal diagnosis.
(Visited 3,427 times, 1 visits today)
Windows Explorer has been included and comes with every generation of operating system Windows systems and went through many changes. Windows Explorer, included with Windows 10, is more than just browsing local partitions hard drive. It can be used to view files and folders on a local or even remote network. It is one of the most important components for Windows for both casual and advanced users. Unfortunately, some users report that File Explorer is getting some problems when connecting to other devices in local network. This is due to the fact that Windows service, which supports this feature, causes problems at startup. Name of this service fdPHost and is called Function Discovery Provider Host(hosted by the function provider). It should not be confused with a similar service called Function Discovery Provider(feature discovery provider) which has similar functionality. About this service Microsoft describes it as:
The FDPHOST service hosts network function discovery (FD) providers. These FD providers provide network discovery services for the SSD and Web Services - Discovery (WS-D) protocol. Terminating or disabling the FDPHOST service will disable network discovery for these protocols when using FD. When this service is not available, network services that use FD and rely on these discovery protocols will not be able to find network devices or resources.
Explorer can't connect to other devices on the local network
First of all, you need to localize this service in a service pool. Press a combination of buttons Win+R and enter services.msc, to open Service Manager in Windows 10.
Now find the service named " Discovery Provider Host" and right-click on it, then select Properties.

- If the service is already running, then click " Stop".
- Select startup type" Automatic (delayed start)".
- Click " Launch".
- Apply and OK.
- Restart your PC for the changes to take effect.

The latest version of the popular operating system was officially released in mid-summer 2015. Over the past period, many have already managed to acquire updates and this moment are the proud owners of the “ten”. However, the euphoria over Windows 10 faded after users began to notice some errors in functionality. Actually, there is nothing surprising in this - nothing is perfect. This is especially true for products from Windows, which always tries to be at the forefront, creating unique technologies and devices.
However, skilled users quickly revealed the shortcomings in new version OS. One of the most common problems that often becomes the object of complaints is the failure to recognize DVD drive. The developers even withdrew the November update, since it was after its release that the public began to be outraged and worried about such problems the most. So what to do if Windows 10 does not see the CD/DVD drive?
Why doesn't Windows 10 see the drive?
Many users of the "new thing" complain that after switching from previous version, the conductor began to selectively notice the DVD drive.
 Despite the inconsistency, when viewing using the BIOS, no glitches are observed and the CD/DVD-ROM displays as expected. The problem comes from the software component of the OS.
Experts voice 3 main reasons at this level - a malfunction of the drive driver; system failures associated with incompatibility of a number of applications and OS; the problem is in the drive itself, causing the failure.
In turn, the system may not detect the drive due to its lack of connection to motherboard or its banal physical breakdown. Problems that do not concern the repair or repair of the drive can be solved by a simple user without the help of professionals.
What can I do to show the drive in Windows 10?
It is curious that the OS developers are aware of the matter and in order to make things easier and help users, the company’s forum published several fix options.
 Fixing the problem using the command line
The first option is command line based. First, activate the line using the Win+X key combination or through “Start”. In the new dialog box you must enter the following:
reg.exe add HKLM\System\CurrentControlSet\Services\atapi\Controller0 /f /v EnumDevice1 /t
REG_DWORD /d 0x00000001
 Then press Enter. Then restart your computer. The drive is ready for work and defense.
Restoring the DVD drive icon using DVD Drive Repair
In the second method, the creators of “tens” recommend using special programs. For example, install the CD-DVD Icon Repair program (you can download it after following the link www.dvd-drive-repair.en.lo4d.com/).
 After installing it, click on the icon and check the box next to “Reset autorun setting”. Within a short period of time, the tool will eliminate existing problems, after which a message will appear indicating that the tool has finished working.
 After the message, restart your computer. When it comes to software failure, CD-DVD Icon Repair will not help you. Having noticed a mechanical malfunction, the utility will definitely inform the user about it.
 Other ways to solve the problem
In general, cleaning the system from unknown devices can also help you. To carry out such a procedure, use the device manager, in which you can rid your computer of unnecessary and unknown devices, and then reboot.
The root of the problem may also be in the drivers. This option is especially possible if you installed “top ten” with one of the two operating systems latest versions. Therefore, you need to update the drivers.
The absence of a letter on the drive can also cause a failure or “invisible” CD/DVD-ROM mode. To check the presence of a letter, follow these steps:
1) press Win + R;
2) type diskmgmt.msc;
3) press Enter.
After completing these simple steps, a disk management window will appear on your computer screen. Browse the list and find your drive. If the letter is missing, assign it.
If you own a laptop, then the ban on using the drive may be activated in BIOS settings. In this case, disable this option.
The ban can also be imposed on a PC, but such cases are extremely rare.
If you have any questions about the topic "Windows 10 does not see the CD/DVD drive, what should I do?”, you can ask them in the comments
Those users who decided to connect second hard drive to your Windows 10 computer, you may encounter problems displaying it. There are several reasons for this error. Fortunately, it can be solved using built-in tools.
First of all, you need to make sure that the disk is free of defects and damage. You can check this by connecting the HDD (or SSD) to system unit. Also make sure you have connected the hardware correctly, it should show up in the BIOS.
Method 1: Disk Management
This method involves initializing and formatting the drive with a letter assignment.

Method 2: Format using “Command Line”
Using "Command line", you can clean and format the disk. Be careful when executing the following commands.
- Call context menu on the button "Start" and find « Command line(administrator)".
- Now enter the command

and press Enter.
- Next do
- All connected drives will be shown to you. Enter
Where X– this is the number of the disk you need.
- We delete all contents with the command
- Create a new section:
create partition primary
- Format to NTFS:
format fs=ntfs quick

Wait until the procedure is completed.
- Give the section a name:

It is important that the letter does not coincide with the letters of other drives.
- And after all, exit Diskpart with the following command: