Good day to all. Once I had the idea to buy a flash drive, with which it would not be scary to go into fire or water, or to be washed with it in washing machine. I found things on the Internet for a thousand rubles and two. There was little money, the toad strangled me, I had to invent something.
I’ll say right away that the only tool I have is a soldering station, although an ordinary Soviet soldering iron will suffice. And further, there are a lot of photos under the cut!
Let's shop
 To begin with, I bought such a container in Splav. It is made of aluminum and is supposedly quite durable. The walls are a millimeter thick on the shiny side and one and a half millimeters thick on the blue side. Costs 55
rubles
To begin with, I bought such a container in Splav. It is made of aluminum and is supposedly quite durable. The walls are a millimeter thick on the shiny side and one and a half millimeters thick on the blue side. Costs 55
rubles
For sealing, we purchased a 20 W heat gun, which, although low-power and very fragile, is sufficient for our tasks. It cost me about 37 rubles Several pistol rods were also purchased from a radio store near the house. Only a quarter of the rod was needed, you can’t even count it, but to be honest, let’s say that it’s worth 10 rubles
On the inside, we disassembled a Transcend JetFlash T5 2 GB flash drive. I deliberately took something that was not very large so that it would not be a pity. For the connector also for 20 I bought a USB plug with a crimp onto the cable.
In the end I got it 350 rubles
Putting it all together

I apologize in advance for the pictures; I had nothing at hand except my phone.
First, let's deal with the flash drive. We can take it apart in an accessible way, it's all held together by glue. When you tear it away from the plate with the lever-button, be careful. It is held on by adhesive gum. As a result, we have an almost monolithic structure on our hands: 
These four contacts are a fairly fragile design; I had a sad experience when they broke off, taking half of the flash drive with them. That is why we will strengthen them with a full-fledged USB plug. 
We take any four wires (for example, two pairs from a power cord) and solder them on one side to the flash drive, on the other to the plug, and use a heat gun to fill the back side of the USB plug with glue so that it looks something like this: 
Then we thoroughly warm up the gun and fill the entire sealed container with glue and quickly insert the flash drive into it. If something doesn’t work out with the hot melt glue, you can even melt it with a soldering iron. It won't stink or burn.

The flash drive is ready!
Now tests
We will conduct a reading test like this: we will write an archive with the latest Linux versions onto a flash drive and compare md5 after each experiment.
Glass of water

Well, that's not interesting. It is written that the container itself is sealed. Let's do it this way: 
So, we take it out, test it... Everything works! Already good.
Microwave
One of the conditions for passing the tests was resistance to short-term, but quite powerful electromagnetic radiation. So we'll put it in the microwave: 
Time - 30 seconds. To be honest, I thought my kilowatt cook was going to explode. The steel ring on the body of the flash drive did not spark like a child. The carrier took it out wearing kitchen gloves. As soon as it has cooled down, we insert it into the computer, the USB hub happily blinks with a light. Everything is working. The reading test passes with a bang!
Fall from the window
Yes, we collected this flash drive, tortured it with water and terrible rays, and now we just took it and threw it out the window... from the 15th floor. It hit the grass (I should have thrown it into the asphalt).

I go downstairs, find the poor fellow in the grass, and carry him home. I connect it - it works. MD5 is correct.
After that I decided to test it for recording. Recorded it on her boot image ubuntu. On another computer I boot from it. Successfully.
Boiling
I poured hot water into a saucepan, brought it to a boil, threw the device in, and cooked for 5 minutes. The result was a wonderful soup that did not lose a single gram of its information value:

I didn’t want to get it out with my hands, so I threw it into the sink and under cold water, like pasta. After connecting to the computer, it turned out that the flash drive was in good condition, all tests passed perfectly (I already installed Ubuntu from it on my laptop).
Here is a little experience in sterilizing drives (unfortunately, it only helps against real viruses, not computer ones :)).
Cooling-heating
A small simulation of winter operating mode, when we bring the device home and quickly warm it up to room temperature.
The flash drive lay in the freezer for 20 minutes in freezing mode, then was quickly heated in a bowl of hot water.

After this experiment, no one was harmed, the data was both read and continued to be read. The recording is also flawless.
That's all! Thus, we assembled a protected flash drive for 350 rubles and, as a bonus, we have a cheap glue gun. Now our data will be safe. Good luck!
In this video I will show you an idea on how to make your own USB hands lighter from an old flash drive! It’s very easy to do your own modding of an old flash drive at home! In order to modd an old flash drive and turn it into USB flash drive- a lighter will not be difficult! But, for that you will 100% stand out from the crowd with such a unique device! With this little trick you can diversify a simple, ugly old flash drive and turn it into a stylish USB flash drive lighter! Such interesting idea and with some cunning you can diversify a simple, ugly old flash drive and turn it into a stylish USB flash drive - a lighter! **************************************** ********** I welcome you to my Roman Ursu channel, where you will learn how to make homemade items, New Year's crafts, gifts, toys, scarecrows for Halloween, and most importantly, that all this can be done at home and with your own hands! Are you into needlework, homemade items, or just have nothing to do? Then you have come to the channel you need, here you can find a lot of homemade items, crafts that you made with your own hands, and the main thing is that they are all made from improvised means and at minimal cost! **************************************** ********** main channel: http://www.youtube.com/user/romanursu my second channel: https://www.youtube.com/user/romanursuvlogs Vkontakte community: http://vk.com/club59870517 Odnoklassniki group: http://www.odnoklassniki.ru/romanursu Attention! be careful and do not repeat this at home, the author is not responsible for your actions, this is an entertainment video and not an education or call to action! ATTENTION!!! - my channel is for decent people: for swearing, shortened or modified swearing, for insults and “trolling” - I WILL BANK!!! **************************************** ********** Channel of Ilukha “Zveriyo”: https://www.youtube.com/user/3BEPbEnokia In this video I"m going to show you an idea of making a USB lighter with your own hands out of an old flash drive! It"s very easy to make a modding of an old flash drive at home! It"s quite an easy job to do a modding of an old flash drive and turn it into USB flash drive-lighter! There's a 100% chance to be unique with having such a device at your disposal! With such a little trick you may vary an old plain flash drive, and turn it into a stylish USB flash drive-lighter! Such an interesting idea and trick will help you to vary an old plain flash drive, and turn it into a stylish USB flash drive-lighter Welcome to my channel Roman Ursu where you will learn how to make hand made crafts, New Year crafts, presents, toys, Halloween scares! . The main thing is that one can make it at home and with one's own hands. You are interested in handiwork, craft or you just have nothing to do, haven"t you? You have found the channel you really need. Here you can find lots of crafts, hand made items, and the main thing is that they all made of make-shifts and at the lowest cost Main channel.
A beautiful, interesting flash drive looks much nicer and attracts people's attention. A funny flash drive is pleasant to hold in your hands. In order to make an interesting designer flash drive, you don’t need a lot of time and money. And the result of the work lives up to expectations. Especially if the old flash drive is already worn out and it is very desirable to update it.
To remake a flash drive, you need a new case. This video uses a hollow cow. Electronic components will require a 300 Ohm resistor and a red LED.
First you need to disassemble the contents of the flash drive. Having freed it from the old case, we prepare the flash drive for placement in the new case. We mark the desired place on the cow to divide into two parts. In this case, you need to focus on the connector.
If the new body is hollow, this makes the job easier. Otherwise, you will need to additionally prepare space in the case to accommodate the electronics and connector. Cutting the cow. Let's make holes in the toy in the area of the eyes and mouth. When our device is plugged into the computer connector, the cow's eyes and mouth will glow red from the LED. This is the interesting idea behind this craft, which we decided to make ourselves.
Next, we connect the positive contact of the LED to our resistor. In order not to confuse the polarity, follow a simple rule - a large cup is a minus, a small cup, respectively, a plus. After this, we need to connect the positive contact to the flash drive on the first leg on the right, and the minus contact on the last fourth leg.
Now you just need to carefully secure the board with glue in the new case. To do this, you need to carefully place the board in the case and fill big amount hot melt glue. If desired, you can equip the lid of the updated designer flash drive with a magnet. With this it will close perfectly after use.
Do-it-yourself flash drive modding.
Creating unusual cases for flash drives has long been a separate trend in modding. Many craftsmen work exclusively with flash drives and, moreover, even sell their mods through online stores and auctions. It would seem like an ordinary compact USB drive - why exactly has it become so popular? Before the advent of flash drives, almost every PC was equipped with a floppy drive for reading and writing floppy disks. Unfortunately, floppy disks were not very convenient and significantly limited the capabilities of users. A flash drive has become a step forward - a compact device, characterized by reliability, lightness and the ability to accommodate a large amount of memory. A flash drive has become a constant companion for many people, because carrying discs or bulky external HDDs It’s very inconvenient and it’s much easier to take a neat keychain that stores all the necessary information. Since this thing is always at hand, many began to think about external design and USB drive style. Modding a flash drive does not require a huge amount of materials, a lot of money and time. There are a huge number of ways to decorate your flash drive or make it a full-fledged custom case with a unique design, and many are within the capabilities of even beginners and inexperienced modders.
Modding flash drives in steampunk style.
Steampunk appeared relatively recently, but its popularity is only growing with each passing year. Many designers have even begun to focus exclusively on steampunk, as the demand for such unusual and original things is growing at a tremendous speed. Steampunk style occupies a special niche in flash drive modding. Particularly popular is the direction of alternative historical steampunk, which is based on stylization of the real historical world of the 19th - early 20th centuries.
Modder Rob Smith, also known under the nickname Back2root, became famous in the foreign modding scene precisely thanks to his high-quality work on creating custom cases for flash drives. For all his mods, he uses wood, elements from old mechanical watches for styling, and small inserts of copper and brass. Each USB drive has an interesting design and convenient housing. Here, for example, is a stylish flash drive capable of storing up to 16 GB of information in a new case in the steampunk style:


Almost all flash drive mods from Back2root have a similar body design. First, the modder removes the flash drive from the standard case, then makes a wooden base, and all the decorative elements are attached to this base. Here are some more photos of this modder's most interesting projects:


It is worth noting that Rob Smith is also involved in modding very compact flash drives. An example of such modding was a stylish pendant in the steampunk style. Inside there is a 4 GB flash drive:


All the projects in the photographs above relate to modding flash drives in the steampunk style, which is especially popular among both Western modders and domestic craftsmen. Modder Shipton Bellinger, whom we talked about in detail in one of our articles, is also interested in steampunk mods of USB drives. It works according to the same scheme - first a wooden base is made, then the body is decorated with additional elements, but there are some differences from the works of Rob Smith. For example, as you've seen, Rob Smith installs decorative elements inside the wood base, while Shipton Bellinger prefers to attach them directly to the surface. Another, no less important difference is that Rob’s projects belong more to the clockpunk style, since they use exclusively elements from mechanical watches for decoration, while in Shipton’s fashions you can see copper tubes and a huge number of movable handles and rings. Otherwise, it’s easier to look at everything with your own eyes:


The modder also known under the nickname BasementFoundry has been collecting neat and stylish flash drive mods in the steampunk style for many years. The main rule of his projects is that the body should not only be beautiful, but also comfortable. That is why the modder practically does not use additional decorative elements in his projects. The base is most often made of a copper tube, sometimes durable glass is used. So, let's take a look at one of the most popular projects of this modder. Copper tubes, which at first glance seem completely unnecessary, actually serve as latches for the flash drive cover. Especially for this, the modder cuts out a small elastic band of the required diameter for the lid:


Of course, while talking about modding flash drives in the steampunk style, we couldn’t forget about Steamworkshop, which makes stylish mods to order and puts many of its works up for sale through online stores. Like many modders, Steamworkshop has its own, one might say, unique style of modding flash drives. Many techniques are used from project to project, but let’s not get ahead of ourselves and look at the projects in more detail. The main materials for modding are copper, brass, durable glass and many additional decorative elements - from gears from mechanical watches, to various springs, small screws and rivets. The modder supplies most mods with rubber gaskets, which makes them waterproof. Almost every flash drive from Steamworkshop has a window cut out in the case. Through it you can often see a small quartz crystal illuminated by an LED (this touch has long been a kind of calling card of Steamworkshop), but in new projects the modder has tried to change established traditions and experiment not only with the shapes of cases for flash drives, but also with ways of stylizing them. So, let's take a look at the photos:


Often, modders use some old, seemingly unnecessary things as a basis for the body. So did Steampunknation. He used an old vacuum tube to create a custom flash drive enclosure. Inside, the drive was covered with a fine metal mesh and also illuminated with an LED. The result is stylish and original work. The only drawback of this project is the relatively fragile body.


A modder under the nickname autumnsteam also sometimes works with flash drives. The main difference between his works is the use of old brooches and pendants. He is especially good at fashioning compact USB drives - the base is made of a thick sheet of metal, and decorative elements are attached to it:

https://www.liveinternet.ru/users/megaline/post180072730
Hello my friends. Today we will not consider any diagrams of certain designs; the topic for today is the so-called homemade flash drive. Some, of course, may not believe that this is possible at home, and they are right to do so, since it is quite difficult and practically impossible to do at home without special equipment. But smart people They invented a memory card for mobile phones a long time ago. In stores you can easily find an adapter with which a memory card can be connected to a computer via usb port. This adapter costs only $2.
The device works very simply - you just need to place the memory card in a certain place on the adapter, and the adapter itself is made in the form of a USB plug that just needs to be connected to the USB port of the PC. For our homemade flash drive you need to have just such an adapter with a memory card from mobile phone and another plug or corresponding plastic case for USB.


Then we place the adapter in the plug housing and close the lid and see what we got.

Now it looks like a cut-off USB plug, but no one will even suspect that there is a memory drive there! Now it's the turn of the schematics. There are 4 wires, we remove a small part of the insulation from the wires in advance and tin them. Next, we take a couple of brand new parts (it’s better to take damaged ones, but so that they look like new) and solder them together. There is no specific circuit here, solder whatever you want, the design just has to look like a circuit, of course it won’t work! You can use capacitors, resistors, polar and non-polar capacitors and a couple of transistors; as you know, some flash drives have a built-in LED indicator on the back; you can get a simulator of such an indicator so that our homemade flash drive looks believable and does not raise doubts.

To do this, an unpacking of the USB socket and plug is attached to the article; power is supplied through the side channels, which needs to be connected to our wires, then assembled the simplest scheme flashers for one LED, in this case we still have two more free wires to which we can attach a pre-made<блеф>memory storage circuit. So, let's summarize - we have a rather interesting design, when connected to the computer's USB port, the LED will begin to blink and for strangers it will give the feeling that a flash drive is connected, but they will be more surprised when the computer notifies that a memory drive is connected to it! Yes, everyone will believe that you are a genius and will ask for a diagram of such a simple miracle flash drive. Try to make the connection diagram of the parts as confusing as possible, so that even the master does not suspect what is being deceived. Well, that’s all, you can see such interesting things in further articles, goodbye friends - Arthur Kasyan (AKA).
We welcome all beginners as well as experienced life hackers on this site!
We have an electronic magazine in which we write various interesting articles about useful gadgets and unusual concepts. We also look into the future or make the present more interesting, beautiful and useful. Read the next article of the electronic magazine.
Almost everyone has USB flash drives today. But despite all the diversity, the range of housings for such devices is quite limited. Why not make a case for the flash drive yourself? It's not as difficult as it seems, you just need to spend a little time. But you will become the owner of a unique thing.
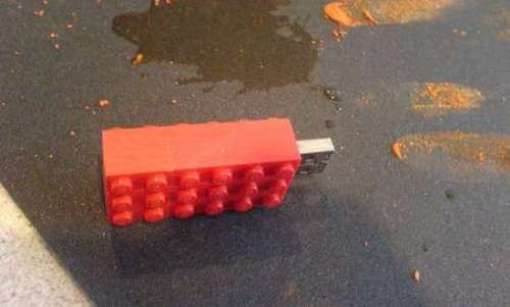
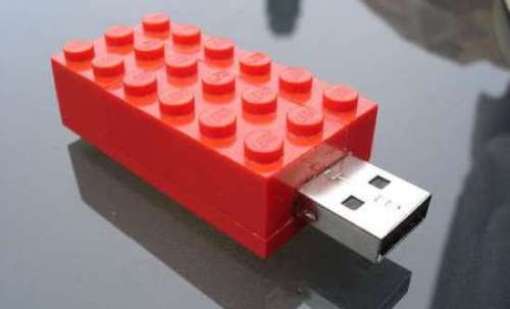
So let's get started! Following the step-by-step instructions, we will make a case for our USB flash drive from bricks from Lego children's construction sets.
 This is what she will look like
Tools and materials
Penknife
Pliers
Several Lego bricks
Super glue
Sandpaper
Metal polish
Flash drive
Step 1: Body Base
 Internal elements are broken
USB memory cards are available different sizes. We will be packaging a fairly large board. Therefore, we will need a Lego brick of 6×3 cylindrical seating elements (let’s agree to call them “dots”).
Using a penknife, you need to trim all the internal partitions of the brick, and then break them out using pliers.
We use two more low-profile bricks with dimensions of 4×2 and 2×2 “points” to create the lid. Also for the lid you will need a low-profile element 1x6 “dots” (for the lid you can use other combinations of construction parts, or you can simply take exactly the same brick as for the base of the body (6x3) and carefully cut off its upper part with a jigsaw parallel to the horizontal plane).
Using superglue, glue the lid elements together to create a part measuring 6x3 “dots”.
Step 2. Install the board
 Board in case
At the end of the case we cut out a groove for the USB connector, and after a little adjustment using a penknife we install the device into the case.
Step 3: Mounting the board
 Fill the body with silicone
We place brick scraps on the bottom of the case and ensure that the board is parallel to the horizontal plane and does not press through. We fill all the remaining space in the case with transparent silicone, sealing it to reduce the possibility of any movement of the flash card inside the case.
It is important to use transparent silicone, since the indicator LED will need to shine through it.
Step 4. Gluing and polishing
 Cleaning the edges
 Polishes of different abrasiveness
To ensure that there are no gaps between the lid and the body, take sandpaper, place it on a flat surface, and level the bottom plane of the lid on it.
After we have glued the lid to the body with superglue, using the same sandpaper we remove burrs and glue smudges from the side edges of the body.
Then we finally polish the body with polish.
Step 5. Completion
 The case is ready
 Compare your exclusive and mass consumer goods
 Looks stylish!
But the creative possibilities for creating exclusive flash drives do not end there. On the contrary, there can be an infinite number of types of cases for them.
Look what other craftsmen have done.

Do you have an original flash drive? What ways of individualizing this mini-media do you know?
Meanwhile, the mini-magazine still contains some unread curiosities: a visionary video about the medicine of the future; gadgets - stationary cellular telephone and a bottle for tourists to disinfect water. and don't miss anything!