When you install Windows 10, the system asks you to create and configure a user account, or more precisely, a local administrator. However, the account you created is not the only one. During the installation of the system in stealth mode, another administrator account is automatically created with higher privileges and access rights. In particular, it is not subject to the mechanism UAC, therefore, all applications launched with rights "global" administrator are performed bypassing this security system.
The hidden administrator account can be used to install drivers, unsigned programs, and perform various settings that require elevated access rights. However, it is recommended to use it only in extreme cases, and be sure to turn it off after performing the necessary actions. There are three main ways to enable the hidden administrator account: via command line, via local policy editor and with the help of equipment . Let's look at them in order.
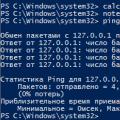
The first method is the simplest and most convenient. Open as administrator command line and run the command net user Administrator /active:yes in it. If suddenly you receive a message "Username not found" , it means your hidden admin has been renamed or you are using the English edition of Windows (the message will be in English). In this case, check the admin name by immediately running the command. By default, the hidden administrator account does not have a password, so we strongly recommend that you set one using net commands user Administrator password , having previously replaced "password" to your password.

With local editor group policy everything is just as simple, just a little longer. Open it with the command gpedit.msc and follow the chain Computer configuration -> Windows Configuration -> Security Settings -> Local policies -> Security Settings , on the right side of the window, find the option "Accounts. Administrator account status" And turn it on .

It will take approximately the same amount of time to enable the administrator account through the snap-in "Local Users and Groups". Open it with the command lusrmgr.msc, expand the section "Users", on the right side find the entry "Administrator" and double-click on it, uncheck the box that opens "Deactivate account" and save the changes.
After Windows XP in the distribution of account rights Windows entries significant changes have occurred. If earlier there was an account for a simple user and an administrator (the first had limited rights, and the second had all powers), now everything is more complicated.
In Windows 10, an account can be given administrator rights, but these rights are limited: when launching applications, you need to give them administrative rights separately, all actions with system settings are constantly controlled by UAC (i.e., User Account Control), this service is precisely responsible for requests to make changes to the computer in windows on dark background. In addition, some administrative actions are still unavailable, because... There is a “true” administrator in Windows, but his account is disabled by default, because has the broadest powers, is not controlled by UAC, and its use in everyday work significantly reduces security. The article will tell you in detail how to activate the Administrator account if you cannot do without it, and how to disable it again so as not to endanger your computer.
It is universal and quick way, which allows you to enable an account in any edition of Windows 10. Other methods may not work in the home edition of Windows 10.

Using the Computer Management tool
If you prefer GUI Windows, enable the Administrator entry through Account Control.


Using the Local Policy Editor
There is another way to activate the built-in Administrator account by changing the system security policy setting. Ultimately, it doesn't matter how you activated this account.
Administrator rights in Windows 10 are required for the user to perform certain actions: changing standard and installed programs, optimization of system operation, access to all files stored on the computer.
How to get administrator rights in Windows 10
You can enable elevated privileges in Windows 10 in several ways.
Important! Home version users will not be able to use all of the available options described below.
Using the Command Line
This method is universal for everyone Windows versions and is considered the simplest. Launch an elevated Command Prompt. In the window that opens, enter: net user administrator /active:yes. With an English-language OS installed, the command is written as follows: net user administrator /active:yes.
Healthy! There is no default password for this entry, so it is worth setting one. You can do this using the command: net user Administrator * in the Command Line, repeating the password twice.
Local Security Policy utility
In the Run window, enter the command secpol.msc.
Healthy! An alternative option for launching the Local Security Policy utility: Start -> Control Panel -> Administrative Tools.
After this, follow these steps:
Open the “Local Policies” branch –> Security Settings –> select “Accounts: State “Administrator”” in the right window
This option is disabled by default. Double-click on it and set the marker to the “on” position.
Using the Local Users and Groups utility
lusrmgr.msc. In the window that opens on the left, select the “Users” section. A list of all computer users will open on the right side. On the Administrator's entry, double-click on it and uncheck the "Disable" account" After this, save your changes.
Computer Management utility
Run the command in the Run window compmgmt.msc. In the window that opens, in the tree list, follow the path:
Computer management –> Utilities–> Local users –> Users –> select the Administrator line and double-click on it
In the window that opens, uncheck the “Deactivate account” menu.
Video “Windows 10 Administrator Rights”
The video shows in detail how to enable superuser rights with Help command line and utilities Local users and groups.
How to remove an administrator account
Disabling is performed in the same order for each item, but instead of enabling, the parameters are deactivated. If using the Command Line, enter: net user administrator /active:no (in the English version - net user administrator /active:no).
Important! You should use an account with elevated privileges only in extreme cases. It is not recommended to constantly work from under it, or leave it on for a long time.
Login
To log in as an Administrator, restart your computer. The entry will become available on the Windows 10 login screen.
Conclusion
There are several ways to enable Administrator rights. A universal option is to use the Command Line. But working under this account on a permanent basis is not advisable!
Microsoft is investing in its operating Windows systems many different hidden functions, which users may need to solve highly specialized problems and correct system errors. There are situations when it is not possible to use the created administrator account on the computer. This problem may occur due to system errors, forgotten password or for other reasons. Windows 10 has a built-in administrator account, and below we will look at how to enable or disable it if necessary.
How to enable the built-in administrator account in Windows 10
The built-in administrator account may be required for one reason or another when the computer starts and the user is able to use Windows, or when operating system does not boot, for example, the computer freezes after entering the password for a regular account. Below we will look at options on how to enable the built-in account in both situations.
When Windows is running stable
If the computer user has the ability to log into an administrator account, then he can enable the built-in account quite simply using the command line. To do this you need to do the following:

Then you can close the line and switch to the built-in administrator account. This is done by simply changing the user, that is, you need to click on the “Start” button and then switch between users, selecting a new active administrator.

You can also restart your computer and log in with a new account, or log out and select the built-in administrator profile when logging in. It is important to note that to log in as an administrator, you will not need to enter any password.
If Windows is unstable
If it is not possible to log in as an administrator account on your computer, but you need to activate the system account, this can also be done. The method described below will be useful, for example, if you have forgotten the password for the current administrator account or the computer freezes when logging into it. To enable the built-in administrator account when you can't log in, you need to:

By activating the administrator account via command Windows string in the recovery environment, you can restart your computer in standard mode, and a new account will appear in the list of users.
How to disable the built-in administrator account in Windows 10
After solving the tasks for which the computer administrator account was activated, you can disable it so that it does not interfere with the list of users when loading. This can also be done via the command line, in which you need to write:
Net user Administrator /active:no
After executing this command, the account will be disabled.

It is worth noting that you can disable the built-in account only if Windows is running with administrator rights, but from a different account.
Note: We do not recommend working using the built-in administrator account as the main one. This is due to the fact that a number of functions and programs may conflict with it. For example, you might encounter a "Cannot open application" error that appears when you launch standard programs, such as Microsoft Edge, Windows Store, Xbox and others.

As in other Windows OS families, after installing them, we create our own account or log into an account that has already been created. So we get some rights. But not everyone knows what's in progress windows installations An interesting administrator account is created. To avoid problems it is disabled. Now we will talk about how you can enable this account in Windows 10 and how to disable it later.
So, since Windows XP, this account was simply hidden and users did not see it, then, starting with Vista, the administrator account was blocked. It provides unlimited possibilities, that is, you have access to absolutely all functions, it does not work, and running programs as an administrator is not required.
Even if the account is blocked, there are ways in which we will try to enable it.
Via command line
This method is the fastest and most convenient; it will be easy for those who have already worked with the command line. So, run it with administrator rights and run this command:
net user administrator /active:yes
If the command is not completed, a message may appear: name not found, then most likely the account has a different name. To display all accounts, you need to enter the following command on the command line:
net user
As you can see, our account is called “Administrator”, then to activate it we enter the command:
net user Administrator/active:yes
net user Administrator *

Local users
So, open the Local Users and Group window. You can type the name in the search or press the keys Win+R and enter the phrase in the window that opens lusrmgr.msc. A window will open in which you expand the “ Users”, double-click on the administrator account, if anything, it says “Administrator”, then uncheck "Account is disabled" and save the changes.

As you can see, everything is also very simple, the main thing is to remember that the user and group policy is not available in the home edition of Windows 10. And from the window where you enabled the administrator, you can also set a password for the account.
Local Policy Editor
Now let’s use the local policy editor, open it like this: click Win+R, and then enter gpedit.msc. Or, you can enter this command: secpol.msc. Next, we follow this path: Computer configuration → Windows Configuration → Security Settings → Local policies → Security Settings. Now we search and edit the policy “Accounts: Administrator account status”. And click enable or Enable.

How to disable the administrator account
In order to disable the admin account, it is most convenient to use the command line. Open it as administrator and enter the command again, only now instead of yes, it will be no:
net user administrator /active:no
If the OS version is Russian, then the command is as follows:
net user administrator /active:no
That's all. And in the following articles we will look at how you can use this account.