In this article I will tell you about a way to automatically save once a day last changes of your files in Windows 7, in case you accidentally delete some desired document or, for example, change it and save it without leaving an old copy. This method consists in preserving previous versions of files using the built-in function in Windows "System Protection", that is, by creating restore checkpoints.
In the case of deleting files from the computer, the "Recycle Bin" usually helps, into which the file is placed before the final deletion. From there, you can always restore the file and continue working with it. However, there are several nuances here:
Firstly, the volume of the basket is limited (it is configured by the user himself) and some large files will not always be deleted immediately, past the basket.
Secondly, the trash can be emptied as a result of careless work in any programs to optimize the system, or you yourself can empty the trash, and then remember that there was something important :)
Thirdly, in Windows, the Recycle Bin is sometimes buggy, and when you open it, you may sometimes not see any files, although they actually are in it.
Therefore, completely relying on the Recycle Bin in the sense that it will save all your files from accidental deletion is definitely not worth it ... Well, in the end, the Recycle Bin will not save your file in any way if you accidentally changed it, then saved and after a while you suddenly needed original copy of the same file (for example, if you made the wrong changes and you need to take the original file and start over). After saving the file, there is no way to bring back its standard copy.
To have additional protection of your files from loss or unwanted, unnecessary changes, in Windows 7, you can use the "System Protection" function. This feature is part of the system restore tool. Windows has a special program that constantly monitors the state of the system, monitors its changes and saves important changes in the form of restore checkpoints. Thanks to these restore points, Windows can be restored to one of the previous states, for example, last day, week, month (depending on which restore points were created).
Learn more about how to restore Windows to a previous state in a separate article.
In Windows 8 and 10 there is a simple and convenient "Backup Service" function for setting up a full-fledged Reserve copy selected files and folders to another HDD at the specified time. This is described.
In addition to the fact that the system protection function monitors the system parameters and records the change in special restore checkpoints, it can also track changes in files, which are also recorded in checkpoints, which allows us to then view the history of each file.
There is an important point. You can only see previous changes if a restore checkpoint was created in Windows prior to those changes. For example, you deleted a file from your desktop and up to this point a restore checkpoint was created. This means that you can then look at the previous versions of the files in the desktop folder and see the file you deleted there. If a restore point was not created before the file was deleted, you cannot restore it.
The same goes for changes to files. For example, you made some change to a file, saved it, and then wanted to restore the original version of that file. This can only be done if a recovery checkpoint was created before the changes. Those. you will get 2 versions of your file: the one that was saved when creating the checkpoint and the file you modified.
The function of saving previous versions of files is not a full-fledged backup, because, firstly, checkpoints will be created on the same disk where the original files are stored. This means that in the event of a sudden failure hard disk, you will lose the files along with their saved previous versions. Secondly, in the event of a system failure, you can only restore the previous versions of your files by restoring the system to a working state!
Configuring the preservation of previous versions of files
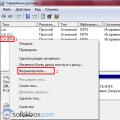
To enable the preservation of previous versions of files, go to the "System Protection" section.
This function can be quickly accessed through Windows Search by typing "Create a restore point" there. In the search results, you need to open the found variant of the same name:
More details on how to use search in different versions of Windows are described.
You can also manually open the section you want by going to Start> Control Panel>> System and Security> System> System Protection.
In the "System Protection" window from the list (1), select the local disk for which you want to enable the ability to save previous versions of files and click "Configure".
At the top of the window, select one of the options: keep both system settings and previous versions of files, or only previous versions of files (1).
In the first case, when creating the next checkpoint, Windows will save not only your files, but also the system parameters, which will allow you, in the event of any failures due to incorrectly configured parameters, to return the system to the state when these failures did not exist.
Below, using the slider (2), you need to specify how much space as a percentage of the total space on the selected local disk will be allocated for storing previous versions of files and system parameters (if you chose the 1st option above).
Remember that if the allocated free space for storing checkpoints runs out, the old checkpoints will be deleted.
Click "Apply" and "OK" to save the changes.
If there are several disks, then you will need to separately select each disk from the list and enable the preservation of previous versions of files!
How can I view previous versions of files?
If you are viewing previous versions of a file, the window displays a list of versions of the selected file, indicating the dates of changes. To see the changes in the file, you need to select it and open it by double-clicking (or by the "Open" button at the bottom). So you can look different versions the file you want and find the one where you made the changes you want.
To restore the selected version of a file, the easiest way is to drag it with the mouse from this window to the desired folder. The file will be restored immediately. If you click "Copy", an explorer will open, where you can select a folder to restore the file. And if you click "Restore", the file will be restored to the same folder where it was previously, and if the same file (of a different version) is already located in this folder, then it will be replaced by the version you are restoring.
If you are viewing previous versions of a folder, then the window will accordingly display all the changes saved in restore points in this folder.
Likewise, by opening different versions from this window, you can find the one you need and restore.
How do I change the checkpoint schedule?
By default, checkpoints where changes to your files are saved are created in Windows 7 every time you turn on your computer and at 0:00 every day.
This means that changes to your files will be saved twice in the specified periods. That is, if your file, for example, is changed during the day and you want to return these changes, then you will not be able to do this, since restore points are not initially created for you in the middle of the day.
You can always change the schedule for creating recovery points to your own. For example, initially set time 0:00 - may be pointless for many, because not everyone is already using a computer at this time of day. And if the computer does not work at the specified time, then the checkpoint, respectively, will not be created.
In order to change the schedule, you need to use the built-in Windows program- task scheduler.
Open the task scheduler by typing in Windows search the word "Scheduler":
On the left side of the Scheduler window, open the following path: Task Scheduler Library> Microsoft> Windows> SystemRestore.
A job named “SR” is displayed in the center of the window. Right-click on it and select "Properties".
You can view and change the current schedule for creating recovery checkpoints on the "Triggers" tab (1). It is better to leave the task "At startup". But the task "Daily" can be changed by specifying a different time for the creation of points. Select “Daily” (2) from the list ”and press“ Change ”(3).
In the settings window that opens, change the time after the word "Start" to your convenience.
It is best to choose the time when your computer is most likely to be turned on. Click "OK" to save the changes.
You can manually create a restore point at any time, if necessary. To do this, in the already familiar "System Protection" window, you need to click the "Create" button.
And in the window that opens, specify any name for the checkpoint and click "Create" again.
In a few seconds, the point will be created!
Through the task scheduler, you can configure the autostart of any programs on a schedule, for example, when you turn on your computer. This is discussed in a separate article.
Conclusion
As a result of the performed manipulations, you will have a checkpoint every day at the time you specify, and as a result you will receive a backup copy of your files for every day. However, you should not confuse this method of saving previous versions of your files with a full-fledged backup, because a full-fledged backup is always done to a separate hard disk so that files are not lost even if your main disk fails. In Windows 7, unfortunately, there is no way to configure quick creation previous versions of files using a scheduled backup to another hard drive. In this Windows, is there only such a simple option with recovery checkpoints, which was described in this article, or the ability to create an archive with the necessary data, which is already in a reliable way backup and will be discussed in a subsequent article.
The File History utility in Windows gets its name from its ability to restore older versions of a file. This feature is part of all backup programs, although it is often referred to as "Restore". Although the idea is the same: you remove from the backup archive old version file. The "File History" function simplifies this process and work with files in general.
In order to return an old version of a file from a backup disk, you need to follow these steps.
- If you need to replace current version new: Select "Recover" and then "Replace file in Destination Application". The current file is overwritten with the backup.
- In order to save both the current version and the restored backup, you must click "Restore" and select "Restore to". Select the target folder for the recovered file.
- To view the archived copy: click "Open". The file has not been restored, but you can view its contents to see if it contains the information you need.
4. Then click to close the Properties window when done. If there are no previous versions, you will see the message “There are no previous versions available after step 2. This means that the file is new and has not been copied, that the file has not changed, or that the backup of this file does not exist. The File History utility is not a replacement for recovering a file from the Recycle Bin; if you delete a file, you need to restore it from the Recycle Bin.
File history only works with files in the folders that you selected when configuring the utility.
Video: How to Recover Unsaved or Damaged Microsoft Word, Excel or PowerPoint Document
You have probably heard about the Android operating system, unless you yourself are the owner of a device running this shell. A good part of gadget owners liked this platform and is the most widespread OS among mobile devices... Since 2009, when the first version of the "robot" was released, the developers did not stop at improving and modifying their brainchild. New versions and updates are released regularly. But do you always need to update your device and how to return the old version of "Android" after the update? We will talk about this in this publication.
Why updates are needed?
First of all, for the proper operation of the system. The developers optimize performance, improve the interface, fix lags, because it is almost impossible to release a perfect system right away, and minor faults will be noticeable only during it active use... In most cases, you can find out about the appearance of an update using a regular message that appears in the notification line. You can make an upgrade by going to the update center, downloading and installing the new version.
Why might gadget owners be unhappy with the update?
In most cases, after the update procedure, the device should work faster, and all the flaws should be a thing of the past. All that users can complain about is some changes in the interface or, for example, the disappearance of shortcuts from the desktop (accordingly, the applications themselves disappear). This is due to the fact that installed programs are already outdated and simply do not match the new firmware.
New versions of applications or their analogues can still be found on the Play Store, and trying to return the previous version of the OS due to the loss of old applications is a rather stupid idea. What else can annoy owners in new version firmware is the appearance of some programs that cannot be removed. For example, it can be new services from Google. And then users all over the world begin to think about whether it is possible to return the old version of "Android". But most of those who want to return to the old firmware are among those who tried to reflash their device on their own. Here, a huge variety of problems may appear, up to the fact that your gadget may turn into a "brick", that is, stop showing signs of life altogether.
So before performing such manipulations, make sure that you have enough knowledge and experience, and best of all, contact a professional. Reflash the device only in extreme cases, when you cannot do without it, because such a procedure will completely void your warranty. But you can still return the previous version.
How to return an old version of "Android" after an update?
To begin with, accept the fact that standard system resources do not provide a system rollback option, as in Windows OS, for example. Accordingly, when you return to the old version, all installed programs and personal files will be deleted. Therefore, immediately before the procedure for returning the old version, make a backup copy of all important documents, files, phone numbers, and so on. Be prepared to say goodbye to user settings, saved accounts or applications, they will erase everything except the built-in ones.
Next, you will have to perform a factory reset yourself. How to do this depends only on your version of the operating system, but most often this item is found if you go to "Settings" and "Restore and Reset". Also, this parameter can be found in "Confidentiality". Finding a factory reset will be easy anyway. Next, you will need to perform a number of steps a little more difficult, that is, enter recovery. And how to return the old version of "Android" using it - read on.
Login to recovery
"Recovery" is a special boot mode for Android, with which you can reset the settings or flash the system. If you buy gadgets in trusted certified stores and with an already installed OS, then they should have a stock "recovery" mode. How to enter the "recovery" depends only on your device model. The most common combination is a power button and a volume down key.
For example, if you do not know how to return an old version of Android to Lenovo, then this combination will work for most of their devices. I would like to note that before entering the "recovery", you need to turn off the phone. If you are looking for how to return the old version of "Android" Sony Xperia, then here you need to hold down three buttons: those that we have already named, and the camera button. You can easily find more detailed instructions for various models in the open spaces world wide web... But what to do after entering boot mode?
How to return the old version of "Android" after updating through the "recovery" mode?
You can navigate the menu using the highlight key, and to select a specific item, you need to press select. You do not need to be afraid of this mode, if you delve into it well, it becomes clear that there is nothing complicated. Now find the line with "wipe data / factory reset" and select it. A new menu will open, in which you will have to confirm the action. After that, wait for the reboot and the OS will return with factory settings.
Charge your smartphone
What is worth noting in the first place is that before starting this procedure, you need to charge the device well. It doesn't matter how long the system rollback takes and how long the gadget will reboot after that.
If during such manipulations in the "recovery" mode the device does not have enough charge and it will not be able to complete its task to the end, then, most likely, problems with its further use cannot be avoided.
The same goes for self-flashing the phone. For some users, certain functions of the system disappeared or did not work, up to the loss of the touchpad's performance. In some cases, the firmware did not become at all and it was simply impossible to enter the OS. But even then recovery helped out again. If you cannot enter this mode or it simply does not exist, there are a number of simple utilities for flashing this mode directly through the "operating system". Sometimes you may need a PC for this task.
We've told you how to return an old version of Android after an update. Take good care of your gadget and it will serve you for a long time.
Probably, there are several people who would begin to delve into this issue after they tried to independently return the version of the operating system to the previously installed one. But, faced with any difficulties, we would have decided to read on the net to figure out what these difficulties may be associated with. And then it turns out that there are many nuances that need to be foreseen in advance.
In addition, from a huge number of foreign names and abbreviations, instead of understanding the process, information in my head turns into a mess. And each sentence read adds to the overall picture more and more misunderstanding.
Well, let's figure it out together!
Brief educational program
- There is no universal algorithm of actions! This is the first thing to know about downgrading Android. Each brand (and even model!) Device may have its own characteristics.
- Returning an OS version is a process that affects the core of the system. Consequently, manufacturers make sure that only "advanced" users can get there. For this, Root rights were invented. They are intended to give you administrator privileges. There are both pros and cons in their application. Before you start doing anything, find out how to get them and what the use of Root rights can promise on your device!
- If you are not scared by everything you read about Root-rights and you are also full of confidence to return Android version 4.4, then another concept that needs to be understood before starting the process is Backup. Speaking Russian -.
After returning the system, you can easily restore all contacts, applications, settings, and more. The main thing is to choose the right program that will make Backup on your device as correct as possible.
How to get your Nexus back
Operating room developer Android systems and manufacturer Nexus devices is one company - Google. Therefore, for Nexus devices, the return process remains as simple as possible and consists of 4 simple steps:
- Download and install the image of that Android firmware that you need;
- Run this firmware directly from the device and wait for the installation to complete;
- Load data from backup.
How to return everything else
Devices from other manufacturers have their own specifics when performing a system rollback. But despite this, there are still general manipulations.

You will need a PC or laptop
Typically, to downgrade Android 5.0 to 4.4 or similar, you will need:
- Required firmware;
- Backup software;
- A program for establishing Root rights;
- Personal computer or laptop;
- The device (tablet, phone) on which you need to make a return;
- USB cable.
Firmware
The first thing to take care of is, of course, the firmware itself. You need to clearly understand and imagine what you want to see as a result of manipulating Android. Decide which firmware you want, custom or official? Official firmware can usually be downloaded from the official website of your device manufacturer. Custom - search forums, compare and choose. It is necessary that the firmware is suitable for your device and is known to be working, that is, verified. To find out, you will have to study more than one forum, read a lot of reviews and ask a bunch of questions. But this must be done, since otherwise you risk saying goodbye to your favorite device!

The selection of custom firmware should be approached responsibly
Backup
The main rule of any gamer or programmer is "Save !!!" And in our case, this rule is of the same importance.
Has the function of creating a backup with saving in your Google account. But in this case, only contacts can be saved. Therefore, it is necessary to acquire the necessary program. And then you can reserve almost everything: contacts, messages, system settings, and information about applications, thanks to which the system will automatically download and install them from Google Play.
But, whatever one may say, you again have to make a choice yourself. We will only list the most popular programs today:
- Titanium Backup
- GO backup
- HTC backup
- Clickfree Mobile Backup.

Various programs can be used to save data
The backup process looks about the same for all devices:
- Insert a memory card into your mobile device;
- Search, read reviews and download the Backup software you like to your tablet or smartphone;
- Install it and run it;
- In the program settings, mark what you want to reserve. Do not forget to check in the settings if there is enough space to save the backup. You need this free space on the memory card;
- Start the reservation process, wait for the end, take out the card.
Now all important information is on the flash drive and after returning your Android from version 5.0 to the previous one, it will be restored using the same program.
Root
On your device you need additional program... You also choose, read reviews, ask questions, compare. Then download and install on your computer.

Process directly
So, you are all set to start the process. Recall that this process is individual for each device, so we will focus on the manipulations, which are the same in most cases. We present you the procedure:
- Making a Backup (see above);
- We transfer the device to the programming mode (it can be called differently; see the instructions);
- We connect the device to the computer;
- We launch the Root program;
- Run the downloaded program and select its version;
- We start the installation process, wait;
- At the end, it is advisable to reset the settings to the factory settings;
- We reinstall the program with which you did Backup, insert the memory card with the backup, start the data recovery process.
Conclusion
In conclusion, I would like to make out another concept that you will definitely come across in the process of studying the forums. This is the concept of "brick". A "brick" is a device that stopped working at all after returning from Lollipop to Kitkat. To prevent this from happening with your Android device, you need to approach the matter as carefully as possible and scrupulously study all aspects. Only after the whole picture of the planned actions is clear and clear, you can be sure of a successful result.
Google and the developers of programs for smartphones or tablets based on android are constantly developing updates, trying to make them better and fix bugs.
Moreover, if you do not prohibit them, then they will be installed automatically, although the system usually asks if you want to update.
Only sometimes the process can go wrong and problems appear. What to do then? Those who have already dealt with the computer, of course, will try to do a rollback.
But android is not Windows and such a function as in a computer is not provided in it.
For example, on your Asus or Samsung phone, when you bought it, there was android 4.4 and over time the system was updated to android 5.1, but this firmware did not suit you.
Before that, you had android 5.0, 4.4.2. Is it possible to make an automatic rollback to 5.0 or 4.4.2 No, it is impossible, only to 4.4, just like you cannot rollback the android system for a week or a month, as in a computer or laptop.
This is just an example, to show you how to rollback, you can only go to the version that was installed at the factory.
Still, there are some nuances. Let's take a look at them - if you are in no hurry, read about them below.
How to roll back the system on android - to the previous version
So, after updating the firmware, the operation of the smartphone or tablet does not make you happy, so we will roll back to the previous version, more precisely to the factory firmware.
NOTE: if needed previous firmware, then you can only install it, so to speak, reflash it yourself, after downloading it.
IMPORTANT: if you roll back the system update to the factory firmware, you will lose all data, including contacts, photo programs, and so on, except for those stored on the memory card.
Therefore, think carefully, perhaps it is better to tweak something in the installed on this moment version of android and continue to use it.
If you nevertheless decide to roll back, turn off your smartphone or tablet and use the following key combination:
- most often you need to hold and hold two buttons: on and volume down.
- on Samsung, hold and hold on and volume up;
- on Sony turn on, volume down and camera;
- on LG, hold and hold the Power, Volume Down and Home buttons. when the logo appears, release the power button, while holding the rest until recovery appears;
- on Huawei, hold and hold the power button, volume down and volume up;
- on HTC - press and hold the volume down button and then briefly press the power button. When the recovery menu appears, release the volume down button. Find "Clear Storage", select it by clicking on the power button and confirm the action with the volume down button.
If you follow the steps described above, you will be taken to the "Android system recovery". There you will see several options.
- highlight - will move you around the menu;
- select - select a specific menu item;
- "Wipe data / factory reset" - roll back the phone to the factory one (after pressing, you need to confirm).
After selecting "wipe data / factory reset" in the new menu, go down to the action confirmation sub-item and select it.
Now wait for the reboot and then get the android firmware that was installed at the factory. Some of the above written little is clear -.
How to roll back settings to android
To roll back the android settings in all versions of smartphones or tablets, you first need to open the settings.
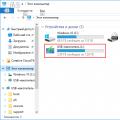
Further actions slightly depend on the version of android. I will show you with pictures from a Samsung Galaxy smartphone with Android 6.0.1.
First, select "Settings" and click on the "backup and reset" option.
In other words, in addition to quickly recovering the system in case of a failure, you can now recover individual files if they were accidentally deleted, damaged, or if you just need to quickly undo all changes made to the file.
While file recovery is a great Windows 7 feature, oddly enough, few people know about it and few people use it. In this article, I will go into more detail about this technology and explain how it works.
Briefly about previous versions
While I advertise previous versions of the files as a new feature, this is actually not the case. The roots of this technology go back to Windows XP and Windows Server 2003, where it was implemented as. When installing a shadow copy client shared folders(Shadow Copies of Shared Folders) on a Windows XP computer connected to a server under Windows control Server 2003, restoring previous versions of files was possible in Windows XP as well. The main innovation in Windows 7 is that this function is now fully available as part of a single operating system and does not require a connection to the server.
I also mentioned that older versions of the files are supported to some extent in Vista as well. More precisely, in Vista Business, Enterprise and Ultimate. This feature is not available in Home Basic, Home Premium and Starter versions. In Windows 7, it is present in all editions.
How it works
As you know, to create restore points, the operating system constantly monitors any significant changes, which include the installation of new applications, hardware, drivers, system updates or security patches through the Center windows updates... When such changes are detected, the system automatically creates a restore point, which is, in fact, a snapshot of the system state, including important system files, including certain parts of the registry. At the same time, snapshots of all data files stored on the hard disk are taken.
However, major changes to operating system Is not the only reason to create a restore point. By default, Windows 7 automatically creates a restore point once a day, and in addition, you can create such a snapshot at any time yourself.
In addition, when you create backups using the Backup and Restore tool, Windows 7 automatically tracks them and allows you to restore previous versions of files not only from restore points, but also from backups.
To use the Restore Previous Versions feature, right-click on the file and select in context menu the option "Restore Previous Versions" (Fig. A).
Figure A. The option "Restore Previous Version" is available in the context menu of any file in Windows 7.
The file properties window will open with the " Previous Versions"(Previous Versions, Fig. B). As you can see, in my example, the file is included in both the restore points and the backup, so to restore it to its previous version, I can choose any option, depending on which date I'm interested in.

Figure B. Using the Backup and Restore tool, you can restore older versions of files not only from recovery points, but also from backups.
As you can see, there are three buttons on the Previous Versions tab: Open, Copy, and Restore. To check if this is the version of the file you want, you can select it in the list and click "Open". This will open the file for viewing in the appropriate application - in my case, it's Word.
The Copy button invokes a standard copy dialog like the Copy To command and allows you to restore a file to a different folder. Note that the "Open" and "Copy" commands are available only for files saved in the recovery point, and do not work for backed up files. The "Restore" button allows you to restore the file to the exact state it was in when the restore point or backup was created.
Things to Consider
Keep in mind that older versions of a file from restore points will only be available if changes have been made to the file since the last restore point was created. If the file has not changed since then, a message will appear on the Previous Versions tab: There are no previous versions available (Figure C).

Figure C. If the file has not changed since the last restore point, you will see a message like this.
However, this does not mean that the previous version of the file was not saved to the restore point. If you just open and save the current file, the previous version will immediately appear on the Previous Versions tab.
If a file has not changed for several months, new versions will not be saved every time a restore point is created.
File recovery
Now that you have an idea of how the restore legacy feature works, let's see how to use it. Let's say I accidentally permanently deleted Word document(fig. D), and then realized his mistake. Since the file is gone, there is nothing to right-click on. Instead, you must open the Previous Versions tab for the folder in which the remote file(fig. E).

Figure D. I accidentally deleted a Word document.

Figure E. To recover a permanently deleted file, open the Previous Versions tab for the folder where it was stored.
To make sure that the correct file is saved in this folder, I click the "Open" button. The folder opens, and in it is the file you are looking for. Now I can open it in Word and see the content. After making sure that this is the file I want, I close Word, close the folder, and return to the Previous Versions tab. I click the "Restore" button. The dialog box shown in Fig. F. If I click the "Restore" button in it, the file will be restored to its original folder.

Figure F. Before restoring the file, the system prompts you to confirm the operation.
Although the warning in the dialog box is worded as if the restore replaces the entire contents of the folder, in fact, only the deleted file will be restored. There were several other files in my folder, for example, and they were left intact after the restore.
What do you think?
Did you know about the existence of the file restore functionality in Windows 7? If not, will you be using this feature now? And if you have already, what are your impressions? Share your opinion in the comments!
| Materials (edit) |