If the computer does not see Android via USB, then it will not be possible to upload photos, videos or music, install applications not from the Play Market, flash the device. And this is very bad, because the functionality of the phone is not fully revealed due to some silly mistake.
Someone may argue that you can flash the phone without connecting via USB, and for transferring files there is Wi-Fi, instant messengers, cloud storage, email, finally. But I just can't refuse the USB connection, I constantly carry a cable with me and I think this is one of the most convenient ways to transfer data.
Checking the cable and port
Before you go into phone settings, install drivers and curse the day you bought this Android for yourself, check the cable and USB port. I was somehow very surprised that the computer stopped detecting a smartphone that it had seen perfectly before. It turned out that the cat liked the cable, which gnawed at it. From this situation, I made two conclusions: the wires must be put in a box and inspected before connecting. The cat did not draw any conclusions. If there are no kinks, bites, breaks or other mechanical damage on the wire, check the USB port. Try to connect to a different connector or insert another device, such as a mouse, into the same port.If Windows XP is installed on your computer, then urgently look for an opportunity to go at least to the "seven". But for starters, you can simply install MTP protocol to get XP to work with Android. The trick is that when the first version of Android appeared, Microsoft released Windows 7. Therefore, there is no MTP protocol in XP, and you have to install it separately. You can download MTP

If the computer detects any other device, and the phone categorically does not want to see, then it's time to move the focus to Android settings and connection features. Yes, there is a possibility of mechanical damage to the microUSB connector on the phone, but I have not encountered this yet. If you have something broken, you will most likely notice it.
Most often, the inability to establish a connection between the computer and the phone is associated with software errors. If none of the methods listed below helps to solve the problem, contact the service center - it seems that the smartphone really needs to be repaired.
Android setup
I faced two situations. The first phone required not only obtaining developer rights and enabling USB debugging, but also installing phone drivers on a computer. In the settings of the second smartphone, I did not find the parameters responsible for connecting via USB at all. They are not needed: the phone is perfectly detected by the computer, after which it offers to select the connection mode.So, if you connected your smartphone, but nothing happened:
- Open up Android settings.
- Go to the section "About the phone"(may be called "About device").
- Find build number(models) and click on this item until you see a notification that you will be a developer soon. Usually n press 7-10 times.

After you become a developer, a new section will appear in the Android settings - Developer Options... Inside it you will find a switch USB Debugging to be translated into position "On".

Now try connecting your phone to your computer again. When connected, a mode selection window should appear on the smartphone screen. The default on older versions of Android is Charge Only. If the window does not appear, slide it out of the notification shade.

To transfer files, you must select Media Device (MTP) or Mass Storage mode. There will also be a PTP mode among the options, but this is only suitable for photos that can just as well be moved to MTP.
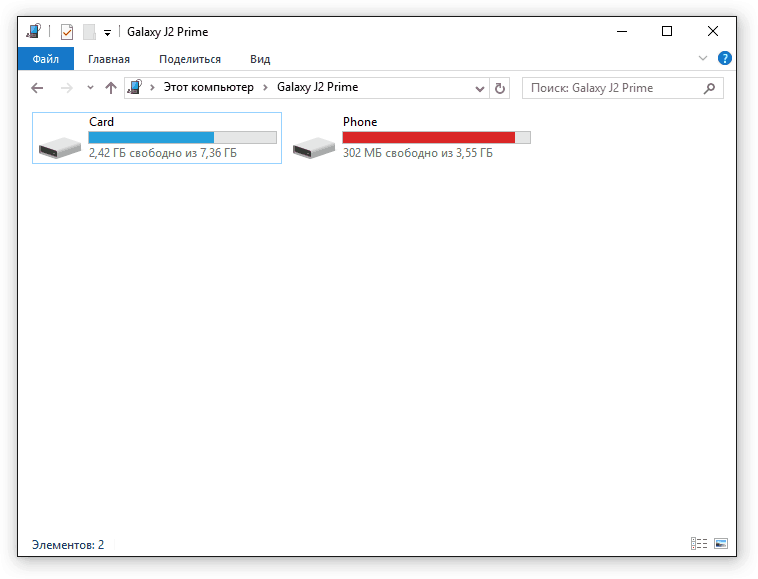
After selecting the appropriate mode in the "Computer" on Windows, a media device will appear, with the contents of which you can work. Internal memory and SD card may be shown together or as separate drives, depending on the features of phone models and Android versions. But it doesn't matter, the main thing is to be displayed at all.
There are no other options in Android settings that are responsible for connecting via USB, except for debugging. However, there are some peculiarities. For example, on Nexus smartphones, you need to unlock a screen protected by a password or pattern in order for the computer to access the contents of the memory.
Also, a USB connection cannot be established if tethering is enabled on Android. To check its status and disable it if necessary:
- Open up Settings.
- In chapter "Network and connections" click "Additional settings" or "Yet".
- Go to modem mode and disconnect the WLAN hotspot... If it is disabled, nothing else needs to be done.

Some manufacturers offer users special programs for controlling smartphones on a computer, but you can establish a simple connection via USB without this software. Utilities from manufacturers are needed not for trivial transfer of photos, but for performing more complex tasks: updating the phone software via a computer, flashing the device, resetting settings.
The reason that the computer does not see Android via USB may be incorrectly installed or just a crooked custom firmware. Also, a factory reset sometimes helps, but be sure to back up your data before doing it, as it will be deleted. The problem may disappear even after a normal restart of the smartphone - keep this in mind.Checking energy saving settings
W indows strives to conserve energy so that those same notebooks can run on battery longer. One of the saving factors is the automatic disconnection of USB ports. Sometimes this leads to the fact that external devices are not connected at all. To check these parameters and fix the drawbacks:
I did not measure how much the prohibition on automatic port shutdown affects the battery life, but there is no noticeable difference. But problems with connecting external devices like Android phones are eliminated.
Installing drivers
The first time you connect any device, Windows installs drivers on it. Often this process goes unnoticed and very quickly (as in my case with the second phone), so you may not even be aware of the presence of smartphone software on your computer. But it is there, which means it should work correctly.- Connect your phone to your computer.
- Open up Device Manager... On Windows 10, the corresponding item is in the context menu invoked by right-clicking on "Start". In earlier versions of Windows, the Manager can be found under Control panels in view mode "Badges".
- Check all USB controllers. If there is an exclamation mark next to one of them, then this indicates a problem with the software.
To make sure that the phone is marked in the Manager, disconnect the USB cable. If the problem controller disappears, then you have found the source of the problem. A smartphone without drivers can also appear in other sections: for example, among other or portable devices.

So you've found something strange with your phone's drivers. What to do next?
- Connect your phone to show it in Device manager.
- Highlight it and delete it.
- Please update your hardware configuration so the computer will re-detect the phone and begin installing the drivers.

You don't have to remove the device, just update the driver. Right click on the phone, select the tab "Driver" and press "Refresh"... Another option is to first and then reinstall without touching the device itself.

In the search box, select automatic detection. If you downloaded the phone driver from the official website, you can click "Search this computer" and specify the path to the downloaded software file.
If you have a Chinese smartphone, then there may be another problem with it - the inability to find a suitable driver on the Internet. They are often posted on forums like w3bsit3-dns.com, but if there is nothing, try installing a universal driver. It is called the Universal Adb Driver and is designed to ensure the Android Debug Bridge and PC sync utilities work properly with Android devices. Versatility is not always good, but chances are high that in the case of a Chinese phone, you can easily access the contents of the memory.Eliminating error code 19
If, when connecting the phone, the computer shows a message about the inability to start the device due to incomplete or damaged settings, then you need to check the system registry. But be careful, deleting the wrong entries can cause Windows to stop working.

After removing the setting, restart your computer and try connecting your phone again.
Alternative ways to transfer files
If you are unable to fix your USB connection problem and want to transfer files now, use one of the alternative methods.- Synchronize data via Google Drive. Android requires a Google account to function properly, so you definitely have access to cloud storage. You can transfer files through other services - DropBox, OneDrive. I am using Yandex.Disk.
- Transfer files via email, instant messengers or social networks. I often add small files to VKontakte's “Documents” and then download them to my computer.
- Install the AirDroid application on your phone and access the memory through the browser on your computer.
You can think of other options as well. For example, create an FTP server on your phone or set up a remote connection via TeamViewer. So USB is not the only way out. But if the wired connection is not established, you should still see what the reason is and, if possible, eliminate it.
More on the site:
Computer does not see Android via USB updated: February 7, 2018 by the author: Sergey
No matter how advanced a smartphone is, it is still a dependent device. In many cases, a personal computer is still required to operate a mobile device. Particularly when it comes to mobile development or device recovery after a failed firmware. For example, if the gadget is out of order, reinstalling the system will require a cable (via USB) connection of the smartphone to the PC. In order for the computer to detect your phone or tablet, the device is put into debug mode. In this article, we will try to tell you how to enable USB debugging on Android and what else you may need it for.
What is USB debugging - what is it for
Debugging mode (this mode is also called debug mode) is a function of Android gadgets, created for testing new software products, if you don't bother with technical features. It is used by developers to assess the health of their applications.
USB debugging allows you to perform the following tasks:
- Testing and validating applications before releasing them in the Play Market.
- Obtaining ROOT rights (hacking) a mobile device.
- Copying files from the root directory of the operating system.
- Installing software from third party sources.
- Installing unofficial Android firmware.
- Creation of backup copies of devices (data archiving).
Debug mode can be used to restore the firmware if, for example, it does not work correctly or the phone stops turning on.
How to enable USB debugging mode on Android

Enabling USB debugging from a phone or tablet is done through the settings menu. This option is usually found in the developer options or in the accessibility menu.
Often this menu item is hidden so that ordinary users cannot switch to debug mode and do not disrupt the system. Usually famous manufacturers like Samsung or HTC resort to this, while Chinese manufacturers allow switching on the USB debugging mode on a smartphone without any questions.
If you own a device from Samsung or any other major brand that hides debug access, then you will have to do the following:
- We open system settings.
- Go to the "About phone" submenu.
- We click on the build number of the system until the device transfers you to the developer status.
- In the new status, you can try again to go to the section with parameters for developers and enable USB debugging.
Turn on USB debugging via computer

This method will be useful for those users on devices whose touchscreen does not work for some reason, the screen is broken or it is not possible to connect a USB mouse.
Often, to enter debug mode, you need to connect your smartphone or tablet to your computer. To do this, you will have to use a number of additional tools and be patient.
So, to switch to this mode through a computer, you need to do the following (this method is suitable for all versions of Android, including 5.0, 6.0, 7.0 and higher):
- First, you need to download the Platform-Tools and QtADB-CWM files (these are Recovery files for recovering devices).
- We move these files to the root directory of the computer on the C drive.
- Download the Sqlite3 archive and move it to the Sqlite3_Windows directory on the C drive (you need to create it yourself).
- We put the gadget into recovery mode and connect it to the computer.
- Run the previously downloaded QtADB.exe file.
- After opening the program, we find the Advanced sub-item there and make sure that the data folder is connected to the computer. The command line in the application will give the response Ready.
- Then open the "Files" submenu. It is split into two separate file managers. In the left FM, open the Sqlite3_Windows directory, which was created before, and in the right one, open the /data/data/com.andoid.providers.settings/databases directory in Android.
- Find the settings.db file in the right FM and drag it to the left one.
- Then open the Start menu, select the Run item and enter cmd there.
- Windows Command Prompt will start.
- You need to enter the following commands into it one by one:
cd C: \ Sqlite3_Windows (press Enter to activate the command)
sqlite3 settings.db (to activate the command, press "Enter")
update secure set value = 1 where name = ‘adb_enabled’ (press Enter to activate the command)
Quit (to activate the command, press "Enter")
- Go back to the QtADB application and update the data in the left pane.
- After the update, drag the settings.db file back to the right side, where it was earlier.
- The program will ask if you need to replace the existing file - we agree.
- That's all. The phone can be used in debug mode.
What to do if, after enabling USB debugging, the device is still not detected?

Unfortunately, USB debugging doesn't always work. Often, even after switching to this mode, the device does not function properly in it. Why can this happen and what measures can be taken to solve the problem?
- Make sure you have the correct Android Debug Bridge driver installed. It can be found on the Google site for the Android operating system. Different driver kits are available for different devices. If there is no specific driver for your device, then you can use a universal one.
- Make sure your device is detected by the computer. If the cable or port is damaged, then the device may not be displayed at all in the system, and, of course, there can be no question of any debugging mode, in this case.
- USB debugging may not work properly on devices with unofficial firmware.
Conclusion
This, in fact, is all. Now you know how to enable USB debugging mode on Android. As you can see, if you follow the instructions carefully, then this procedure is not so difficult. The main thing is not to get lost and download all the necessary files in advance. In most cases, the methods described above are needed only by developers and testers, but there are situations in which ordinary users have to work with this mode, so it is better to familiarize yourself with the ways to enable it.
In many instructions, when working with a device on the Android platform, you need to enable USB debugging mode. This option is available in all gadgets of this operating system, but its location may differ depending on the version of Android. Let's figure out how to enable or disable USB debugging mode.
What is USB debugging mode for?
USB debugging mode allows you to use the Android Debug Bridge (ADB) service, which checks the operation of each application and the system as a whole. Basically, this mode is actively used by developers when creating new applications or improving old ones. But for ordinary users, it can also be useful. What else can you do with this service:
- copy the desired folder or section from your smartphone to your PC;
- send a file from a PC to a smartphone;
- install the Android application;
- make a backup copy of applications;
- flash a smartphone;
- restore the functionality of a smartphone or tablet;
- get Root rights.
How to enable USB debugging mode: step by step instructions
There are several ways to enable USB debugging on your device. Several options will be presented below, they are distributed by Android version, but there are also exceptions to the rules. For example, on Sony Xperia M with operating system version 4.1, the latter method works. Therefore, if you were unable to enable debugging in standard ways, use the options for other versions.
For Android versions 2.2 - 3.0
- Go to the "Settings" menu.
- Find the "Applications" item there.
- Find "Development" among all applications.
Android less than 4.2 - the first way
- Go to the "Settings" menu
- Find the item "Development" or "For Developers" there.
- Check the "USB Debugging" checkbox.
Android less than 4.2 - option two
- Go to the "Settings" menu.
- Open More.
- Find "Developer Options".
- Check the "USB debugging" checkbox.
Debug connection for Android 4.2 and higher
- Go to the "Settings" menu.
- Find the "System" item. In Xiaomi, Samsung and LG phones, this menu item may be called "General". If you have not found anything like this in yourself, go to the next step - in your case, the operation will require one step less.
- Next, click on "About Smartphone / Tablet / Phone".
- Find the "Build number" and click on it 7-10 times (depending on the phone model, but sometimes a hint is written there, how many more times you need to click). You are now a developer and can enjoy more advanced phone functionality.
- Return to the Settings menu.
- Now you have the item "For Developers" or "Features for Developers", click on it.
- Check the box next to USB Debugging.
Video: Activating USB Debugging
Computer authorization after enabling debug mode
This item is relevant for versions of Android 4.2 and higher. After enabling USB debugging mode, you will, of course, need to connect your smartphone or tablet to your computer. The device identifies this computer and asks for permission to debug from this PC. In order for debug mode to work as intended, you need to enable debugging on your phone. If you do not want such a request to appear in the future when connecting to this computer, check the box next to "Always allow this computer". But when connected to any new device, the smartphone will still ask for permission.
The device was not found - why did this happen and what to do?
Lack of drivers
When you connect your smartphone or tablet to your computer for the first time, the first thing a PC does is look for and install drivers for your device. Most often this is some kind of program that has the name of the manufacturer of your gadget in its name. Look for something similar among all installed programs on your PC. If such a program was not found, then use the Internet to search and install the drivers yourself.
Locked device state
Make sure your smartphone or tablet is turned on. Unlock your device if you need to enter a picture or regular password.
USB port
Do not use USB 3.0, only USB 2.0 will work for debugging.
PTP mode
If you still cannot activate debug mode, try lowering the upper information panel on your smartphone or tablet while connecting to a PC and select "USB Connection". Then change the connection mode to PTP.
How to disable USB debugging mode
If you have already found an option to enable this mode that suits you, then turning it off will not be a problem. Follow the same list of instructions as to enable debug mode, but instead of checking the box next to USB debugging, uncheck it.
The USB debugging mode is primarily needed by developers, but it can also be useful for ordinary users. There are several methods for enabling it, the choice of the method depends only on the version of Android and, possibly, on the manufacturer of the gadget. When connected to a PC, the device may not be detected by the computer, but this problem can also be easily solved by correctly enabling the settings.
In the Android settings, you probably found the mysterious item "Debugging via USB", but does everyone know what this mode is for and how to enable it correctly on different versions of Android OS?
What is debugging for?
Initially, this mode was provided exclusively for developers of applications or services for Android. With the help of debugging, they got access to the "internals" of the operating system.
But later, more and more cases began to occur when the debug mode is also needed for "simple" users. It's just that the developers created automated tools for getting root (), restoring a smartphone, modifying the OS that required a debug mode.
Despite the formidable name, it is quite easy to activate this mode.
How to enable debugging
For Android 4.1 and earlier: when the developer menu is visible:

In earlier versions of Android, developer options are available explicitly and explicitly. Just open system preferences. In different versions, the developer options section may be in different places: in the general list, in the Applications section, in the main menu.
Select "USB Debugging" and check the box there. You will see a pop-up warning; just click ok.
You do not need to overload your smartphone to activate this mode.
What if the required section is not visible?

In Android versions since 4.2.2, debug mode (like other developer options) is not shown in the menu. However, there is a way to easily open them:
- Open the settings menu and the "General" tab
- Find the section "About device"
- Open the item "Software Information" in it
- Find the line "Build number" in it and tap on it 7 times
- After the notification about the receipt of the developer status appears, return to the "General" section
- Find the item "Developer options" that appears in it
- Find the line "USB debugging" in this section and put a tick there
- Exit the menu
Congratulations, you now have access to your device via your computer!
Cases where debugging saves
Any Android user has situations when debugging is desperately needed. It's good that you followed the instructions from the previous section and activated it. Now you can:
- Get root access on your smartphone / tablet using special applications for your computer. Debugging enabled is required for this.
- Retrieve data from a device that does not have a display. We devoted a separate article to this problem.
- Recover device if it won't boot. To do this, you need to use special utilities, which may differ for different devices and chipsets. Look for more information specifically about your model.
- Work with the command line on a computer to quickly copy files, install an application or a whole set of applications at once, change access rights to a particular file. To do this, the ADB (Android Debug Bridge) program must be installed on the computer, which allows you to issue commands to the Android environment on the connected device. There is both a graphical interface and a set of console commands for it, which are sent through the command line.

In general, if you want to get the most out of the functionality of your Android tablet or smartphone, the debug mode will be extremely useful to you.
Most people use their tablet or phone “as is”, without noticing various inconveniences in their work or simply putting up with them. However, a fairly large category of users is trying to modify it to fit their needs or to be able to freely manipulate data and settings. Another category is employees of service centers. USB debugging is a method for those who want to get to know a tablet or phone better. Make adjustments, changes, diagnose problems, and so on.
Everyone is a little familiar with the principle of building an operating system. It should be clear to you that you need to look for the answer to the question of how to enable USB debugging in the "Settings" item of the main menu. However, the location and method of activation are very different. This, as well as the choice of the device manufacturer. Let's consider the ways how you can enable USB debugging mode.
Standard Option
In firmwares where the manufacturer did not try to complicate access to the capabilities of rooting and flashing, as well as on devices without the possibility of fine diagnostics, Android debugging via USB is enabled. In the "Settings" item of the main menu there is a "Development" section, in which you need to put a checkmark in front of the "USB debugging" item.

Different firmware version
The arrangement looks similar for firmwares with a "close" version. For example, it can be the same item "Settings", but further the submenu will be called "For Developers", where you also need to put a check in front of the debug option.
Operating system versions 2.2 - 3.0
Here is a more detailed menu, the development item is located at "Settings" - "Applications". Further, the Android USB debugging mode is turned on in the same way as described above.
Other firmware
There may be an option when the "Applications" submenu in the "Settings" menu is called "More". The rest is the same as in point 3.
Operating system versions 4.2 and later
The Android USB debugging option is deliberately hidden here. In order for the activation checkbox to become available, you need to go in, select the "About tablet" item and click on the "Build number" about 10 times. After that, a sub-item "For Developers" will appear in the "Settings" menu, where the "Debugging via USB" option will become available.

Another location
The "About Tablet" item can be located right in the "Settings" menu. However, there are versions of the operating system assemblies, when you need to additionally go to the "System" or "General" submenu. For the rest, debugging is the same as in point 5.
PC connection
Before using a USB debugging application or root utility, you need to properly connect your device to your computer. The first thing that can create an obstacle on this path is the lack of drivers. However, this problem is solvable. For branded devices with non-standard exchange protocols, everything you need can be found on the official websites. Besides, programs for phone books, pictures, music from device manufacturers are usually completed with driver sets. It is enough to install the corresponding utility.

As a good option, you can recommend the MOBILedit Enterprise program, which offers a huge selection of drivers for all types of equipment. or smartphones from Chinese manufacturers based on MTK processors. If you still cannot install the drivers, you should look for them on specialized sites by device model and operating system firmware version.
When the drivers are installed, the first connection to the PC will require confirmation of trust. After setting the appropriate checkbox in the request on the tablet, data exchange will be allowed.
Why debug?
Let's briefly list some of the tasks that can be solved using USB debugging:
- and sections responsible for operating system settings;
- easy file transfer, bypassing the built-in transcoding systems;
- restoration of work after incorrect installation of applications;
- changing the version of the operating system to a newer one;
- Changing the firmware to gain access to specific device functions or language packs;
- getting root (root) rights.
Video on how to enable USB debugging on Android:
It is worth dwelling on the last point in more detail, since rooting is the reason for enabling USB debugging in about 99% of cases.
Why root a tablet or smartphone?
Route access is, roughly speaking, the maximum rights in the operating system. They allow you to back up all contacts, message content, phone history,