It is no secret that installing an operating system "from scratch" is fraught with many pitfalls that may not be sickly to spoil your nerves. This is especially true for installing an OS from a USB flash drive to an SSD solid-state hard drive. Both media must be properly prepared and formatted, and the BIOS of the computer must be configured accordingly. Otherwise, annoying errors may occur: the installation program will not see the disk or will not start at all.
Installing Windows 10 on an SSD - sleight of hand and no cheating
In terms of operating system and computer hardware, a solid state drive (SSD) is no different from a classic hard drive with magnetic platters. Accordingly, installing an operating system on an SSD will be no different from installing on a regular hard drive.
The only nuances will be in setting up the disk subsystem for maximum performance and in creating partitions on the disk before installing the system. Since the disk is new, a clean copy of the OS will be installed.
Installing an OS on a blank disk will always be more difficult than an update that will automatically download from the Internet and perform all the manipulations in the background, requiring literally a few clicks from the user.
Installing a clean copy consists of several sequential steps that should go smoothly and without errors. Let's get started?
Preparing bootable media (flash drive)
As practice shows, when installing Windows 10 on an SSD drive using a bootable DVD, errors often occur that prevent the normal installation of the OS. This happens especially often on laptops in which both the optical drive and the hard drive are connected to the same SATA controller: accessing the optical drive forces the computer to not optimally configure the controller, and the SSD may malfunction.
Therefore, to install the system, it is necessary to prepare a bootable USB flash drive, the installation from which will allow the process to be carried out quickly and without errors.
To prepare bootable media with the OS distribution, you need to download the Windows 10 distribution image, format the flash drive and unpack the image to it. And if there are no questions about downloading, then further preparation of the flash drive can be carried out by a dozen different programs, similar in functions, but different in settings and interface.
We will focus on the official tool for deploying images from Microsoft - Microsoft USB / DVD download tool. The program is so simple that it is impossible to make a mistake when using it.
- Search the Internet for the Microsoft USB / DVD download tool and download it.
- Connect a USB flash drive to an available USB port to which the system image will be deployed. Insert into the USB port the flash drive to which you want to write the bootable Windows 10 image
- Open "File Explorer" and remember the drive letter of the flash drive. In our case, this is the letter L.
 The connected flash drive was mounted in the file explorer, like drive L:
 - Run the Microsoft USB / DVD download tool.
- Using the Browse button, select the ISO image with the operating system distribution kit and click the Next button.
 Step 1: select the image to be written to the USB flash drive
 - Select the media type - USB Device (flash drive).
 Select the type of media you will make bootable using the USB / DVD download tool
 - Select the disk (flash drive) to deploy the media from the drop-down list and click the Begin copying button.
 Among the available devices, select your USB flash drive and click the Begin copying button
 - Answer yes to the question about erasing the media. The program will format the USB flash drive and start copying files to it.
- When the progress bar reaches 100% and a message appears about the successful creation of the media, the program can be closed.
 The bootable USB flash drive has been successfully created, and the files of the Windows 10 distribution have been transferred to it
 The bootable USB flash drive is created, and you can start installing the operating system using it.
The occurrence of any errors during the operation of the program indicates a malfunction of the flash drive. Change the media to a known good one and repeat the bootable disk creation process.
In addition to its simplicity, this method is good because the use of an official Microsoft tool instead of one of the "free" programs guarantees a safe installation. Using it, you will not infect your computer with keyloggers or annoying adware modules.
Video: creating a bootable USB flash drive with Rufus
Activating AHCI Mode
In order not to find yourself in a situation where the OS installer does not see the disk on which Windows 10 should be installed (this applies not only to SSDs, but in general to all hard drives with a SATA interface), using the BIOS settings, you must put the SATA controller into AHCI mode ...

Preparing an SSD drive for OS installation
To avoid problems during the installation of the Windows 10 operating system, the disk on which the installation will be carried out must be completely cleared of partitions. If this is not done, the system installer may display a message stating that this disk cannot be used to install the OS. The reason will be the lack of space for creating service partitions, invisible to the user, but vital for the operating system.
To prevent this from happening, remove all partitions from the SSD disk. This can be done using the console command diskpart:

All partitions from the SSD drive are removed, and it is ready to install the Windows 10 operating system.
This method requires care and a lot of keystrokes, but it gives you full control over the process. If you are a fan of beauty and mouse clicks, then you can find hard disk management programs with a graphical interface.
Video: How to Manage Disks with Minitool PartitionWizard
Installing Windows 10 - step by step instructions
The bootable USB drive is created, the computer BIOS is configured, the SSD is pristine. We start the process of installing the operating system:
- Boot the computer from the previously created flash drive with the Windows 10 distribution kit.
- Select the default interface language and keyboard, then click Next.
 Selecting the default system language and keyboard when installing Windows 10
 - Click the "Install" button to start the Windows installation.
 Start the Windows 10 installation with the "Install" button
 - Read and accept the terms of the license agreement. Without this, further installation will be impossible.
 Accept the license agreement to proceed with the installation
 - Select the installation type Custom: Windows Install Only. A clean copy of the system can only be installed in this way.
 Installation of a "clean system" is possible only in the custom installation mode.
 - Since we have previously cleared the target disk (SSD) of partitions, in the dialog for selecting a partition for installation, you will need to click the "Create" button, and then set the maximum possible size of the partition (it will be that by default). Together with it, the system will also create service sections for its own needs. They will not be visible in the "File Explorer":
- section # 1: recovery environment. Contains a recovery environment necessary to "roll back" the system after critical errors or malware infection;
- section # 2: system partition (EFI). Contains a boot configuration store (BCD) and files required to boot the operating system;
- section # 3: MSR (system reserved). Required for service operations of embedded and third-party software (for example, for converting a simple disk to a dynamic one);
- section # 4: operating system. This section will host the installed system. Space not occupied by the operating system will be available for installing applications and storing files.
- After selecting the disk, the OS installation will begin. During the installation process, the screen may flicker and go out, the computer will automatically restart several times. This is required to complete some of the installation steps.
 Copying files and installing updates is the longest stage of OS installation
 - Now you need to select the basic settings for personalization and location, as well as connection and error reporting. The option "Use standard parameters (default)" will be most preferable for an inexperienced user. At this stage, it is advisable to have a valid internet connection.
 In this window it is better to use the button "Use standard parameters"
 - After entering the user password, the operating system is ready to work.
 The system waits for user action on the lock screen
Video: Install Windows 10
Proper preparation of two solid-state media: a bootable USB flash drive and an SSD drive is the key to a smooth and quick installation of Windows 10. In conclusion, I would like to dwell on the choice of the system distribution kit. It is strongly discouraged to use self-made OS assemblies, which are often stored on torrent trackers. Their authors promise mountains of gold and extraordinary opportunities, but in fact, everything can result in viruses built into the system, pop-up ads and hardware failures. Use only original images from Microsoft, even if you are installing a "pirated" version of the OS.
) grows exponentially. Classic magnetic HDD disks are rapidly becoming a thing of the past, or more often they play the role of volumetric storage for files, and modern operating systems are recommended to install a screw on an SSD.
Modern operating systems are recommended to install a screw on the SSD
Compared to traditional HDD, SSD hard disk has several advantages:
But along with this, a lot of questions have arisen regarding the use of solid state drives. The most common:
- Is it possible and necessary to defragment an SSD drive?
- is frequent rewriting harmful?
- can i format an SSD drive?
- Is it possible to fill SSD files to capacity?
- How to extend the life of an SSD in Windows 7?
Can you defragment an SSD?
Defragmentation to optimize space. You don't need to defragment your SSD. This procedure will not affect the speed of the storage medium in any way and may even harm. Disk defragmentation is about constantly overwriting files, and an external solid state drive has a finite number of write cycles.
Defragmentation is needed only for the HDD, because each file on them is in separate parts on different sectors and the hard drive slows down when accessing them. Defragmentation organizes the sectors of the railway and less mechanical movements are made inside the device. In solid-state drives, such actions are not performed and files from individual sectors are read equally quickly. Thus, we disable automatic defragmentation, if such a function is available in your operating system.
Defragmentation is required only for HDD disksDisk defragmentation is not necessary for SSD drives
What operating systems are best for an SSD drive?
The TRIM command is a way to notify Solid State Drive that it can physically delete blocks of data that are no longer contained in the file system. It is recommended that you select an OS that supports this command for installation on a solid state drive. That is, the operating system for the SSD must be up-to-date. Windows 7, 8, 8.1 and 10 are ideal.
The TRIM team itself emerged with proliferation so that new storage technologies could compete with HDDs. Accordingly, operating systems, XP and earlier are not suitable for
installation on an SSD. You can use them, but they will be slow.
What happens if the disk is low on space?
It is not recommended to fill the SSD to 100%. Otherwise, you will notice how much the SSD slows down when executing the simplest programs. Optimal disk filling is 75%. This will preserve the harmony between performance and storage capacity.
Experts in modern computer technology advise leaving some free space on the SSD, or even better unallocated space. However, do not forget about the presence of a spare area, which begins to be used when the SSD is critical.
Can I store large files on an SSD?
Most of the time, users use SSD for operating system and applications.
A program launched from a solid state drive will run faster than from an HDD, and the OS will boot faster.
For storing user files, it is better to use a regular HDD operating in parallel. Why?
Firstly, because the capacity of a solid-state drive is often small, and secondly, the cost of an SSD drive is equal to the price of a much larger HDD. The first one speeds up the loading and operation of the operating system and all programs, and in terms of volume it is suitable only for them. But it is not always possible to install HDD (in ultrabooks).
WATCH THE VIDEO
In this case, it is recommended to purchase an external hdd. It is better suited for storing movies, music, and other large files. In fact, nothing bad will happen to it if you store large files on it, but as long as the volumes of such disks are small and the cost is high, it is better to use them where they demonstrate a confident increase in performance.
What else cannot be done?
Lots of tips for conserving SSD resources is a myth. Often users have voiced the idea that the fewer data rewriting cycles an SSD experiences, the better. Yes, it is, but to ditch the SSD by overwriting, you have to sweat. Even if you completely rewrite it 10 times a day, it is unlikely that in a year or two something will happen to a high-quality drive and you will need to repair your SSD drives.
But what you should definitely not do is do it yourself SSD repair. An exception to the rule is if you are a specialist in the appropriate profile. The most that you can do without experience and skills is SSD firmware (replacing the factory software with a new version). Very often, the "crooked" firmware from the factory causes the SSD to work too slowly and refuses to read and write files at the declared speed.
It is easy to fix this by flashing, as many manufacturers offer special applications. Such a program for SSD returns it the necessary performance on the basis of the principle "further - further - further - complete".
You can perform such operations without fear for the disk itself. The main thing is to be sure of the correct choice of the official firmware for your drive. Recovering an OCZ SSD after a major crash is best left to professionals.
Outcomes
In order not to worry about the health of your solid state drive, use a variety of monitoring utilities. Numerous programs for working with SSD disks are easy to find both on the Internet and on the official websites of SSD manufacturers.
SSD Tweaker allows you to monitor the health of your disk HD Tune software allows you to monitor the health of your disk SSD Life software allows you to monitor your diskRemember that modern solid-state drives have a long service life and it's silly to worry about a couple of extra rewriting cycles. You can format it, but it's stupid to abuse it. Now you know about ssd defragmentation.
Currently, an ever-growing number of users of Windows and other operating systems are choosing SSDs as the main storage devices in personal computers and laptops. This is due to the large number of advantages of this technology:
- high speed of functioning of the Windows operating system and applications in comparison with conventional HDD;
- low power consumption and noise even at maximum load;
- high resiliency during overloads and adverse external conditions;
- optimization of the latest versions of windows and non-windows-like systems for working with SSD.
But besides the obvious advantages, there are some disadvantages of this type of media:
- high cost in comparison with the price of classic HDD;
- limited number of rewriting cycles, which reduces the "life" of the device;
Obviously, this type of media will become more widespread. Therefore, we will give a detailed sequence of steps for installing the Windows operating system on an SSD media.
Preparing your computer and media for a Windows installation
 Before using the SSD, make sure the anti-static packaging is not damaged. Otherwise, the static voltage arising during operation can not only damage the stored information, but also disable the carrier. Avoid touching the connectors and exposed parts of the disc.
Update your motherboard BIOS to the latest version available and check that the SATA mode is set to AHCI. At this, the preparatory stage of setting up the system proceeds to the next stage.
Installing media into your computer
 When installing into the case of a personal stationary computer, it is necessary to take into account the fact that the SSD disk has a 2.5-inch form factor. This means that it is necessary to have a suitable compartment in the structure of the system unit rack, or to use special mounting brackets-screws. It should be added right away that unstable fixation of the SSD is highly discouraged. strong vibration can shorten the life of the device.
If you own a laptop, then the fastening process will become much easier, since the storage media of this form factor is used in compact devices. So the installation of a new SSD will be limited to switching contacts from an already used disk.
In any case, after fixing the disk, you must connect it. For this, two cables are used. The first is the power cable and extends from the power supply. For user comfort, this cable is equipped with a notch mount that will reduce the chance of misconnection. If your system does not have a suitable wire, an inexpensive "adapter" can be purchased.
The second cable is a signal cable and is used for data transmission. Most modern SSDs use a SATA connector, which is also equipped with a notch for proper connection. One end of the cable is plugged into the connector of the data carrier, the other into the motherboard. Make sure your motherboard has SATA connectors before purchasing an SSD, as there are no data cable adapters. 
Plug in the power cables and turn on the computer. At startup, the BIOS recognizes the media and you can proceed to the next step of the instructions. Otherwise, check the execution of all steps of this algorithm. If, after reconnecting, the carrier is not recognized by the system, then there is a high probability that the device is incompatible with your motherboard or that one of their devices is malfunctioning.
Installing the accompanying software
You can proceed directly to the installation of the Windows operating system itself. There are practically no peculiarities of this process from installing software products on the HDD. The steps are almost the same, starting from formatting the disk and so on. The only important thing is to correctly configure the BIOS settings. After starting the computer and the system recognizes all the components, you must select the device from which the information will be read before installation. It can be like a CD or DVD, a bootable USB flash drive. To select, you can use the BootMenu (keys F10-F12, depending on the brand of computer) or select the required SSD media as the first device in the BIOS settings. 
Next, we follow the standard steps when installing Windows or another operating system - step by step we follow the instructions of the installer program (formatting the media, choosing regional settings, and others). An important point: if you install the system on a completely new disk, then it will not be divided into logical partitions. In this case, you need to think in advance about how best to do the partition and, at the stage before formatting, do this operation in the installer.
More interesting for the user may be the option of cloning an existing operating system onto a new media. This method is very convenient, since SSD media are highly integrated with the system and will allow the operating system to start without problems. The latest versions of the tools allow you to clone a large set of versions of Windows and other systems. To carry out this operation, it is convenient to use a tool such as Acronis® True Image HD.
To run it, you need to use a boot device, but the algorithm itself is very simple. Click the Tools and utilities tab> Click the Clone disk button> Select Automatic (recommended) to activate the fast system clone mode. In the process, the program will automatically format the media. For a more accurate copy, it is recommended to specify the type of operating system up to the Windows version. Select the source disk (HDD)> Click the “Next” button, then select the target disk (SSD)> Click the “Next” button. After rebooting the system, you can start Windows from the solid state drive.
Notes for different operating systems
Modern users pay much attention not only to windows, but also to other operating systems. Consider the specifics of installing them on a solid-state SSD drive.
- MacOS. While holding down the Optoins button in the menu item, open the system boot window. Additional specification of the destination media type may be required to start the installation on an SSD. In some driver versions, this media type may be recognized as FDD or HDD. Therefore, he may not get out as the first device. The disk will be formatted before installing the OS.
- Unix systems. Installing the operating system will format the hard drive. Therefore, in the case of moving from windows, it is recommended to copy important information to a third-party independent media.
Formatting is the process of marking up media. In other words, this process creates a structure that provides access to the data. There are two types of formatting: low-level and high-level.
Low-level formatting is performed during the manufacturing process of the hard drive and provides for the application of information about the location of sectors and tracks necessary for positioning the servo heads.
High-level formatting involves creating master bootable media, partition tables, writing the structure of the file system, etc. This is the process required for the storage medium to be used by the operating system. The user has to perform high-level formatting in those cases when he installs a new drive on the computer so that he can work with it.
For already used media, formatting is performed if it becomes necessary to completely clean the disk or flash drive, remove viruses and fix errors, as well as when installing a new OS. Portable drives may come with a variety of file systems. Therefore, for their correct operation, it is often necessary to format it to bring the file system of the drive and the computer into conformity.
It should be understood that formatting implies the complete deletion of existing information. In this regard, if the data is of any value to you, then they must first be saved to another medium.
Choosing a file system and cluster size when formatting
 Before you start, you need to decide what type of file system you will use on the media. Such a choice will be offered to you before starting work, whichever of the available methods you choose. In most cases, NTFS and FAT32 systems are offered.
 The older system is FAT32. Today it is used much less frequently due to the limitations on the volume of partitions and stored files. These file systems are mainly used on computers running older versions of Windows (prior to Windows Millenium Edition).
For modern computers, NTFS is the best option, which not only allows more rational use of memory, but also has additional advantages, including in the field of security and self-recovery in case of errors. Another advantage of NTFS over FAT32 is the ability to store files larger than 4 GB.
In addition to the file system, you will have to choose the size of the cluster. This parameter characterizes the minimum file size that can be stored on the media. Accordingly, you need to choose the cluster size based on which files you will predominantly store on the media. If these are large files, then it is better to choose a larger cluster size, and for small files - a smaller size. In most cases, the default cluster size suggested by the system is optimal.
Quick formatting of a disk or flash drive using Windows
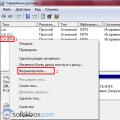
 The easiest way is to format it in Windows. For this purpose it is enough to open “My Computer”. Here you need to select the volume with which you will work, and open the context menu with the right mouse button, and then select the "Format" command. After that, a window appears where you will need to select the file system, cluster size and confirm the operation (see photo).
 Alternative access to this function is possible through the "Disk Management" menu, which opens through "My Computer", then "Management". And by choosing "Disk Management" in the menu, you can carry out not only formatting the entire hard disk, but also its partition.
You can format a hard drive in Windows only if the operating system is not installed on it. This method is also suitable for external hard drives. If there is an OS on the media, then it will simply be unavailable to perform this operation. If you need to format a disk with Windows installed, then you can use the formatting methods through the BIOS.
Partitioning and formatting a USB stick or drive in Windows
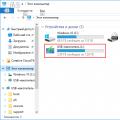
 This method is recommended if you decide for some reason to create and format partitions on a drive or flash drive. Or if you have expanded the capabilities of your computer for storing information and installed an additional new hard drive on it, then to start working with it, you need to format it. This method also allows you to change the drive letter assigned by Windows.
 For this purpose, you need to go to the "Disk Management" menu, the path to which through the Control Panel, we examined earlier (see photo). All installed drives will be displayed here: SSD, HDD or Micro SD, MMC, USB stick. The new hard drive will be displayed as Disk 1. You need to right-click on it and select the "Create simple volume" menu item, after which the wizard for creating a simple volume will start. Here we can select the volume letter, file system, cluster size. After that, in the wizard's dialog box, put a check mark on "Quick formatting" and click "Next". Now all that remains is to wait for the program to complete its work.
In some cases, it becomes necessary to divide the media available on your computer into partitions. Of course, this should not harm your data, and especially the operating system.
This task is accomplished through the same Disk Management menu. In this case, on the disk we need, we need to right-click and select "Shrink Volume". The system then checks the available space for compression. After that, a dialog box opens, prompting you to select the size of the space to compress. In this case, the system shows us the size of the space remaining after compression. These two numbers will correspond to the volume of each of the resulting partitions of the hard drive. After that, all that remains is to press the "Compress" button.
When the compression is finished, in the "Disk Management" menu we will see that unpartitioned space has appeared on the volume we are sharing. After that, it is enough to call the New Volume Creation Wizard and format it as described above.
Ways to format a flash drive or disk through BIOS
 In addition to standard tools, special software is widely offered today for formatting hard drives, external drives, and other media. The use of these utilities often greatly simplifies the process and gives the user a number of additional options. In particular, such programs make it easy to combine and split media, resize, move and copy with complete information preservation. Among the best among these programs are utilities such as Acronis Disk Director, Partition Magic, FreeFormat and a number of others.
 The disc must first be loaded into the drive, and then start the computer. When the computer boots up, press F2 to bring up the BIOS settings. In the opened settings (in the Boot section), you must set the boot priority on the CD-ROM and save the settings using F10. The computer will restart automatically.
After that, the computer will start from the CD-ROM on which the program for working with discs is written. In special programs, the interface is quite simple or it is worth following the instructions of the program (see photo).
There is also a way to format when installing Windows. For this method, you will need a Windows installation disc or USB flash drive. During Windows installation, you will be prompted to select a partition to install the operating system. Here you need to select the media you need. Having selected the required hard drive or its section, you must click "Disk settings", after which a menu will open, in which you need to select the "Format" command.
P.S.
Thus, today there are enough options for formatting flash drives or disks available to any user. Special utilities provide maximum convenience and efficiency in this process.
ArchiveReaditorial
The main problem with SSDs is the low number of rewrites of NAND flash chips.
Our reader decided to speculate about the benefits and harms of defragmentation in the light of the popularization of solid-state drives. The spelling and punctuation of the author are preserved. - approx. ed.
As you know, the main (and, in fact, the only) serious problem of SSD drives is the small number of rewriting cycles of the NAND flash memory chips that make up these drives. The number of rewriting cycles is, on average, 100,000 times for each cell (1 bit) in each flash memory chip, which imposes serious limitations on the device's lifespan. It is because of this that defragmentation for SSDs is disabled by default in Windows 7 (is it often used ?!). Moreover, file fragmentation does not affect the speed of solid-state drives.
To increase the lifespan of an SSD, manufacturers write non-trivial algorithms into the storage controller to more or less evenly distribute the load on the flash memory. The Winchester has to not only record data, but also analyze its actions and correct behavior every time. Naturally, this cannot but affect performance.
Let's imagine this scenario: system files, your documents, photos, videos, music, software - everything is stored on an SSD. Obviously, the frequency of overwriting these files is fundamentally different. Let's take a useful feature like autosave documents. By default, it saves the file every 10 (!) Minutes. 3 documents opened in the background will be rewritten 144 times during the working day, this is 34848 times a year. And if past experience still taught you to save all the changes made, this number can be safely multiplied by 5. Let's add the browser cache to this. My browser cached 170 files in a quiet half hour, despite the fact that most of the time I read articles about SSDs. Multiplied by a modest 3 hours a day, we get 372,300 more times a year.
There is the time of the last opening of the file, which the servicing OS updates every time the file is accessed, and it makes no difference whether the user opened it or the program. Performance counters. Logs of installers, services and programs. System event logs. Constantly rocking updates, patches, service packs. Even software players remember how many times you listened to a particular song.
The work of a computer is based on the constant movement of bytes / kilobytes / megabytes from the hard disk to the RAM and back. But the main problem is not so much that data is constantly being overwritten, but that there are files that do not change at all. OS libraries may not change even once, drivers (not video cards), movies, files of the games themselves (given the fashion to pack everything into one huge archive / database). Tens of gigabytes are dead weight, reducing the usable volume that the solid-state drive is trying with all its might to use to evenly distribute the load on the flash memory chips.
What is it about uniformity!
The paradox is that defragmentation can help us extend the lifespan of an SSD. Usually, good defragmenters place frequently changing files at the end of a logical disk, so that later, when fragmented, the fragments of the file are as close to each other as possible. For solid state drives, this technique can also be effective, with the only difference that when defragmenting an SSD drive, the most rarely changing files must be written to the most worn out sectors of flash memory and vice versa. As a result, the wear of the drive as a whole will be more even.
Obviously, modern operating systems are completely unsuitable for working with solid state drives. And if you consider that the greatest gain in performance you will get by using an SSD for the system partition, where the files that change most often are located ... There is clearly no way to get rid of the defragmentation service.
In any case, the era of affordable solid state drives hasn't even thought of starting yet. And during the use of SSDs in business projects, in servers, one can hope that the specifics of their use will be analyzed more thoroughly. Perhaps the disk defragmentation left the scene just to give way to some kind of "de-intensification";)
When files are written to the hard disk, a "smart" system algorithm breaks them into fragments for the sake of rational use of space. Unfortunately, when reading files consisting of many small fragments, computer performance inevitably decreases and Windows starts to slow down. Add problems and thousands of old system and user files. But there is a way out - regular cleaning and defragmentation system disk will prevent performance degradation.
Settings for Windows 10 | Windows 8 | Windows 7
We do not recommend doing defragmentation on solid state SSD drives... This can lead to errors and malfunctions. Defragment SSD does not improve performance. However, cleaning the disk from unnecessary files will still not be superfluous.
The number of fragments into which only one single file is divided can be in the hundreds and even thousands. Of course, such fragmentation does not at all contribute to the fast operation of the hard disk and the computer as a whole. Especially often this problem is subject to laptops, in which very brooding hard drives are most often built.
To speed up data reading, it is necessary to collect all small fragments of files into one. For these purposes, very effective programs for defragmenting files have been created. Performing regular defragmentation leads to an increase in the speed of accessing and reading data from the hard disk.
However, do not immediately start defragmenting the disk. For achievement maximum effect of defragmentation , you must first carry out a complete cleaning of your computer from various "file junk", the size of which on most computers can reach many gigabytes! And we are talking not only about old and unnecessary user data, but also about various system junk: temporary files, outdated shortcuts, remnants of previously deleted programs, etc.
Without first cleaning your computer from garbage, defragmentation is meaningless.
For effective cleaning hard drive computer and optimize the performance of the entire system, we recommend using one of the best programs in its class - CCleaner, just before defragmentation. After cleaning the system from junk files, defragmentation should be entrusted to another high-quality free program from this developer - Defraggler.
Step one: install Defraggler and CCleaner
Defraggler and CCleaner work in versions Windows 7, Windows 8 and Windows 10 × 86 and x64(32 and 64-bit).
For advanced users, paid versions of CCleaner Professional or Defraggler Professional are available.
Defraggler and CCleaner programs have fully functional free versions, which, however, does not prevent the creators from regularly updating and supplementing the programs with new features and settings.
The latest versions of Defraggler and CCleaner are fully optimized to run on all current Windows operating systems, including Windows 8.1 and Windows 10. Both programs are designed to optimize the performance of computers and laptops and are developed by the same development team. You can download them on the official website Piriform.com. In order not to waste time exploring the site, you can download them in one click: Defraggler and CCleaner directly from this page.
After installing CCleaner and Deffragler, you can proceed directly to cleaning the computer hard drive from the accumulated load of unnecessary files.
Step two: cleaning the PC from various junk
First of all, let’s give free rein to the clever CСleaner algorithm, which painlessly removes a huge number of unnecessary old files from Windows - these can be various obsolete temporary files, program cache, clipboard, website history and other file junk. You will be surprised, but together they can take up to several gigabytes on your hard drive! This is especially true for SSD owners, where every gigabyte is worth its weight in gold.
It is for these purposes that a tool with the unambiguous name "Cleanup" has been created in the CCleaner program - it is designed to find and remove various system junk and unnecessary temporary files. By default, all settings of the utility are made in such a way that the user does not experience any inconvenience after cleaning. We recommend that you still review the parameters and only after that start the analysis (so that authorization on sites and in social networks does not fly off, disable the cleaning of Cookies).
So, to effectively clean up the system, just click on the "Analyze" button, after which CCleaner will conduct a full disk scan for various file junk. During the analysis, the program will ask you to close the browsers if they are open - for example, Google Chrome or Opera.

After the analysis is completed, all you need to do is click on the "Cleanup" button. Done - the disk has lost thousands of unnecessary files. Now, let's move on to cleaning up the larger user files.
To begin with, we recommend that you make a thorough revision of all user data on your hard disk. We bet you have a lot of unnecessary video, audio and image files lying around on your hard drive. We hasten to please - thanks to CCleaner, you don't have to do it all manually!
Open the "Service" tab, then "Disk Analysis". Here, select the disk you need to clean up your computer (the system disk is always designated as "C:") or check everything at once. Also select the type of files you want to search for. Music, videos, documents and images take up the most space, so be sure to turn them on.

After performing the analysis, the program will provide you with a list of the largest files that are located on your hard drives. The list is formed in descending order - at the very top are the most "dimensional" files. If the name of the file does not tell you anything, right-click on it and select the "Open folder" menu item. Review the files in the folder and delete them if necessary. You can also select all files of the same type (for example, video in .mkv format) and delete them at once - to do this, select the file in the list, right-click and select the menu item "Select by type", then "Delete selected" ...
Thus, one day, I cleared out the 70GB SSD of my laptop, which was not enough to install Photoshop Lightroom and GTA V from Steam. But be careful when deleting, so as not to accidentally erase the necessary data.
It is equally important to remove all unnecessary programs from the system. I talked about this in detail in a separate article on Removing programs from Windows, but I will not bypass the side here either. Go to the "Service" section and to the "Remove Programs" subsection, as shown in the screenshot. CCleaner will generate a complete list of all programs installed on your computer.

Carefully study the list of programs, and remove unnecessary applications one by one by highlighting in the list and clicking on the " Uninstall"(But not" Delete "). When uninstalling some programs, you may need to restart your computer. We recommend that you do it right away, without starting to uninstall other applications.
Now that the computer is cleared of unnecessary files, programs and other debris, you can safely proceed directly to defragment your hard drive on your Windows computer.
Step three: defragment your hard drive
Run Defraggler with administrator rights... In the upper window of the program, select the hard disk that you want to defragment, right-click and select " Disk Defragmenter»In the context menu. To select multiple drives, hold down the Ctrl key and highlight the desired drives. The program will run disk analysis and start defragmentation.

Using the program, you can defragment the registry and Windows system files. Defraggler allows you to view comprehensive information about the progress of defragmentation and fragmented files. One of the undeniable advantages of the program is the ability to defragment individual files by opening the "List of files" tab.
Defragmentation can take a long time to complete the first time. During the defragmentation process, you can use your computer, however, we recommend that you do not do this to speed up the task. In the program settings, you can check the "Turn off the PC after defragmentation" item, which allows you to carry out it, say, before leaving for work.
Save yourself the hassle by setting up a defragmentation schedule by going to Settings> Schedule. After completing all the recommended operations, restart your computer and enjoy a significant increase in the startup speed of Windows 7 and software. The overall performance of the system will also increase significantly. The effect will be especially noticeable on computers where defragmentation has not been performed for a long time.
To reduce the number of requests to the paging file and thereby speed up the hard disk, you can use the proprietary ReadyBoost technology with a compatible flash drive.
To unleash the full potential of your computer, follow the next section of the Express System Optimization course. And do not rush to uninstall the CCleaner program - it will be useful to us more than once!
Defragmentation using standard Windows tools
If you do not want to download additional programs for defragmenting hard drives, you can use the standard utility, which is already integrated into any operating system of the Windows family.
However, despite some advantages of the native defragmenter, we recommend using the Defraggler software package, which favorably differs from the standard solution in more flexible and fine settings, convenient management and advanced functionality.
To run the standard utility, open the "Start" menu and type the word "Defragmentation" in the search box.  Select the link " Disk Defragmenter»In the search results.
For Windows 8: open the search bar with the keyboard shortcut + (Win + Q)  Enter "Defragment", highlight the "Options" tab and select "Defragment and Optimize Your Hard Drives."

Optimizing Windows:
Customizing Aero Visual Effects
Freeing up system resources by disabling some subtle visual effects.
Used software:
Windows visual effects manager
SSD-drives: getting rid of "childhood diseases"
Archive Platform
Solving the problems of solid-state drives requires software optimization of operating systems for their design features. The first step towards this has already been taken in Windows 7.
Solid-state SSD-drives appeared on the general market only five years ago, although they have been used in aviation and military equipment since 1995, when M-Systems introduced the world's first serial "hard drives" based on flash memory chips.
Today they are considered one of the most promising data carriers, which should replace the "hard drives" that have lingered on the market.
Modern solid-state disks, of course, have little in common with the very first ones, except that they are similar in principle of operation: they use non-volatile memory chips as data carriers.
Therefore, it is no coincidence that almost all SSD drive manufacturers are the same companies that have always specialized in the production of memory chips.
The advantages of SSDs are obvious. The absence of moving parts means high reliability, resistance to mechanical stress and reduced energy consumption. Thanks to the use of modern memory chips, SSDs have an order of magnitude less average access time (0.12-, 0.18 ms versus 14-15 ms) than in the fastest magnetic hard drives, and, as a rule, 2-2.5 times higher data reading speed (up to 250-300 Mb / s). Such drives provide a noticeable acceleration in loading the operating system, applications and access to folders with a large number of files. Finally, they run cooler and are completely silent.
The first drawback of an SSD drive that comes to mind - the high price - is a transient phenomenon and in no way related to the actual design features of such drives.
Meanwhile, they have a couple of unpleasant properties associated precisely with the nature of non-volatile memory. In order to understand the origin and ways of dealing with them, let us briefly recall how it all works, without going into details (they can be found here).
Flash memory cells are field effect transistors with an additional floating gate surrounded by a dielectric. As a result of electron injection or, more often, tunneling, the gate is capable of accepting one of two (SLC, Single Level Cell) or four (MLC, Multi Level Cell) states. In the first case it is "0" or "1", in the second - "00", "01", "10" and "11". It is clear that MLCs provide twice the capacity, albeit at the cost of some increase in latency, which is why most modern SSDs are of this type. However, drives with SLC are also available - usually these are expensive models for systems where minimum latency and increased reliability are required.
The first SSDs used chips with a logical organization of NOR (OR-NOT), but today NAND (NAND) chips are much more popular, providing higher sequential read and write speeds, but less fast random access. Almost the most important problem of solid-state drives is connected precisely with the logical organization of flash memory - it is "clogging" the disk with cells with "deleted" files, which manifests itself in the fact that over time the drive works more and more slowly, and in the end the delays become annoyingly noticeable.
Probably, it's not a secret for anyone that when we "delete" files from the disk, at first they are simply marked as "deleted", and their physical destruction occurs when they are replaced by new ones. It is on this feature that all kinds of data recovery algorithms are built.
If, in the case of a magnetic hard disk, the recording of new information occurs simply "over" the deleted one, then in the case of flash memory, everything is more complicated.
The fact is that NAND memory cells are combined into so-called pages, and physical erasure of data in them is possible only in 512-kilobyte blocks (128 4K-byte pages). To write new data, you need to either find free pages, or prepare a whole block by erasing the cells occupied by files marked as deleted. The process of erasing a block takes time, and when a lot of these blocks accumulates, then annoying "brakes" appear.
There are three solutions to this problem. The simplest, used in the outgoing generation SSD, is a complete low-level formatting of the drive, restoring all cells to its original state. For example, the Wiper Tool is able to do this, which is compatible with any drives with Indilinx controllers (for example, Corsair X series or OCZ Vertex series of the first generation).
The second is the GC (Idle Time Garbage Collection) technology built into the drive's firmware, which, in the absence of access to the drive, analyzes the state of the cells and forcibly cleans them of deleted files.
And finally, the third and most effective is the use of a set of TRIM instructions, implemented both at the disk firmware level and in the operating system. This is the same forced cleaning, only optimized for a specific file system. In addition to erasing trash cells, TRIM disables background indexing and defragmentation procedures that are unnecessary and even harmful to flash drives. TRIM is supported by nearly all new SSDs from leading manufacturers, including A-Data, Corsair, Intel, OCZ, SanDick, Samsung, and Transcend. But there is only one operating system compatible with TRIM so far - this is Windows 7.
The second drawback of an SSD drive is the limited number of write / erase cycles associated with physical wear: a constant load on the dielectric that insulates the floating gate causes changes in its structure and leads to "breakdown", that is, the inability to hold a charge. As a result, the cell loses its functionality, remaining permanently in some stable state. The SSD controller is able to track such cells and mark them, and the signal applied to them is redirected to the spare ones, the number of which can be up to 10% of the capacity of the entire drive.
At first glance, the declared number of write erase cycles is small - up to 10,000 for MLC and up to 100,000 for SLC. If we take the average write speed of 100 MB / s and the most common SSD of 128 GB, then we get a potential uptime of 3640 hours or 151 days. But in fact, such intensive use can only be simulated artificially: during normal work with computers, most of the files are written to disk only once, and no more than 10 percent are constantly changing. Based on this, we can assume that we already have 1510 days at our disposal, that is, a little more than four years of operation, and during this time any computer and, moreover, a drive will become morally obsolete.
Of course, you can completely disable an SSD drive in six months - if you use it incorrectly. Numerous stories about the sudden death of "solid-callers" are connected precisely with their improper exploitation. A particularly neglected case is the use of SSDs for recording, editing and mixing music and video, for such purposes they are, in principle, not intended. But there are also annoying situations when the owner was simply not explained how to use a computer with such a drive.
Unfortunately, it automatically recognizes and sets the correct operating mode with SSDs from the entire Windows family so far only "seven", and the same XP or Vista, with the default settings, wear out the drive intensively. Detailed instructions for setting up an OS to work with "solid-state devices" are easy to find on the Internet, and almost all of them boil down to disabling the functions necessary to ensure the performance of a conventional hard drive, but useless and at the same time destructive for SSDs. This, for example, caching files of frequently launched programs in a separate folder, indexing files, regular background defragmentation. It is recommended to disable the paging file and hibernation as well.
Summing up, we can say that SSD-drives have almost completely got rid of one of the two main "childhood diseases" - slowing down during operation. Obviously, the key to solving the second problem also lies in the software optimization of operating systems for the design features of such disks. The first step towards this has already been taken in Windows 7.
How to use SSD drives correctly

Today you will not surprise anyone with an SSD. It is advisable to build a modern Windows-based PC on the basis of two drives: SSD and HHD. The first is set as the system one, the second - for data storage. If anyone remembers, a long time ago we defragmented hard drives to speed up the computer. So: you can't defragment SSD drives! This will only shorten their already short lifespan. There are other subtleties to be aware of.
First, let's see the cost of the disks. The price for a 120 GB SSD starts from 3.5-4 thousand rubles. If you need 240 GB, this is at least 5-5.5 thousand rubles. And that's just the price of budget models. For better quality sdd disks, you will have to pay 1.5-2 times more.
HDDs are much cheaper. A terabyte will cost 3 thousand rubles, a 2 GB HDD - 4-4.5 thousand rubles.
SSDs only last a few years (HDDs can last for decades without dropping them). Why so few?
Because budget models have a small number of rewriting cycles for the cells where the data is stored.
Do not defragment
In Windows XP, when using hard drives with the FAT32 file system, it was recommended to periodically defragment. Thanks to this, the hard drive started to work a little faster. Later Windows switched to the NTFS file system. For it, defragmentation is no longer needed, because it practically does not give an increase in speed.
Defragmentation is contraindicated for SSD drives. It does not affect the speed of the disks in any way, but due to the additional write cycles, you will reduce the lifespan of the SSD. In addition, the access time to memory cells does not depend on how they are scattered (HDDs depend on this to a greater extent).
We leave 20-30% free space
Such a recommendation exists. If you want to get the maximum speed from the SSD, leave about a quarter of the volume in free reserve.
Do not format
Also, you do not need to format the SSD or use special utilities to completely delete information. Modern operating systems and SSD drives use the TRIM function, which allows information to be written over deleted data (otherwise, cells with deleted data must first be cleared and only then new information must be written there - and these are two different operations that reduce the speed and lifetime of an SSD).
Use modern operating systems
Windows XP and Windows Vista do not support TRIM technology, so it is best not to use them.
We store not data, but the system
An SSD is primarily needed to speed up Windows, programs and games. Therefore, we put these applications there. It is not recommended to store various content (music, movies, photos) on an SSD. Better to buy an HDD to store this data. It will be much cheaper than using an expensive SSD for this.

SSD drive is a fast enough storage medium, but its memory has a certain number of times in stock to be rewritten. And if SSD disk memory often overwrite and even in large volumes, then his days are numbered. At the moment, SSD drives are used mainly to install an operating system on it, this will significantly speed up the operation of the system itself and launch applications from it. In this article, I will give several recommendations for using an SSD drive that will help extend its life.
Do not use disk defragmentation
Disk defragmentation is needed for hard disks, this reduces the time it takes to read files, since the hard disk head does not have to run over the surface of the entire magnetic disk in search of file fragments. But for an SSD drive, this is not at all important, since it can (almost) access the next file fragment with the same speed, regardless of the location of the previous one.
Therefore, defragmenting an SSD drive will not give you anything other than additional wear and tear on memory cells.
Disable paging file
In Windows operating systems, the paging file, which is located on the system disk by default, is used as virtual memory. And in Linux operating systems, this role is played by the Swap partition. In this virtual memory, the operating system writes certain intermediate data or frequently used data, in short, uses (tries to use) instead of RAM, and this leads to a constant overwriting of this paging file or Swap section. This file or section must either be completely disabled (if there is enough RAM), or transferred to a hard disk partition.
Do not "clog" the SSD
The SSD controller of the drive monitors the uniformity of the use of memory cells, but if it does not have a sufficient number of free cells in stock, then it will have to overwrite those that are, and this will lead to uneven wear and tear, and faster failure of the entire SSD. Leave at least 15% free space.
Update firmware
Update your SSD controller firmware, it is possible that the newer firmware already has more advanced optimization algorithms and support for additional functions that will extend the life of the SSD.
Move cache folders to hard drive
Windows temporary folders or browser cache, albeit not globally, but still make constant overwriting. You can move Windows temporary folders in the system properties, on the "Advanced" tab, by clicking the "Environment Variables" button.