Boris Nikitin
Date of first publication:
Oct 2009Audio file editing program.
Sony continues to develop software it acquired in 2003 from Sonic Foundry. New versions appear almost every year - recently Acid 7, Vegas 9 and Sound Forge 10 were released. Sound Forge will be discussed now, and since version 8 was considered, we will talk about the innovations of versions 9 and 10.
For testing, we used a computer with the operating system Windows Vista Home Premium (Service Pack 1), a Core 2 Quad 2.5 GHz processor and 2 GB of RAM. This configuration fully complies with the system requirements of Sound Forge 9 and almost completely - the requirements of the tenth version: Windows XP (SP2 or higher) or Vista (SP2 or higher) operating system, 1 GHz processor, 512 MB RAM, 350 MB disk space, DVD drive, DirectX 9.0c or higher, Microsoft .NET Framework 2.0. As you can see, the inconsistency is the use of the operating system with the first service pack, which, however, did not cause any problems.
Sound Forge 9
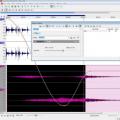
An important innovation in version 9 (modification 9e was used - Fig. 1) was multitrack support. The program allows you to open, edit and save multichannel files of different formats, as well as record up to 32 monotracks (16 stereo). Still, it should be borne in mind that Sound Forge is not a multitrack audio sequencer - the program's capabilities in this regard are severely limited, since it is designed to work with ready-made multichannel master files. For example, Sound Forge does not have convenient mixing tools - to convert multichannel files to stereo or mono, the Channel Converter function (Process menu) is used, which allows you to set the relative level of each channel, but is much inferior in convenience to a traditional mixer.

In the mentioned article about version 8, among the shortcomings of the program, the absence of some types of indicators was mentioned. In version 9, a vector oscilloscope and mono-compatibility indicators finally appeared, which, moreover (along with the spectrum analyzer and level indicators already available in the previous version), can work in multichannel mode.
Sound Forge 9 adds the ability to edit by dragging and dropping parts of a file (including between tracks). This function works without problems, but there is a slight inconvenience in it. According to the Windows interface standards (and Sound Forge strives to match them as much as possible), the shape of the cursor indicating editing, after selection (in this case, a part of the file) should change to the shape indicating movement. Here, the cursor does not change until you start dragging, which is somewhat confusing.
After dragging and dropping a part of the file to a new location, the Mix / Replace dialog box appears, in which you can specify the mixing parameters of the signal of the moved part and the signal present in the place where it is moved. In this case, you can use the crossfade, choosing from 25 different forms.
Crossfade options, as well as the balance of the direct and processed signals, have been added for processing effects. Parameter settings are opened by clicking the More button in the effect window.
Files encoded in this format can be exported using the included Dolby Digital AC-3 Studio plug-in. But this plug-in does not allow you to change the parameters (for example, the bit rate), for this you need to purchase the Dolby Digital AC-3 Pro version.
Other innovations in Sound Forge 9 include the ability to customize the interface colors (Preferences - Display), support for Gracenote MusicID technology (retrieving information about audio CD tracks), and support for the Windows Vista operating system.
Sound Forge Pro 10
The main news of the tenth version (Fig. 2) is event-based editing.

The Event tool has appeared (Fig. 3), when selected, new editing operations become available. For example, pressing the S key splits the file into two parts ("events") at the current playback position. Moving the boundaries of an event allows you to change its duration (however, it cannot exceed the duration of the file). The events themselves can be moved, deleted, copied, cut, pasted, etc. While holding down the Alt key, you can move the content of an event without changing its boundaries.

Most importantly, event editing is non-destructive. That is, if you split the file into two events, delete one of them, and then move the border of the remaining one, then the contents of the deleted event will appear in it.
At the top of the beginning and end of the event there is a small yellow triangle, by moving which you can create a smooth increase or decrease in volume (fade). By right-clicking on the fade area (it is highlighted with a slight change in the background color), a context menu is called up, in which you can select one of five fade shapes.
If parts of the events overlap, a crossfade is automatically created. Right-clicking on the crossfade area opens a context menu in which you can select the crossfade shape (25 options). In version 10 settings, you can set the default crossfade shape (Options - Preferences - Editing).
Moving the line at the top of the event changes the signal level. All of these operations are reflected in the waveform. Event editing also works on multi-channel files.
Processing functions and effects are applied to events individually. Naturally, with the exception of functions that change basic parameters, such as sampling rate or bit depth. In addition, the handling of multiple plugins in the Plug-In Chainer window only works on the entire file, not on individual events.
The second most important innovation of the tenth version can be considered an increase in the attached algorithms of the iZotope company. First of all, the set of plug-ins Mastering Effects Bundle, attached to the ninth version, has been replaced by Mastering Effects Bundle 2, in which the number of plug-ins has been increased from four to six (Stereo Imager and Harmonic Exciter have been added to the existing Mastering EQ, Mastering Reverb, Multiband Compressor and Mastering Limiter ). The set uses algorithms from the iZotope Ozone plugin versions 3 and 4, which differ from Sound Forge's own similar algorithms in better sound.
The elastique Timestretch plugin (Fig. 4), also based on the iZotope algorithms, complements the standard duration and key change function, and works better than it, allowing you to get an acceptable result even with changes of more than 10%.

In addition, iZotope 64-it SRC (sampling rate conversion) and iZotope MBIT + Dither (dithering) algorithms appeared in the program, which also do their job perfectly.
Finishing the conversation about new algorithms, we should mention the resonant filter that appeared in the tenth version. It sounds rather weak, but it can be suitable for creative use. In addition, it should be noted that the program still comes with a set of Noise Reduction 2.0 plugins (Noise Reduction, Audio Restoration, Click and Crackle Removal, Clipped Peak Restoration).
The program has a new window for editing metadata (View - Metadata), which contains general metadata of files (Summary Information), specific metadata of BWF (Broadcast Wave format) and Acid files, sample loops, lists of regions (Regions List) and playback ( Playlist / Cutlist), CD recording metadata (Track List and CD Information).
Speaking of CD. The built-in recording function has received support for the DAO (Disc-At-Once) mode, which allows you to create audio CDs that comply with the Red Book standard. Previously, you had to use the included CD Architect program to do this. However, CD Architect 5.2 is still included. However, the presence of the DAO recording function directly in the Sound Forge program is convenient, in addition, this function is well combined with other innovations: editing events allows you to separately process tracks of the future CD, and the metadata window allows you to enter the necessary information.
The main change in the interface was the ability to customize and save the layouts of on-screen elements (View - Windows Layouts). There are three preset options, and you can save up to ten of your own (Fig. 5). Two other useful additions: open windows are now shown as tabs at the bottom of the program window and you can create your own layout grid (useful when working with magnifiers). Well, as usual, some menus, toolbars and keyboard shortcuts have been changed. The Special menu has been completely removed, its commands are distributed across other menus, including the new Insert and Transport. The latter is hidden by default, it must be enabled in the settings (Options - Preferences - General).

Among the remaining innovations: the ability to edit virtual instrument files (DLS, SF2, GIG formats), a shared data buffer in RAM (improves performance), more efficient handling of BWF file metadata (also improves performance), added interactive tutorials.
Your: No
Any advanced PC user sooner or later faces the need to create and process audio content, after which the question naturally arises of choosing the right software that can meet the needs that have arisen.
Creating podcasts and ringtones, removing noise and distortions, increasing the volume of "quiet" files, recording sound from external sources, digitizing vinyl records and audio cassettes - this is not a complete list of tasks for which you need to have a good audio editor capable of processing any material ... This review is dedicated to the Sound Forge Audio Studio 10 software product from Sony, which, as you might have guessed, can do all of the above. Intro A high serial number of the version indicates that the product has a long and interesting history. This audio editor was created by Sonic Foundry back in the era of Windows 3.11 and has always enjoyed some success, but over time the developers faced stiff competition from other manufacturers of client music software and began to suffer heavy losses. In 2003, three such programs - Sound Forge, ACID and Vegas - were acquired by Sony Pictures Digital, which provided them with a long life and further sustainable development. Sonic Foundry itself has not disappeared anywhere, it just stopped working on client software and focused exclusively on professional tools for webcasting, and its main product at the moment is the Mediasite platform.
In the area of audio processing, Sound Forge has the same potential as Adobe Photoshop in the area of image processing. That is, it allows you to do almost everything with sound.
So, in fact, why did we stop at Sound Forge Audio Studio as a sample program for processing and creating audio content, and why version 10? There are at least two good reasons for this. The first is that in the area of audio processing, Sound Forge has about the same potential as Adobe Photoshop in the area of image processing. That is, it allows you to do almost everything that you can ever need with sound files, as well as a lot of things that you didn't even know about (smiley). There is also a second reason.

The fact is that this version of the Sound Forge editor (for the first time in history) was fully officially Russified, which significantly simplified the work with it for most of the population of our country. The quality of the translation is very good - the developers have done their best and delivered a truly decent result without any mistakes or ridiculous cuts, which cannot even be compared with similar attempts made in the past by enthusiasts on a voluntary basis.
- Program: Sound Forge Audio Studio 10
- Type: audio editor
- Developer: Sony
- Distribution kit size: 145 MB
- Interface Russification: yes
- Address: www.sonycreativesoftware.com/audiostudio
Obviously, the localization involved professionals with knowledge of the issue, and not just random translators of a wide profile. Moreover, not only the program interface itself with tips and pop-up messages was translated, but absolutely all sections of the help, so if you need to learn something new, it is not at all necessary to scour the forums on the Internet, since now you can get answers to many questions without leaving the program window ... There is also an extensive glossary with explanations of many sound engineering terms, from which you can glean a lot. For this alone, we can say a big human thanks to Sony!
Sound Forge Audio Studio 10 is suitable for recording sound from external sources - microphones, turntables, live instruments, etc.
In addition, on the toolbar there is a button "How to do this?" etc.). There are also visual video tutorials, but for free (that is, as part of the software) they can only be obtained by those who are upgrading from the previous version of the editor, and everyone else will have to buy them separately. Well, it will not be superfluous to note that the interface and appearance of Sound Forge have not changed at all in recent years, so if you have ever dealt with, say, the ancient version 5.0, you will have absolutely no difficulties in mastering the tenth release. Menu items, buttons, toolbars, operating principles - everything remained in place, but not because the authors were too lazy to improve their product, but because from the very beginning they made their software as convenient and thoughtful as possible. Basic features The first thing you will most likely want to do with your audio material is to break it apart. Suppose you decide to create a new ringtone for your mobile phone, which will contain the brightest fragment from your currently favorite music composition. To do this, you must first open the audio file in the program, where it will be displayed as a sound wave, consisting of two parts located one above the other (left and right channels, respectively).
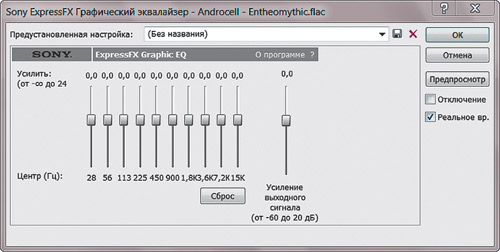 Graphic Equalizer Dialog Box. Here, in general, the Russian language is not needed (smile)
After that, it remains to select the desired fragment with the mouse, copy it with the standard keyboard shortcut Ctrl + C and paste it into a new empty file (Ctrl + V), or simply drag the selected fragment into the free area of the window. The insertion operation, if desired, can be repeated several times in a row, then the fragment will be repeated several times. Next, you can slightly edit the created passage and bring it to mind - for example, make the beginning and end smoother using the Fade / Fade commands from the Processing menu item, and raise the overall volume level (Processing> Volume ). By the way, using the "Normalization" processing, you can automatically raise the volume level to maximum without any distortions. Now all that remains is to save the result in the desired format and upload it to your mobile phone. All these operations, with proper skill, will take no more than 5 minutes. It is worth remembering that when you open any file, the program creates on your hard disk (in the same folder) a description file of the same name with the * .sfk extension, which takes some time depending on the length and format of the source file. The description contains all the metadata, the "picture" of the sound wave and is automatically updated on the next save. This is useful if you are editing a long file and cannot complete the work in one go. Next time the file will be opened instantly based on the available description. After closing the program, SFK files are not deleted, so they will have to be manually rubbed from the disk. 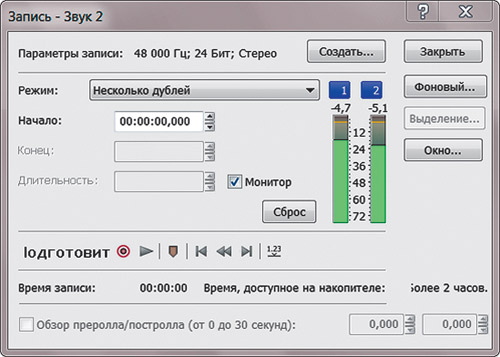 Working with effects Applying audio processing algorithms (applying effects) is the main method for modifying your audio material. In Sound Forge Audio Studio 10, effects are tools like filters and brushes in Photoshop. Working with them is an easy, intuitive process. You can apply an unlimited number of effects either as a whole to all files, or to a separate selection or channel. To do this, open the "Effects" or "Selected Effects" item. The first contains 11 basic, time-tested algorithms (with a detailed description in Russian) that have survived since the time when the Sound Forge package belonged to Sonic Foundry, the second contains plugins developed by Sony or third-party VST plugin manufacturers. In my case, after installing the program in the "Chosen" immediately lay a few dozen effects - equalizers, delays, echoes, noise elimination, etc. For the first time, enough with the head, no doubt. Unfortunately, in most cases there are no descriptions for them even in English, so the user will have to figure out the intricacies of their use on their own. After selecting the desired effect, a window with settings appears. The easiest way is to select one of the presets through the drop-down list, and then manually bring it to "condition" a little. For more confidence, you can click on the "?" and read the corresponding section of the help. The best part is that by clicking on the "Preview" button, you can immediately, without any waiting, listen to how your audio file or its fragment will sound after processing with the effect. Moreover, this operation almost does not load the processor and RAM. When the result suits you, you can click on "OK", after which the program will write the modified file (with the applied effect) to the hard disk. Recording Sound Forge Audio Studio 10 is great for recording sound from any external source - microphones, turntables, live instruments, digital players, etc. The process is extremely simple and, moreover, presented as an object lesson in the “How to do this? ". You can record sound to an existing or to a new file, and if there are several takes, you can record them one after another without closing the dialog box once again. The program captures the signal arriving at the input of the sound card specified in the general settings. The default quality is 44 100 kHz / 16 bit, but these values can be increased up to 19 200 kHz / 32 bit, of course, if they are supported by your sound system.
  To digitize sound from analog media (vinyl, tape), the program provides the function "Record and restore from vinyl" in the "Tools" menu. With its help, you can record two sides from a record or audio cassette, immediately eliminate unnecessary artifacts (clicks, crackles, noise) on them, divide the recorded material into separate tracks and save them as audio files of the desired format with the simultaneous creation of tags. It's even easier to rip tracks off a CD. This operation is performed in three clicks: "File"> "Extract Audio from CD"> "Ok". The disc information is automatically downloaded from the Internet through the Gracenote service, so in some cases the program will automatically place the necessary tags and name the files. Video The "video capabilities" of Sound Forge Audio Studio 10 are limited to editing the built-in audio track. The basic software package (without installing additional modules) supports only three formats - WMV, AVI and SWF. When you open a file, the video track is located at the top, below it is the audio track, which can be handled in the same way as with any audio material. For confident work with video material, it is recommended to have a powerful modern dual-core processor and a fast hard drive, otherwise the editing process will not go as smoothly as we would like.

About editing myths One of the functions of the audio editor is called "Erase Voice", and the developer's website says a lot about it, in particular, that the user can allegedly remove vocals from a musical composition and use the instrumental part for his own creativity. This is a popular myth that music software manufacturers have been supporting for years in order to increase the attractiveness of their products. In practice, it is possible to remove something from an audio file only at the level of the frequency spectrum, but not at the level of instruments, the sound of which usually covers almost the entire frequency range and is never limited to any one area of it. Therefore, do not believe such advertising promises - no, even the most expensive, software will be able to remove a part of an instrument or voice from an audio file. In fairness, it is worth noting that there is still some truth in this. The declared function will work if, when mixing a musical composition, the voice was placed exactly in the center of the stereo panorama, and all instruments, on the contrary, were removed by 100% to the left or right channel. In such a case, it is indeed possible to eliminate the vocal part by simply removing the center channel. However, in the field of sound recording, at least in the last ten years, such precedents have not been registered (smile). Outro Finally, it remains to say that Sony has set a more than adequate price for the tenth version of Sound Forge editor, which makes its purchase absolutely justified and, most importantly, real for most home computer users. Less than 70 US dollars for a high-quality, stable and fully Russified software product from a world-renowned company is exactly what an ordinary user who is fond of music, who is not burdened with any professional duties in this area and unnecessary money, can quite afford. Sound Forge Audio Studio 10 from Sony will regularly help you in editing audio content and will cope with it much better than similar products from other manufacturers, not to mention free counterparts. This tool is well worth the investment! UP
Professional distinctions In addition to the Sound Forge Audio Studio we are considering today, there is another product from this line with the laconic name Sound Forge Pro. It has many significant differences from the younger version, in particular, it can handle multichannel material, while the "audio studio" is capable of handling only two- (stereo) or one-channel (mono) files. It's easy to guess that this feature allows you to create and edit audio content in 2.1, 5.1, 7.1, etc., including exporting data to Dolby Digital AC-3 format. In addition, Sound Forge Pro supports 192 kHz / 64 bit and contains a huge number of built-in professional grade plugins from iZotope. Another key difference between the Pro version and the regular version is the support for Sound Forge Project files. So, if the "studio" allows you to save the results of the user's activity only in the form of separate audio files of the selected format, then Sound Forge Pro is able to record the working material in the form of a "project", in which many files can be opened simultaneously, and for each of them the entire history is remembered changes even after closing the program. This allows you to interrupt the process at any time and turn off the computer, and the next time you start the program, you can continue editing from the point at which it was stopped. When performing professional tasks, such an opportunity is an urgent need, since almost any high-end project always involves a certain number of audio files, and its completion requires, as a rule, several approaches. Naturally, such radical differences could not but affect the final cost of the product. On the developer's website, the Pro version is offered at a price of $ 375, in addition, it is available only in English and Chinese, although Russian folk craftsmen, of course, have already managed to make a homemade crack for it, which is installed separately. In my opinion, there is no point in purchasing Sound Forge Pro for home use, especially considering that the basic possibilities for working with audio material are absolutely the same for both versions.
A new version of Sony Creative Software's professional digital audio production suite, including everything you need to go from raw audio to finished product. Sound editor Sound Forge Pro 11 includes an event-driven editing engine, disc-at-once CD burning, iZotope 64-bit sampling rate conversion, MBIT + technology for signal bit depth aliasing, musical instrument file processing, and a plug-in elastique Pro for stretching sound bites and resizing / rhythm.
Use the program SONY Sound Forge Pro 11.0 build 234 to create and edit multichannel stereo sound files for speed and accuracy. Analyze, record and edit audio efficiently. Digitize and restore old recordings, overlay acoustic environments, engineer sound for multimedia applications, and create replicable CDs.
Event-based editing in Sony Sound Forge Pro 11
Peculiarities SONY Sound Forge Pro 11.0 build 234:
- Tools for design and installation.
- Elimination of shortcomings of recording: interference from a power frequency source, tape hiss, clicks and other sound elements.
- Sound recording on schedule or when a certain sound frequency is reached via Record Time.
- Editing stereo and multichannel sound in real time.
- Commands similar to Windows for cutting, copying, pasting, mixing or blending audio.
- Drag and drop audio files.
- 24-bit and 32-bit / 64-bit at 192 kHz floating point resolution for audio fidelity.
- More than 40 professional effects and processes: Normalization, EQ, Delay, Shift, Comb, Chorus, Loudness, Logic noises, Dynamics, Vibrato and others. Supports AVI, MPEG-1, MPEG-2 and WMV video formats, as well as importing Flash (SWF) files for visual synchronization of audio.
- Export of multichannel files to AC-3 format.
- Powerful audio editing tools.
- Excellent sound quality.
- Stereo and multichannel sound recording.
- Integrated CD mastering in Disc-at-Once (DAO) mode.
- Powerful effects processing capabilities.
- Powerful noise reduction tools.
- Editing and processing of files of musical instruments (.DLS, .SF2, .GIG).
What "s new in version 11.0
- Improved recording workflow, including a new Record Options window and input monitoring through the Plug-In Chain.
- Added a Loudness Meters tool and loudness logging.
- The Statistics dialog now includes loudness data.
- Added Use True Peaks and Enable DC Blocking Filter controls to the Detect Clipping dialog for measuring loudness.
- Improved support for metadata in Broadcast Wave Format files.
- Added support for editing files in SpectraLayers Pro 2.0.
- Improved Plug-In Chain window now allows floating plug-in windows.
- Improved selection dragging: you no longer need to drag up before dragging a selection.
- Fade in and fade out curves now default to a linear curve in the processing and Mix dialogs.
- Added Remember last-used Save As folder to the General tab in the Preferences dialog.
- Added plain text file option for saving and opening a file's regions list and playlist / cutlist.
- You can now rearrange maximized data window tabs by dragging the tabs to a new location.
- Added automatic resampling during playback for unsupported sample rates when you "re using an ASIO audio device.
- Added support for splitting events at region boundaries.
- Added support for moving markers, regions, and envelope points with events.
- The Options> Paste Markers / Regions command is now Options> Lock to Selection> Markers / Regions and Options> Lock to Selection> Envelope Points.
- Added support for ripple editing in event-editing mode. Choose Options> Event> Auto Ripple to toggle automatic ripple editing for downstream events.
- Improved audio playback and recording device routing in the Preferences> Audio tab.
Products webpage:
http://www.sonycreativesoftware.com/soundforgesoftwareYear of issue: 07.2013
Version: 11.0 build 234
Platform: Windows
Interface language: English + Russian
Medicine included.
Archive size: 201 MB.
A quick introduction to the Sound Forge program
Since Sound Forge is a very powerful application, you can use it for a variety of tasks. These tasks include audio editing and mastering, developing sound effects and sample loops, preparing CDs, creating audio files for the Internet, and even finishing up movies and video clips. Sound Forge has several functions to accomplish these and many other tasks. Combined with your favorite sequencer software, Sound Forge allows you to create the same recordings produced in professional studios. With Sound Forge, you will find exceptional flexibility and functionality in its instruments.
Audio files
Since Sound Forge is a sound editing application, it does not have its own format for storing data, since sound data can be stored in various formats. The two most popular formats are WAV (on Windows platform) and AIFF (on Macintosh platform). These formats are so popular that they have become standard, but there are other file formats that have their own disadvantages and advantages over WAV and AIFF. These formats include MP3, Window Media, and RealAudio. Sound Forge can open and save files in over thirteen different file formats, not counting the ACM formats. We'll talk about file formats in Chapter 4.
Working space
Sound Forge has a Workspace for working with audio files. This is the main part of the program interface, which contains the data window (which we will talk about now) for each of the open audio files. In the Sound Forge program, you can have several open audio files at the same time (Fig. 2.3).
Rice. 2.3. The workspace is where you will work with your audio files in Sound Forge:
The workspace also contains playback meters, where you can see the output level of the audio data being played. You can save the layout of the workspace elements to special workspace files and then load them later, which is a quick and easy way to customize Sound Forge for each of your projects. We'll talk about the workspace in Chapter 3.
Data window
When you open an audio file in Sound Forge, its data is displayed in the Data Window. If several files are open at once, each of them has its own data window. When you work with an audio file, you can see an image of the sound waves representing the data from that file, as seen in Fig. 2.4.
The data window allows you not only to see the data of the audio file, but also to edit and process it. Moreover, you can add effects. Throughout this book, we'll be talking about the data window and working with it.
Rice. 2.4. Each audio file opened in Sound Forge is displayed in its own data window:

Menu
Almost all functions for editing, processing and adding effects can be accessed through the menu. Most often, you will need to use the Special, Process, Effects, and Tools menus (Figure 2.5).
Rice. 2.5. Most of Sound Forge's features are available through the menu:

Each menu contains its own group of functions. The Special menu contains most of the navigation, recording and playback functions. The Process menu contains audio processing functions such as equalizer and amplitude control. The Effects menu, as the name suggests, contains various effects. Finally, the Tools menu provides additional options that cannot be categorized above, such as Spectrum Analysis. We'll talk about audio processing capabilities in Chapters 8, 9, and 10.
Record Dialog Box
In addition to opening and saving existing sound files, you can also use Sound Forge to create and record new files. The Record dialog box is intended for sound recording (Fig. 2.6).
Rice. 2.6. You can record new audio files to Sound Forge using the Record dialog:

Sound Forge allows you to record sound in up to 64 bit depth and multiple sampling rates from 8 Hz to 192 kHz. The Record dialog has its own set of input level meters and even provides MTC / SMPTE timing. We'll talk about recording sound with Sound Forge in Chapter 6.
Spectral analysis
Differences between Sound Forge and Sound Forge XP Studio
Not everyone needs the full power of a professional digital audio editing application like Sound Forge. For ordinary users, and even more for beginners for whom music is just a hobby, another product from the same family will be enough: Sound Forge XP Studio. Essentially, Sound Forge XP Studio is just a stripped-down version of Sound Forge. It has the same basic functionality, but lacks some advanced features.
Sound Forge XP Studio is intended for those users who need audio editing at an amateur or semi-professional level. Basic audio editing and processing capabilities are quite powerful, but lacks features such as DirectX plug-in support and processing preview. The number of processing functions in it is limited, for example, there are only eight effects (versus seventeen in Sound Forge) and there is only graphic equalization (as opposed to graphic, parametric and paragraphic equalization in Sound Forge).
Here we have just touched on some of the features of Sound Forge XP Studio versus Sound Forge. For a detailed comparison, Sonic Foundry has released a complete list of features available in each of these products. You can find it on the Sonic Foundry Web site at http://www.sonicfoundry.com.
One of the most powerful features available in Sound Forge is Spectrum Analysis. While the Spectrum Analysis feature may seem daunting, it is actually easy to use. It makes sense to take some time to understand how it works. In short, the Spectrum Analysis feature allows you to explore your audio data with special charts that display the amplitude and frequencies found in the data. This allows you to process the data and actually "see" the effect of the processing. This is a very powerful feature, so we'll talk about it in Chapter 10.
Tuning your system for better performance
Sonic Foundry specifies that the minimum requirements for Sound Forge to run are a computer with a 90 MHz Pentium processor and at least 16 MB of RAM. Of course, you must also have a sound card that is supported by the Windows operating system. If your computer meets these requirements, all you need to do is install the program on your computer. If you want to get the best performance out of Sound Forge, you need to do some tweaking on your computer.
CPU
You will hardly be able to squeeze a lot out of the processor, unless you replace it with a newer and faster one or buy a new computer at all. The newer and faster your CPU is, the better the performance of your computer and Sound Forge software will be. In terms of performance, the processors are in the following order: Pentium, Pentium MMX, Pentium Pro, Pentium II, Celeron, Pentium III, Pentium IV (at the time of translation). You can also supply an AMD processor, but in this case there is some possibility of incompatibility between the computer and the sound card. Some sound cards do not work on these processors, so please be aware of this before purchasing. It all comes down to the fact that Sound Forge processes sound significantly faster than the most powerful processor, so having a faster processor allows you to reduce the waiting period. In addition, Sound Forge runs more smoothly with a powerful processor.
If you want to check how your processor's performance is being used for various tasks, the Windows operating system includes the System Monitor program. To use it, follow these steps:
1. If System Monitor is not installed, open the Windows Control Panel. Double-click the Add / Remove Programs icon and select the Windows Setup tab in the Add / Remove Programs Properties dialog box. Then select Accessories from the list, click the Details button, select System Monitor from the list that appears, and click OK to close the dialog box. The Windows operating system will then install the System Monitor program.
2. Open System Monitor by clicking on the Start button and selecting Programs -> Accessories -> System Tools -> System Monitor
(Programs -> Accessories -> System Tools -> System Monitor). The general view of the program is shown in Fig. 2.7.
3. Select Edit -> Add Item from the program menu. In the dialog box that appears, click on the Category List Core item. Then click on Processor Usage in the Item list and click on the OK button.
4. Depending on your current settings, you will see a line chart, bar chart, or numeric representation of the data. You can choose another view from the View menu.
Rice. 2.7. The System Monitor program allows you to estimate the processor load:

The System Monitor will now continuously show changes in CPU usage.
RAM
You probably already know that the more RAM you have installed on your computer, the better. This is all the more true for complex applications like Sound Forge. Although Sonic Foundry specifies 16 MB of RAM as a minimum requirement, it is best to have at least 64 MB. This allows you to significantly speed up the system. With more RAM, the Windows operating system is less likely to need to access virtual memory.
Virtual memory
To trick the computer into thinking that more memory is installed than it actually has, Windows uses a portion of the hard drive as virtual memory. Each time Windows starts up, it creates a swap file called win386.swp on the hard disk. This file changes its size depending on what tasks are performed on the computer. When you try to use more memory than the computer has installed, Windows stores redundant data in the paging file. For example, if your computer has 32 MB of RAM, and you are running four different programs at the same time, each of which requires 16 MB, two of these applications, in theory, cannot run. However, Windows simply uses virtual memory to provide 32MB of additional memory. Since virtual memory uses a hard disk to store data, the access speed to which is incomparably lower than to RAM, working with the paging file dramatically slows down the computer. This is one of the reasons a computer with more RAM is faster.
HDD
The speed of your hard drive is one of the most important factors in how quickly Sound Forge can complete large audio editing tasks. In terms of performance, SCSI is better than IDE, but a good E-IDE drive can be just as good as a SCSI drive. When choosing a drive, you need to pay attention to several parameters. The average seek time should be as short as possible, preferably 9 ms or less. The rotation speed should be higher, the most common speeds are now 5400 and 7200 rpm. The sustained data transfer speed should also be as high as possible, at least 5 MB / s. Another important consideration is how the hard disk controller card is connected inside the computer. A PCI slot is preferred over an ISA slot.
By the way, you can use System Monitor to test the performance of your hard drive, much like you can test a processor (see the "Processor" section earlier in this chapter).
Apart from updating the hard drive, it should be said that there is a trick that allows you to slightly speed up the work of an existing drive. This is the direct memory access (DMA) setting for the hard disk controller. In this case, the hard disk accesses the computer memory directly, without data processing by the processor. If your hard drive supports Direct Memory Access, you can activate it as follows:
1. Open the Windows Control Panel. Double-click the System icon, then select the Device Manager tab in the System Properties dialog box.
2. In the list of devices, expand the Disk Drives group and select your hard drive. Its name might look something like "Generic IDE Disk".
3. Click the Properties button, then select the Settings tab in the drive properties dialog box. The dialog box should look something like the one shown in Fig. 2.8.
Rice. 2.8. This disk properties dialog box shows the hard disk settings:

4. Select the DMA check box in the Options group and click the OK button to close the dialog box.
After Windows restarts, your hard drive will have direct access to the computer's memory, which can give a noticeable speed boost.
Video adapter
Believe it or not, the video adapter can affect the performance of your computer. Firstly, hardware acceleration of the video card can cause problems with audio playback. If you have a video card on the PCI bus, and the sound is sometimes interrupted by clicks and other unexpected sounds, this may mean that the hardware acceleration of the video card is set too high. Try dragging a program window across the screen while playing a digital audio file. Does this action affect audio playback? If so, try decreasing or disabling the hardware acceleration of the video card to fix the problem. To do this, follow these steps:
1. Open the Windows Control Panel. Double click on the System icon.
2. In the System Properties dialog box, select the Performance tab. Then click the Graphics button in the Advanced Settings group.
3. In the Advanced Graphics Settings dialog box, move the Hardware acceleration slider to the left to decrease or completely disable the hardware acceleration of the video card. The dialog box should look something like the one shown in Fig. 2.9.
Rice. 2.9. The degree of hardware acceleration of the video card is set in the Advanced Graphics Settings dialog:

4. You may or may not turn off hardware acceleration completely. The best value can be found experimentally. After you find the optimal position of the slider, click on the OK button to close this dialog box.
The new settings will take effect after Windows restart. If you have a graphics card on the latest AGP bus, you don't have to worry about hardware acceleration issues. Such video cards access the RAM directly without interacting with the PCI bus, so they usually do not cause the problems described above.
Other screen settings that can affect system performance are screen savers, monitor resolution, and color depth. When performing tasks that require a lot of CPU usage, it is best to disable the screen saver. Even when it does not display anything, it still monitors system activity in the background and thereby additionally loads the processor. In addition, some screen savers do not know what the computer is doing at any given time and are activated in the middle of the recording process. To disable the screen saver, follow these steps:
1. Right-click somewhere on the desktop and select Properties from the context menu.
2. Click the Screen Saver tab of the Display Properties dialog box. The dialog box should look something like the one shown in Fig. 2.10.
Rice. 2.10. In the Display Properties dialog box, you can configure many Windows settings, including screen savers:

3. Select (None) from the drop-down list in the Screen Saver group and click the OK button.
Screen resolution and color depth affect how accurately your monitor displays graphics. Greater color depth means more colors are output, while higher resolution results in sharper images. But the higher the resolution and color depth, the more work the computer has to do. Increasing the values of these parameters can significantly slow down your computer, especially if it has an older processor. The best choice is 800 x 600 and 256 colors. Usually higher values are not needed, but you can experiment with how higher values affect the performance of your computer. However, decreasing color depth is more beneficial than decreasing resolution.
Comment
Although Sound Forge can work at any color depth, it looks better at 16-bit color. Therefore, if your computer supports this resolution, try setting it.
Rice. 2.11. In the Display Properties dialog box, you can adjust many Windows settings, including screen resolution and color depth:

To change the color depth and resolution, follow these steps:
1. Right-click anywhere on the desktop and select Properties from the context menu.
2. Click the Settings tab of the Display Properties dialog box. The dialog box should look something like the one shown in Fig. 2.11.
3. Select 256 Colors from the drop-down list in the Colors group. Then drag the slider in the Screen area group to the left until the resolution reaches 800 x 600. Then click on the OK button.
After Windows restarts, your monitor will run at the set resolution and color depth. It may take some time to get used to the new settings if you have been constantly working at higher values before, but this is not fatal. But you will notice how much faster Windows will run.
Network Card
If your computer is connected to a network, you may want to use another computer to edit and record sound, or disconnect your network card while using Sound Forge. Network activity puts a heavy load on the processor and can greatly slow down your computer. The easiest way to disconnect your computer from the network is to simply unplug the network cable from the network card. However, you can further improve performance by disabling the network card as follows:
1. Open the Windows Control Panel. Double-click the System icon, then hide the Device Manager tab of the System Properties dialog box.
2. In the list of devices, expand the Network adapters group and select your network card. Its name usually reflects the name of the product. It might look like "EZ-Link USB Adapter" for example.
3. Click the Properties button to open the properties dialog box for the network card. The dialog box should look something like the one shown in Fig. 2.12.
4. Select the Disable in this hardware profile check box in the Device usage group and click the OK button to close the dialog box.
Windows will disconnect the network card without having to reboot. Now you can simply close the System Properties dialog box.
Rice. 2.12. This NIC Properties dialog box shows the status of the device:

Sound card
As for sound cards, we can give only one piece of advice: the performance of a sound card on the PCI bus is significantly higher than on the ISA bus. Newer PCI sound cards usually have more sophisticated sound design designed to take the most out of the processing work of the CPU. It's also a good idea if your card supports the Direct Sound features of Microsoft's DirectX technology. This type of card provides greater application compatibility and sometimes better performance.
Another important point: if you really want the best sound quality, get an audio interface, not a sound card. The difference is that the audio interface comes with an external housing that covers the circuitry and pins. As a result, the audio interface is not affected by noise generated inside the computer. A conventional sound card is located very close to other computer circuits, which give different pickups. Of course, an audio interface costs a lot more, so it's up to you to decide if you need to spend the extra money.
One of the most common readers' questions is: "What brand is the best sound card to buy?" There are so many different sound cards on the market with a wide variety of capabilities that it is simply impossible to give a definite answer. However, we can tell you what opportunities you need to look for in order to make a meaningful choice.
We already mentioned that you need to look for a DirectX compatible sound card for personal computers. You also need to understand the types of connectors available on the card. A typical sound card has several different input and output jacks, including line in and out, microphone in, and speaker out. Line in and out are designed to exchange signals with a cassette recorder, radio, electronic keyboard, and other standard audio devices. Microphones generate a very weak electrical signal and therefore require a separate input connected to an internal amplifier on the sound card. Speakers also require a separate jack with a built-in amplifier in order to deliver sufficient signal strength. Some high-end cards have digital input and output jacks. These dedicated connectors allow you to connect your sound card directly to compatible devices such as CD players and digital recorders. Using these connectors gives you the best possible sound quality since you do not need to convert the audio signal to analog form. In addition, you must understand that the connectors can have different shapes. Cheap sound cards usually have the same 1/8-inch jacks used for microphones on audio players. For best quality, there are 1/4 inch jacks, RCA and XLR connectors. Connectors can also be balanced or unbalanced. Balanced connectors provide RFI shielding, while unbalanced connectors do not.
If you want to be able to record simultaneously from multiple audio sources, you need a card with multiple audio connectors. Most mid-range sound cards mix all incoming signals into a single stereo signal, but high-end cards (which, of course, are much more expensive) allow you to record sound from each connected device into a separate stereo channel. This feature is very useful for recording studios, but not everyone needs it. You can also look for a full duplex sound card. This means the card can record and play audio at the same time, unlike a half-duplex card, which can only do one of these tasks at a time.
Everyone wants high quality audio. During recording, the sampling rate (which we talked about in Chapter I) plays a leading role in the quality of the recording. The higher the sampling rate, the better the sound. The sampling rate for CD-quality recording is 44.1 kHz (44,100 samples per second) and all currently commercially available sound cards support it. Professional cards can support sampling rates of 48 kHz and above. The bit depth of the card (which we also discussed in Chapter D) also affects the sound quality. The higher it is, the higher the sound quality. The standard for CD quality recording is 16 bit and is supported by all sound cards. Some cards (mostly expensive) support bit depths up to 20, 22 and even 24 bits.
Other numerical characteristics that you need to pay attention to are signal-to-noise ratio and frequency response. As with the above characteristics, the higher the value, the better. Since all electronic devices generate noise, the signal-to-noise ratio of a sound card indicates how many times the signal is stronger than the noise produced by the sound card. The higher the value, the quieter the card. A good signal-to-noise ratio is at least 90 dB. Frequency response is a range of numbers based on human hearing capabilities. The frequency response of human hearing is approximately 20 Hz to 20 kHz. A good sound card should cover at least this range, and preferably a wider one.
If you are looking to purchase a sound card with a built-in MIDI synthesizer, there are a few additional options that you need to be aware of. Older sound cards used synthesizers based on the frequency modulation method. Unfortunately, this method is not far from the sounds that are emitted by the standard built-in speaker of a personal computer. While FM works well with organ or bell sounds, problems arise with other instruments. Today, sound cards use a different technology called wavetable synthesis. It allows you to create very realistic sounds. This technology is based on the use of pre-recorded sounds of real instruments to reproduce sound. When a synthesizer receives a MIDI Note On message, instead of creating a sound from scratch (as with frequency modulation), it plays a small digital recording that can be anything from a grand piano to the croaking of frogs. The only drawback of wave synthesis is that a large number of samples must be stored in RAM or ROM. Suffice it to mention that the more RAM or ROM on the sound card, the better.
You also need to pay attention to the degree of control over the playback of samples from wave tables that the card gives. All modern sound cards support the General MIDI (GM) standard, which is a set of 128 predefined sounds that should be on any synthesizer compatible with this standard, and the location in memory (or MIDI program numbers) of these sounds. This ensures that if the sound card is instructed to execute program number 37, the sound of the electric bass will be played instead of the sound of the saxophone. However, unlike professional synthesizers, GM does not support any programming of sound parameters. This is why the GS and XG formats came into being. Roland's GS format extends the GM standard by providing additional sounds and software control over certain synthesizer parameters. Yamaha's XG format goes even further. It requires three separate processors for effects, offers over a dozen programmable synthesizer parameters (such as sound brightness) and over a hundred sets of 128 sounds each. Therefore, look for a card that supports at least one of the GS and XG formats.
Setting up a Sound Forge hardware profile
Of course, making the above changes on your computer every time before you start using Sound Forge and returning your computer to its previous state after using Sound Forge is a little meaningful. Fortunately, the Windows operating system has a handy feature called a hardware profile. You can think of a hardware profile as a collection of predefined settings. With the help of hardware profiles, you can save several different Windows settings under one name, and later call these settings as a single set. For example, you can create one profile for normal work, another for gaming, another for editing and recording sound, and so on. Creating a hardware profile is straightforward. Follow these steps:
1. Open the Windows Control Panel. Double-click the System icon, then select the Hardware Profiles tab in the System Properties dialog box. The dialog box should look something like the one shown in Fig. 2.13.
2. Most likely, the list will contain a single default profile called "Original Configuration". This profile stores the current system settings. Click on this profile.
3. Click on the Copy button to create a copy of the "Original Configuration" profile.
4. In the Copy Profile dialog box, enter "Sound Forge Configuration" as the name of the new profile. Then click the OK button to close the dialog box.
5. Restart your computer. At startup, Windows will prompt you to select a hardware profile. Select the "Sound Forge Configuration" profile.
6. Perform the operations that we discussed in the previous subsections - setting up direct memory access, video accelerator, etc.
Rice. 2.13. The Hardware Profiles tab of the System Properties dialog box shows various hardware configurations:

Now, every time you start Windows, you can select the hardware profile that is necessary for exactly the tasks that you are going to do in this session with the computer. The only setting described that is not saved in the hardware profile is the screen saver. You will have to manually change it each time. However, even the author himself always leaves the splash screen disabled. If you need to leave the computer for more than 15 minutes, it simply turns off the monitor.
Where can I get help?
Sonic Foundry offers several ways to get help if you encounter problems with Sound Forge. The two most obvious places are the user manual and the online help file. At the first sign of problems, review the available information on how to resolve them. If you cannot find the answer in these sources, visit the Sonic Foundry Web site.
The Sonic Foundry Web Server's Product Support page (http://wvw.somcfomdiy.com/) contains a wealth of useful information, including a list of frequently asked questions and answers and white papers detailing many issues. Check out these docs first. If you still cannot find a solution to your problem here, visit the Sonic Foundry forum (http://www.sonicfomdry.com/Forums/), where you can share tips and information with other Sound Forge users. The problems you are facing may have appeared before with other users who already know ways to solve them. Also, refer to Appendix 4 of this book.
Our goal is to provide you with the fastest access to the user manual for your device. Using the online view, you can quickly view the content and go to the page where you will find a solution to your problem with Sony Sound Forge V.10.0 Pro SF-10000.
For your comfort
If viewing the manual Sony Sound Forge V.10.0 Pro SF-10000 directly on this page is inconvenient for you, you can use two possible solutions:
- Full-screen view - To conveniently view the instructions (without downloading to your computer), you can use the full-screen view. To start viewing instructions Sony Sound Forge V.10.0 Pro SF-10000 in full screen, use the Full Screen button.
- Downloading to a computer - You can also download the instruction Sony Sound Forge V.10.0 Pro SF-10000 to your computer and save it in your archive. If you don't want to take up space on your device, you can always download it from ManualsBase.
Manual Sony Sound Forge V.10.0 Pro SF-10000
Advertisement
Advertisement
Print version
Many people prefer to read documents not on the screen, but in the printed version. The option to print instructions is also provided and you can use it by clicking on the link above - Print instructions... You don't have to print the entire manual Sony Sound Forge V.10.0 Pro SF-10000 but only some pages. Save your paper.