The WinSetupFromUSB program and, in fact, how to install the “seven” using it? I want to hear answers on your site. The fact is that WinSetupFromUSB has been updated to the final version and now it can even create a bootable UEFI flash drive for Windows 7, 8. In addition, WinSetupFromUSB has learned to create a multiboot flash drive containing two operating systems at once Windows systems 7 and Windows 8 and nothing has been written about this yet!
Could you describe in detail:
1) How to create a bootable USB flash drive for Windows 7 in the WinSetupFromUSB program.
2) How to create a multiboot flash drive containing two operating systems: Windows 7 and Windows 8!
3) How to configure the UEFI BIOS to install Windows 7 from a USB flash drive to HDD GPT style, as well as on simple hard MBR disk? After all, some of the users will want to install with Windows flash drives 7 on a simple computer or laptop with a regular BIOS, and someone on a computer with a UEFI BIOS and a hard drive with GPT partitioning.
How to create a bootable USB flash drive for Windows 7
Hello friends! There is already an article on our website using command line, as well as various programs: UNetBootin, UltraISO, Microsoft Windows 7 USB/DVD Download Tool. You can also create a bootable USB flash drive for Windows 7 using the utility (a separate article has been written).
But just recently the final version was released WinSetupFromUSB programs, with its help you can easily create a bootable UEFI flash drive for Windows 7 and Windows 8; the created flash drive can be used for installation either on a GPT style hard drive with a UEFI BIOS, or on a simple MBR hard drive. And what is also important, WinSetupFromUSB can create a multiboot flash drive containing both Windows 7 and Windows 8 operating systems for installation.
Note: For those who don’t know what UEFI BIOS is and the format standard for placing partition tables on a GPT hard drive, read our article, which is called that. Also, don’t forget that if your computer, laptop or netbook has USB ports 2.0, as well as USB 3.0 and you decide to install Windows 7 on it with bootable flash drive, then you need to know that you need to connect the flash drive in USB port 2.0, since Windows 7 does not support USB 3.0 (ports are usually colored blue).
In the recent past, a beta version was posted on the official website of the WinSetupFromUSB program, which I didn’t quite like and used, but now the program has been updated and what the final version of the program can do cannot be compared with the beta version. Let's make sure of this and create a bootable USB flash drive for Windows 7 and Windows 8 with the WinSetupFromUSB program, and at the same time look at the UEFI BIOS settings.
How to create a bootable USB flash drive for Windows 7 using WinSetupFromUSBWe go to the official website of the WinSetupFromUSB program and select WinSetupFromUSB-1-3.exe (22 MB; 385673 downloads), the WinSetupFromUSB program is downloaded to our computer.

Extract the program files to a folder. If we are going to make a bootable USB flash drive for Windows 7 64 bit, then we run the file WinSetupFromUSB_1-3_x64.exe.

Attention: Friends, if you need Bootable UEFI USB flash drive with Windows 7, which means you will have to format the flash drive in file system FAT32, this means that the image of your Windows 7 must be less than 4 GB, since the FAT32 file system does not work with files larger than 4 GB. WITH just go to the very end of the article, there is detailed information for you there.
Most users do not need a UEFI flash drive, but rather a regular bootable flash drive with the Windows 7 operating system, which means the image of your Windows 7 may well be more than 4 GB, in which case the bootable Windows 7 flash drive we created will be in NTFS format!
In the main window of the WinSetupFromUSB program you can see the name of our connected flash drive.
Check the box Auto format it with FBinst and check the NTFS box
Check the box Vista/7/8/Server 2008/2012 based ISO and click on the button on the right that opens the explorer window,

If your flash drive is formatted in the FAT32 file system, then this warning will appear, click OK.

Explorer opens, find the ISO image of Windows 7 64 bit, select it with the left mouse and click "Open".

Press GO

A warning will open, click Yes.

Here we also click Yes.

The process of creating our bootable USB flash drive begins, which ends successfully.

Click OK.

A bootable Windows 7 USB flash drive has been created!
Now the most important thing is friends. How to actually install Windows 7 from this flash drive.
If you are installing Windows 7 on a laptop or computer with a UEFI BIOS and you want to convert your hard drive to the table format standard GPT partitions, then you need to configure the UEFI BIOS itself accordingly; how to do this, read our article.
If you install Windows 7 on a laptop or computer with a simple BIOS, you simply boot your device from the Windows 7 bootable USB flash drive we just created. Perhaps at this stage some of the users will find our article useful
If you have correctly set the priority in the BIOS to boot your computer from a flash drive or simply selected your flash drive in the laptop boot menu,
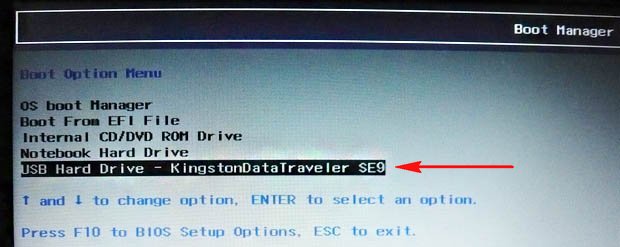
then the first window will be the menu; in our case, you don’t need to select anything in it and it will disappear within a few seconds.

Next, the GRUB4DOS bootloader window appears, which the WinSetupFromUSB program uses as a bootloader. Select the first option using the arrows on the keyboard 0 Windows NT6 (Vista/7 and above) Setup,

which means installing operating systems Windows Vista, Windows 7 and higher. Press Enter. In the next window, select Windows 7 SP 1 x64

and the installation process begins operating system from our Windows 7 bootable USB flash drive.
Further.

Install.

We accept license agreement. Full installation(Extra options).
To create a multiboot USB drive using the WinSetupFromUSB utility you need:
- computer with Microsoft operating system installed
- iso images of operating systems that are required for a multiboot USB drive, for example, MS Windows XP, 7, 10, Acronis Disk Director 11, Kaspersky Rescue Disk 10.
- WinSetupFromUSB utility
- clean USB drive at least 8 GB for the above ISO images
Program WinSetupFromUSB designed to create a bootable or multiboot USB drive. Download this program you can from our website:
Supported systems:
- operating rooms Microsoft systems Windows XP/2000/2003/7/8/8.1/2008/2012/10
- operating rooms Linux systems/ *BSD / *nix
- Ubuntu – 13.04 (32 and 64 bits) / 13.10 Server / 12.04.03 Server LTS
- Debian 7.1 Netinst i386, AMD64/7.2/7.6
- Linux Mint– 15 cinnamon dvd 32bit
- Mageia – 3 Dual CD
- CentOS – 6.4 LiveCD i386
- Fedora – Live Desktop 19 x86_64
- OpenSuse – 12.3 GNOME Live i686
- PCLinuxOS – KDE MiNime 2013.10
- SlackWare – 14.0 x86 DVD ISO
- OpenBSD – 5.3 Minimal, 5.3 Full
- m0n0wall – 1.34 CD-ROM
- ArchLinux – 2013.10.01-Dual
- Beini – 1.2.1, 1.2.5
- CloneZilla – 2.1.2-43-i686-pae
- DamnSmallLinux (DSL) – 4.4.10, 4.11.rc2
- Elementary OS – stable-amd64.20130810
- Gentoo – x86-minimal-20131022 , amd64-minimal-20140313
- GParted – gparted-live-0.18.0-2-i486
- Inquisitor – v3.1-beta2 Live CD (x86), 3.1-beta2 Live CD (x86_64)
- Knoppix – 7.2.0 CD EN, Adriane 7.2.0F EN
- Manjaro – openbox-0.8.7.1-i686
- Ophcrack – xp-livecd-3.6.0
- Antivirus systems:
- Avast Rescue Disk
- Sophos Bootable Anti-Virus
- Other:
- Acronis True Image
- Acronis Disk Director
- HDD Regenerator 2011
- Memtest86+ – v5.01
- MS-DOS – 7.1
- Paragon Hard Disk/Partition Manager
- UltimateBootCD – 5.20, 5.26
1. Download the utility WinSetupFromUSB
2. Download iso images of operating systems that are required for a multiboot USB drive
3. Unpack the archive with the utility WinSetupFromUSB
4. Launch the program WinSetupFromUSB
5. In the window that opens WinSetupFromUSB select from the drop-down list required USB storage device
Fig.2 Selecting a USB drive in the program WinSetupFromUSB
6. Check the checkbox AutoFormat it with FBinst to automatically format a USB drive.

Fig.3 Setting up automatic formatting of a USB drive in the program WinSetupFromUSB
If you have previously used this program to create a multiboot flash drive of this drive and there was a need to add a few more operating system images, check the checkbox AutoFormat it with FBinst no need to install.
7. Select the required file system.
8. To add an operating system Microsoft Windows XP, you must first unpack the ISO image of the system or mount it into a virtual drive, check the checkbox Windows 2000/ XP/2003 Setup and indicate the path to the folder or drive in which the folder is located I386 .
9. To add an operating system Microsoft Windows 7 (or others) you need to check the checkbox Windows Vista/7/8/ Server 2008/2012 based ISO and specify the path to the iso image of the desired operating system.

10. To add an operating system Ubuntu(or other Linux operating system) you need to check the checkbox Linux ISO / Other Grub4 dos compatible ISO and indicate the path to iso image of the required operating system.
11. After completing the process of adding the required distributions, you must click the button Go.
12. Upon completion of creating a multiboot USB drive, in the Done pop-up window, click the button OK.
13. To exit the program, press the button EXIT.
14. To add distributions to the created multiboot drive the next time you start the program WinSetupFromUSB you must specify the desired drive, do not check the checkbox AutoFormat it with FBinst and indicate the path to them.
Creating bootable flash drives is a very popular task today, so instructions for using , a program that best helps in solving this problem, will be very relevant.
Interestingly, WinSetupFromUSB has other similar functions, but we will look at all of them during the instructions.
The use of this program begins with downloading it and this point should be given a little attention.
Where can I download
Advice: Shouldn't searchWinSetupFromUSBin any search engines!
The fact is that this program can be found on our website.
If you download from other sites, a problem may arise, namely, most sites post already “added” programs.
And they are supplemented with all sorts of advertising and malware, even dangerous viruses such as Trojans. And there are also situations, as shown in Figure No. 1.
As you can see, here on the official website the program download button is shown in a red frame. But special attention should be paid to what is written next to “Download for free.”
And it says “version 1.0 beta”. This means that this site contains old version. After version 1.0, which was released in 2013, version 1.4 was released in 2015.
Today there is version 1.6 on the official website.
By the way, you should download it from the site winsetupfromusb.com. Downloading it from there is quite simple. To do this you need to do the following:
- Go to winsetupfromusb.com.
- Go to the “Downloads” tab, which is highlighted in Figure 2.

Scroll the page down a little (scroll the mouse wheel) and click on the inscription “WinSetupFromUSB 1.6.exe”, which is also highlighted in Figure No. 3.

Note: Usually on this page the tab with the latest version of the program is already open. But if it is closed (the page will look like shown in Figure 4), you should click on the “+” sign (highlighted in the same figure), after which the tab will open and the link will become visible.

- The user will then be taken to the download page. There you need to click on one big “Download” button.

Installation and launch
After the program is downloaded, it, of course, needs to be opened. To do this, simply launch the downloaded file. It will look like shown in Figure 6.

As we see, installation file is an archived image of the program in question. After launch, we are convinced of this - we see the window shown in Figure No. 7.

In this window you need to select where the actual WinSetupFromUSB file will be unpacked. By default, there will be a folder in which the downloaded file is located.
To select another location, you must click on the button shown in Figure 7 with a red frame. After this, a window will appear, highlighted with a green frame in the same figure.
There, in fact, you should select where to unpack the WinSetupFromUSB launch file and click the “OK” button. She's the only one there.
After this, click the “Extract” button, that is, “Unpack”, highlighted in blue. Next we will see the unpacking process visually.
This window is also shown in Figure 8.

This window makes it possible to pause the process at any time (the corresponding button is highlighted in green in Figure 8), return everything to the initial state(button in a red frame) or quit altogether (button in a blue frame).
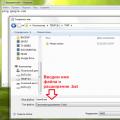
Now in the storage location on our computer that we specified, we find a folder called “WinSetupFromUSB-1-6”. It will look something like what is shown in Figure 9.

Interestingly, this folder will not necessarily be the first in the list, even if you sort by creation date. So don't be surprised if you don't notice it right away.
This phenomenon is especially common in Windows 7. The contents of this folder are shown in Figure 10.

As you can see, there is a version for 32-bit Windows versions(underlined in red in Figure 10) and for 64-bit (underlined in blue).
Accordingly, in order to run the program in question, you need to run the program according to your version of the operating system.
Using the program
After this, the most important thing begins. At first everything looks as shown in Figure 11.
There are five main fields here:
- Flash drive selection field;
- Additional utilities;
- Field for selecting the operating system that will be on the flash drive;
- Additional options;
- Process options (progress bar and “Start” and “Exit” buttons).

The main task of this program is to create a bootable USB flash drive. Therefore, it is necessary to describe at the very beginning how this process occurs.
Creating a bootable USB flash drive
To perform this task, you should run WinSetupFromUSB and do the following:
- Insert the flash drive into the computer. After this, it will automatically appear in the window underlined in Figure 12 with a red line.
If it still does not appear, you should click on the “Refresh” button, that is, “Update”, because, quite possibly, the program will not be able to immediately find the drive.

- Now we need to choose which operating system we will write to the flash drive. To do this, put a checkmark next to the OS that we will record. After this, click on the selection button, which is shown in Figure 13 in orange.
A window with a green frame opens. In it we select the ISO image of the system that we are going to write to the flash drive.

- After this, all that remains is to press the “GO” button, which is located in area number 5 in Figure No. 11. Next, the recording process will begin.
Concerning additional functions, there are quite a lot of them here. The main ones are shown in area number 4 in Figure 11. They relate directly to the recording process.
For example, the “Advanced options” button is responsible for advanced options.
If you check the corresponding box, the window shown in Figure 14 will appear.

All these are specialized functions that relate to a particular operating system. More information about them can be found in the descriptions for these operating systems.
If you don't know what each of them means, it's best to leave all of these features alone.
If you check the box next to “Show Log”. This is a simple feature to show each step of the recording process. Very useful in cases where some error occurs.

Finally, the “Test in QEMU” checkbox is responsible for special testing of the flash drive, but this is a very risky function that can erase all data from the drive.
In general, it is better not to touch it at all.
Additional functions
As mentioned above, WinSetupFromUSB has a number of additional utilities. You can find them in the area indicated by number 2 in Figure 11.
For example, there is a very useful utility called “BOOTICE”. It looks as shown in Figure No. 16.

BOOTICE is responsible for converting or returning to the MBR flash drive (main boot record) and PBR (boot code).
This program makes it possible to install Grub4DOS in MBR or BOOTMGR in PBR and so on.
Again, if you don’t know why all this is needed and what it is in general, then it’s better not to touch BOOTICE. Although all these functions are very useful.
Using this utility is very simple - to do this, select the appropriate drive and press the desired button.
To put it simply, it is designed to format flash drives, but not in the usual way, but using a structure of a special type.
In particular, it is often used to make USB-ZIP flash drives from USB-HDDs.
Working with this utility is quite complicated, but if you’ve already got into it, you probably should know which buttons do what.

Finally, latest utility V this section called RMPrepUSB. It performs all the functions of the two utilities described above and much more.
In addition, it has a very user-friendly interface. The most important thing is that there is Russian language here.
It can be selected by changing the options in the frame highlighted in green in Figure 18.
It is also very convenient that when you hover your mouse over each function in a window highlighted in yellow, its description appears.
By the way, it is short here, but very understandable.

In general, all this can and should be used. And it will be very easy to understand their use.
Visual instructions for using this program are shown in the video below.
How to create a bootable USB flash drive - WinSetupFromUSB
Instructions for using WinSetupFromUSB - Full description
I have already touched upon the free program WinSetupFromUSB, designed for creating a bootable or multiboot flash drive, more than once in articles on this site. In addition, many other thematic resources may draw your attention to this tool as one of the most functional when it comes to recording bootable USB drives.
Where to download WinSetupFromUSB
First of all, I would like to draw your attention to the fact that by asking the corresponding request in search engine you will most likely stumble upon a site on which there will be a lot of green Download buttons leading incomprehensibly to where, and after the necessary download link is found, it turns out that when installing WinSetupFromUSB, several more “junk” dubious programs were installed on the computer usefulness.
To prevent this from happening, just go to the official website of the program Http://www. winsetupfromusb. com/downloads/ and download it. The final version 1.0 was released a little less than a month ago (October 17, 2013), and it is this version that we will consider (before that, WinSetupFromUSB 1.0 beta6 and beta8 were the most frequently used).
Update 2015: Current version 1.4, working with the program has not changed. Below in the article there are video instructions for using WinSetupFromUSB 1.4.

By the way, the program does not require installation: you need to unpack the archive with it and run the desired version - 32-bit or x64.
How to make a bootable USB flash drive using WinSetupFromUSB
Responsive2(width:300px;height:300px)@media(min-width: 500px)(.responsive2(width:336px;height:280px))
Despite the fact that creating a bootable USB flash drive is not all that can be done using this utility (which actually includes at least 3 additional tools for working with USB drives), this task is still the main one. Therefore, I will demonstrate the fastest and easiest way to do it.

In the main program window, in the top field, select the USB drive to which recording will be made. Please note that all data on it will be deleted. Also check the AutoFormat it with FBinst checkbox - this will automatically format the flash drive and prepare it to become bootable when you start. In fact, this can be done manually using the Bootice and RMPrepUSB utilities, but, as I already said, the instructions are for beginners and we will use the simplest method.
Note: However, you should check the box for automatic formatting only if this is your first time writing images to a flash drive using this program. If you already have a bootable USB flash drive created in WinSetupFromUSB and you need to add, for example, another Windows installation, then simply follow the steps below, without formatting.
The next step is to indicate what exactly we want to add to the flash drive. This can be several distributions at once, as a result of which we will get a multi-boot flash drive. So, tick the required item or several and indicate the path to the files necessary for WinSetupFromUSB to work (to do this, click the button with the ellipsis to the right of the field):
- Windows 2000/XP/2003 Setup - we use it to place the distribution kit of one of the specified operating systems on a flash drive. As the path, you need to specify the folder in which the I386/AMD64 folders (or only I386) are located. That is, you need to either mount the ISO image with the OS on the system and specify the path to virtual drive disks, or insert a disk with Windows and, accordingly, specify the path to it. Another option is to open the ISO image using an archiver and extract all the contents into separate folder: In this case, you will need to specify the path to this folder in WinSetupFromUSB. That is, usually, when creating a bootable USB flash drive for Windows XP, we just need to specify the drive letter with the distribution. Windows Vista/7/8/Server 2008/2012 - to install these operating systems you need to specify the path to the file ISO image with her. In general, in previous versions programs it looked different, but now they have made it simpler. UBCD4Win/WinBuilder/Windows FLPC/Bart PE - just like in the first case, you will need the path to the folder that contains I386, intended for various WinPE-based boot disks. A novice user is unlikely to need it. LinuxISO/Other Grub4dos compatible ISO - required if you want to add a distribution Ubuntu Linux(or other Linux) or any disk with utilities for computer recovery, virus scanning and similar, for example: Kaspersky Rescue Disk, Hiren’s Boot CD, RBCD and others. Most of them use Grub4dos.SysLinux bootsector - designed to add Linux distributions, which use the syslinux boot loader. Most likely it won't be useful. To use, you must specify the path to the folder in which the SYSLINUX folder is located.

After all the necessary distributions have been added, we simply press the Go button, answer affirmatively to the two warnings and begin to wait. I'll notice if you do bootable usb drive containing Windows 7 or Windows 8 when copying windows file. wim may seem like WinSetupFromUSB is frozen. This is not the case, be patient and wait.
Update 2015: in latest version WinSetupFromUSB makes it possible to write an ISO of more than 4 GB to a FAT32 UEFI flash drive.

This completes the instructions for using WinSetupFromUSB. All that's left for you is to set boot from the flash drive to the computer's BIOS and use the newly created drive and boot from it. As I already said, these are not all the capabilities of the program, but in the vast majority of cases the points described will be quite sufficient.
WinSetupFromUsb is a feature-rich, freely available tool for creating bootable USB files Windows operating system, most Linux distributions, files of various emergency recovery, anti-virus and minimally equipped ready-to-run operating systems, like WinPE. In addition, the utility has the functionality of creating multiboot media based on flash memory, which includes several of the distribution kits listed above. Such media may include a volume editor hard drives
Gparted and a set of SisLinux loaders for loading CD and magnetic disk images, if necessary, added to the flash drive by the program itself.
Collapse English language, which does not make it difficult to use the software.
Additional tools:
- the program is equipped with an integrated editor for creating a menu of multiboot media - FBinstTool;
- tool for creating bootloaders - Bootice;
- the most powerful utility for creating bootable flash drives, which has an impressive number of supported functions, OS, bootloaders, devices and other tools - RMPrepUSB;
- utility for cutting and collecting files;
- a couple of archivers (7z and upx);
- bootloader editor Grub4DOS and many others. Based on this, it follows that the program is a shell that combines the functionality of a large number of tools that allow you to work with bootable media. Features of the application:
- availability of powerful tools for work;
- logging events during user actions;
- free distribution of the utility and its included tools;
- Support for creating multiboot media.
How to download winsetupfromusb final rus
It is recommended to download WinSetupFromUsb 1 4 and its latest versions from the official Internet resource. Search engines often lead to sites where there is, if not a virus or a broken link under the “Download” button, then definitely an installer offering to watch an advertisement and install additional applications or replace the start page.
The current version at the time of writing is WinSetupFromUsb 1 6 dated November 28, 2015. Some changes have been made to it regarding: the corresponding inscriptions and the imdisk package has been updated to make the application compatible with this OS edition.
Installation of winsetupfromusb is not required: download the utility via a direct link from the development server, run the installation file, which is a self-extracting archive in 7z format, and specify the unpacking path. Download from here.
Self-extracting 7z archiveAfter archive decompression is complete, you can use WinSetupFromUsb.