In Windows 10, it is very easy to set a screen resolution that is convenient for yourself, and we have already discussed this issue in detail. But sometimes it is impossible to perform the described steps to change the resolution, and only one inactive item is available in the display settings. Let's figure out how to find a way out in this situation.
In Windows 10, the settings for changing the screen resolution are located in the "Settings" application, section "System" - "Display". If the item with the choice of resolution looks something like the screenshot, the reasons may be as follows:
- The correct video driver is not installed. Sometimes it happens that even after updating by means of Windows from the Task Manager and receiving a message about installing the most suitable driver, you will install the correct driver.
- Incorrect driver settings or malfunctions.
- Hardware malfunction of the monitor connection cable.
How to fix the problem
If you are unable to change the resolution of your monitor, try one of the several methods described below.
Driver check
Right-click the main Start menu and launch Device Manager. 
Find the "Display adapters" section and expand it. When you see a device named Microsoft Basic Graphics, you can be sure that the correct graphics driver is not installed. Also, the presence of a “VGA-compatible video controller” device in the “Other devices” section may indicate an incorrect driver. 
If you do the usual way to solve this problem - right-click the device and select the item "Update driver", you will not be able to solve the problem. Even the received system message that you already have the driver installed indicates that there is simply no other version of it on the Microsoft server.
Download the latest driver from your graphics card manufacturer's website and install it. If necessary, uninstall the previous driver first.
Other options

Instead of an afterword
As you can see, the reason Windows 10 won't let you change your screen resolution can be quite simple. We hope that one of the methods we have considered will suit you, and the monitor will work in the usual mode again.
The screen resolution directly depends on the diagonal of the monitor (physical characteristics). It determines the number of dots (pixels) horizontally and vertically, as well as their ratio. The higher the resolution, the smaller the screen image and vice versa. For widescreen monitors you should choose one resolution, for "square" - another.
If initially it was set incorrectly, then the picture quality will be noticeably lower. These can be defects such as:
- black stripes on the sides;
- a disproportionate "slid to the side" image;
- blurry, indistinct picture (especially seen in the text);
- too large or, conversely, small icons, etc.
To prevent this from happening, the permission must be set based on technical characteristics devices. You can find it out from the instructions or look at the manufacturer's official website. Typically, after downloading the latest drivers for your graphics adapter (video card), your computer will automatically set the recommended settings. If this does not happen, then the user will have to do it manually. The article will address the question of how to find out the screen resolution on Windows 10.
There are several ways to define this parameter. The simplest and fastest is through the desktop. For this:
- Right-click on an empty area (wallpaper) on your desktop. In the context menu that appears, select the "Display settings" item.
- A new window will open with the current display settings. The resolution, scale, orientation (landscape, portrait, portrait format) of the monitor are indicated here. If other screens are connected to the PC, they will be displayed in this menu. As for the main one, you can specify the desired parameters for them, turn them over.
You can get to this menu in another way. It is convenient to use if you have a laptop, and the key responsible for calling the context menu (via the right mouse button) does not work on the touchpad. For this:
- Call "Start" and in the list that appears, start typing "Options". Please select classic application from the Best Match category. Or just click on the gear icon.
- Will open Windows settings". Find and click on the "System" category. She will be the first on the list.
- By default, you will be immediately taken to the screen with desired settings... If this did not happen, then from the list on the left side of the window, click on the inscription "Display" to display the resolution on the right side.
- Or, on the main Windows Settings page, immediately start typing in an empty field keyword"Display" to start searching automatically. Select Change Display Settings from the options provided.
An extension that is correct for the monitor will be marked with “Recommended” next to the digital designation. It is detected automatically if there are drivers for the video adapter.
If any other is selected, then it must be changed to the one recommended by the system. If none of the parameters have such an inscription, then this indicates that there are no drivers for the video adapter. In this case, you need to download them.
How to change
You can change the value to the desired one through the display parameters. You can get into them by following the instructions described above. Or you can use another method:
- Run system utility Execute. It can be found through the Start menu or by pressing the Win + R key combination on your keyboard.
- In the opened window, enter the command "desk.cpl" and click "OK" to call the display settings.
- The screen options will open. Change the resolution through the appropriate category. To do this, click on the digital designation (which is currently installed) and select the desired parameter from the drop-down list.
- You can do the same by scrolling down the page and clicking on "Graphics adapter properties".
- A small window will appear in which you need to select the "Adapter" tab, then click on the "List of all modes" button.
- All extensions available for the monitor are displayed here. And even those that are not available through the "Display" menu (for example, 1920x1080 Full HD). This is useful if you want to set a custom parameter. Select the one you want and then click the "OK" button.
- Confirm the action to save your changes.
Please note that in the properties of the graphics adapter opposite the recommended parameter there will be no corresponding inscription. Therefore, to check if the selected option is suitable for your computer, try switching to each one in turn. If you choose the right one, you will immediately notice improvements in image quality.
Possible problems
By default, Windows OS (x32 Bit and x64 Bit) automatically determines the optimal display settings. In some cases, this does not happen, and when you try to specify the required extension manually, it simply is not in the list of available ones.
Most often this happens due to the lack of drivers for the graphics adapter or monitor (especially for non-standard devices). You can update them directly by downloading from the developer's official website, or through special software.
Other reasons:
- If you are sure that the latest version of the drivers is installed on the PC, then try installing the required extension through the properties of the graphics adapter (mode selection). The method is described above and differs in the presence of a wider selection of available permissions.
- If you are using a non-standard monitor (for stationary PCs), then make sure that the drivers are loaded for it as well (not to be confused with the drivers for the video card). Some monitors require additional software to work properly. It can be downloaded from the manufacturer's official website.
The problem with the choice of resolution may arise when using low-quality adapters, adapters, cables. Even if you are using a laptop and connect an additional monitor to it via HDMI. In this case, try connecting the screen with a different method.
Sometimes the reason for a bad image on the screen is the diagonal of the monitor (physical characteristic) does not match the screen resolution. If so, try:
- Go to screen settings. To do this, open Start and start typing "Display" in the search box. From the list found, select and run "Change display settings".
- In the window that opens, find the "Scale" item and check if the recommended parameters are set. If not, then return them to the default.
- If the recommended settings do not suit you and the image is too small at the optimal resolution, then increase its size by choosing a different value. For example, scale it up from 100% to 125%.
- For more detailed settings, click on the inscription: "Custom scaling". Here specify the desired parameter (the maximum available is 500%) and save the changes. To do this, click "Apply".
In some cases, this can help eliminate a number of problems associated with poor image quality. If you wish, you can try to select a different screen resolution, adjust the scale. To solve the rest of the problems, most often it is enough just to download the latest version of the drivers for the video card.
How to find out the model of the video card
To download drivers for your graphics adapter, you need to know your graphics card model. Without this information, you will not be able to download them manually, since the automatic online detection of the device does not always do it accurately.
This can be done through the special utility dxdiag. To run it:
- Open "Start" and enter the name of the application. Then click on the found option.
- The DirectX Diagnostic Tools window appears. Here go to the "Display" tab. The "Device" block will contain the name of the video card. In our case, this is the Nvidia GeForce GT 220M. Copy its name to find the drivers. The block opposite will indicate Additional Information about the version of the current software, the date of the last update.
If dxdiag does not start or other problems occur in the process, then you can find out the model of the video card in another way, using staff funds from Microsoft. For this:
- Open "Options" and go to the display settings (the method is described in the instructions above). Here find the inscription "Graphics adapter properties" and click on it.
- Click on the "Adapter" tab. The blocks "Type" and "Information" will contain information about the model of the video card.
Knowing the name of the graphics adapter, you can download the driver from the manufacturer's official website. After that, you can set the optimal screen resolution on Windows.
How to download drivers
Once you know the model of the graphics adapter, you can easily download and install manually new version software... For this:
- In the search engine, enter the name of the manufacturer of the video card (for example, Nvidia) + driver. Then go to the official website. To do this, click on the first suggested link from the search results.
- The browser will redirect you to the "Drivers" tab, but if this did not happen, then with home page go to it yourself. Here, specify the type, series and family of products, following the information obtained earlier and the version of the OS. Click on the big green Search button.
- Agree to the terms of the license and click "Download". The software download starts. Wait for it to complete, then run setup file and follow the instructions in the Windows wizard.
The screen resolution will automatically change to the optimal resolution. If this does not happen, then follow these steps yourself. Through display parameters.
How to update drivers
You can find out the model of the video card and immediately update the drivers for it through the standard features of Microsoft Windows as follows:
- In the Start menu, start typing Control Panel, and then launch the classic application that you find.
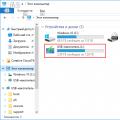
- For a more comfortable experience, change the way you view the available options to large or small icons. Then find "Device Manager" in the list. Click on the label with the left mouse button to launch the application.
- In the window that opens, find the "Video adapters" category. Please note that depending on your computer, there may be several subcategories available. If any drivers were installed for the device, then there should be the model name (in our case, it is Nvidia GeForce GT 220M). If they are not available, then you will see the inscription "Unidentified device".
- Specify the path to the files. To do this, click the "Browse" button and select the folder with the downloaded drivers. Click Next to start the installation.

After the process is completed, the best one for your screen will appear in the list of available resolutions. Remember that there will be a corresponding "Recommended" text next to it.
If you are already using the latest drivers, the system will display a message stating that the most suitable drivers are already installed on this PC. This notification may also indicate that Windows could not find updates. In this case, you can try to download them manually, through the official website (the method is described above).
Conclusion
You can find out the screen resolution through the display parameters or by right-clicking on the desktop. After that, you can see the current value, and, if you wish, change it to the required one. Please note that it must match technical parameters monitor (diagonal).
If these characteristics do not converge, then the image quality will be noticeably lower. If the required screen resolution is not available, you will most likely need to update the drivers for your graphics adapter. This can be done using the built-in Windows tools.
Video instruction
Below you will find a video on this topic.
In this article, we will tell our reader how to change screen resolution in Windows 10... The Windows 10 operating system is new, so PC users have problems with the recommended resolution, which is set automatically. Mostly, screen resolution problems are observed on older monitors and rarely on new ones. Problems are usually strong stretched image on a display on which it is very uncomfortable to work at a computer. This is due to driver support for both the monitor and the graphics adapter. In order to solve the problem with a stretched image and the wrong resolution, we have prepared examples, where we will describe their detailed solution.
We set the monitor resolution with built-in Windows 10 tools
You can set the correct screen resolution by means of Windows 10 itself. In this example, to solve our problem, we will take monitor Samsung S19D300N, which has a TN matrix resolution of 1366 × 768 pixels. Windows tools 10, the stretched image problem can be solved in two ways.
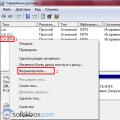
For the first way we need to go to the new panel "".
This can be done in the menu " Start"By clicking on the item" "in it. In the opened panel "" you need to follow the link "". This action will transfer us to the point we need " Screen"In the window that opens.

Now in this window we need to go to the lowest link "".

In the window that opens, we are interested in the "" block. In the image, you can find out that this block has a resolution of 1280 × 720 pixels, and we need to set it to 1366 × 768 pixels. To change the resolution to the correct one, we will click on the drop-down list and select the correct item "1366 x 768 (recommended)". Also in this list you can see how the resolution changes from smaller to the recommended resolution.

After these actions, you need to confirm them. To do this, click the Apply button. At this stage, setting up in the first way ends.
For second way we need to go to the control panel that is familiar to many users. To quickly switch to it in Windows 10, a special menu is provided, which opens with the combination WIN keys+ X. V " Control panels"We need to follow these links" Appearance and personalization» - « Screen"-" ". These actions will open the panel window that we need.
". In the image above, you can find out that the monitor resolution is 1280 × 720 pixels, and our Samsung S19D300N supports 1366 × 768 pixels. To solve our problem, you need to increase the resolution monitor Samsung S19D300N up to 1366 × 768 pixels. Therefore, we will click on the drop-down list and set the monitor resolution we need.

As in the first method, after the performed actions, we confirm them with the Apply button. From the examples, you can learn that setting the correct screen resolution is a snap, and any PC user can handle this task.
Setting the correct resolution using the graphics driver
In this chapter, we will look at ways to change monitor resolution using video card drivers. Driver change of monitor settings is especially important when Windows 10 does not see such ultra-high resolution formats as "Full HD (1920x1080) and Ultra HD 4K (3840x2160)". First, we will look at the video card driver. Radeon from AMD. New driver packages are now available for all current AMD graphics adapters called Radeon Software Crimson Edition... To go to the monitor settings, in this package you need to go to the desktop context menu and select the "" item in it.

After this action, we will get to the main settings panel, in which we are interested in the “ Display».
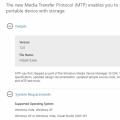
In the advanced settings, go to the item " Properties (VGA Screen)", Which will open such a window.
In this window, we are interested in the block " Monitor properties". In this block, we need to uncheck the "Use EDID" box. After this action, we will be able to independently set the size from low to ultra-high resolution of the screen.
Now let's look at setting up the monitor using the graphics driver. NVIDIA... To open the NVIDIA panel, just like in the case of the Radeon, let's go to the desktop context menu. In the context menu, select the item "".

After that, the Nvidia panel will open, where we are interested in the item " Change resolution».
In the window that opens, the item " Change resolution»You can clearly find out what resolution we can set for a given monitor model. If you want to produce more fine tuning monitor resolution, then use the Customize… key.

In this chapter, we have covered the setup for the main video cards currently on the market. The examples show that adjusting the monitor resolution using drivers is not difficult at all.
Problem solving
Below we have compiled a list of monitor resolution issues that PC users encounter in Windows 10:
- The first most common problem is old video card drivers... Usually Windows 10 will automatically look for graphics card updates. But if the computer is not connected to the Internet, automatic update there will be no video card drivers.
In this case, the driver discs that come with the video card package will help you. Pre-downloaded updates in the form of installers from the official websites of manufacturers of video cards Intel, AMD and Nvidia can also help.
- Another problem could be incorrectly installed drivers... Usually this situation occurs when the user downloaded the wrong driver for his video card and installed it on the system.
In this case, removing this driver and installing a new one, specially created for your video card, will help.
- Like video cards, some monitors too require the installation of their drivers in Windows 10. Usually these drivers come with the purchased monitor, they can be downloaded from the official website of the monitor.
- Often users, in order to save money, use cheap china HDMI adapters and cables... This option of connecting a monitor to a computer often causes problems in which the image is stretched, the picture becomes indistinct and its quality is constantly changing.
This problem is solved by replacing adapters and cables with better ones.
In this chapter, we have described the most common problems that lead to incorrect display resolutions and stretched images. If you adhere to all the recommendations presented in this chapter, then you will surely solve the problem.
Finally
In this article, we answered the question of how to change the screen resolution in Windows 10 different ways... We have also described a list of issues that affect monitor resolution. We hope that our material will be helpful for you and that you can solve the problem with the stretched image and the wrong resolution.
Related Videos
Screen resolution is largely related to the parameters that provide comfortable work at computer. After all, it is important not only to set up the optimal appearance of icons or panels with a certain clarity of display, but also to do this in such a way that the eyes do not get tired and the extended program windows fit into the space of the monitor allotted for them.
Initially, you need to solve the problem of how to change the screen resolution in Windows 10. There are several ways to do this, which you will find in our article. Separately, it will be said why sometimes it is impossible to change the screen resolution (Windows 10, as already clear, we take as a basis operating system). Accordingly, solutions will be proposed to eliminate such problems.
How to change the screen resolution in Windows 10 in the standard way?
Unlike its predecessors, the tenth version of the system has acquired a new toolkit, in which the main parameters and settings are concentrated. And this is not the "Control Panel", but the "Parameters" menu, although you can access the settings without directly entering this section. How do I change the screen resolution in Windows 10 in this case?
As before, first, on the free space of the desktop, you need to make a RMB, and in the menu select the line of screen parameters (and not personalization). After that, the corresponding section of the settings will appear, in which you just need to set the required mode.

If no updates have been installed for the system like Anniversary Update or Creators Update, then to access the settings, you must use the line of additional parameters. In the new section, you can run the detection of supported modes if the desired one is not displayed in the list, but this is unlikely.
in Windows 10 through Control Panel?
Also, on systems without an upgrade to the above assembly updates, you can apply the classic method, which consists in using standard panel control, which is not clear why it is hidden away from the user's eyes.

Cause the most in a simple way it can be done through the "Run" console (Win + R) by entering the control command in the field. How do I change the screen resolution in Windows 10 using this toolkit? Simple too. Select the "Screen" section in the list and follow the "Resolution settings" link, then set the required parameters and save the changes.
However, it is worth repeating: this method is applicable exclusively to "clean" systems, and if there are installed upgrades, this section is not in the control panel.
Using Utilities for AMD Radeon Adapters
For the most famous types of video cards, the question of how to change the screen resolution in Windows 10 is solved by using control utilities. For Radeon graphics adapters, it is best to use AMD utility Catalyst. At least, there are much more settings in it than in the system itself.

Since the application embeds its commands in context menus system, you can call it through the PCM menu on the desktop. Here you need to use the desktop control bar first, and then go to the desktop properties. All available permissions will be shown in the area settings. Select the one you want and save the settings.
NVIDIA graphics card management software
For video adapters from this manufacturer, you can use control panel NVIDIA. There shouldn't be any problems here either.

In the menu on the left, change the resolution is selected, after which it is installed in the list of available ones. desired mode and the applied options are retained.
What if the permission cannot be changed?
But what if you can't change the screen resolution in Windows 10 by any means? Basically, the reason lies solely in the absence or incorrect installation of graphics drivers.
Despite the fact that most of this applies to integrated cards, sometimes such situations can be observed with discrete adapters. There is only one conclusion to remedy the situation - updating or completely reinstalling the corresponding software. In the simplest case, you can use the "Device Manager", where the appropriate update item is selected through the PCM on the marked object. Also, through the properties, the card can be removed from the system altogether, and after the system detects the adapter, the drivers will be installed automatically. But it is better to use original driver discs or software packages downloaded from manufacturers' websites.
It happens that you cannot change the screen resolution in Windows 10 just because the hardware is non-standard, and the driver selected by the system (in its opinion, the most suitable) does not work. In this case, use the information tab, where in the list of properties select the hardware ID, copy the longest string containing the values of the DEV and VEN identifiers, search for it on the Internet, then download the driver and install it yourself.
Instead of an afterword
As you can see from the above, the issue of changing the screen resolution is quite simple. In the case of integrated adapters, only the settings of the system itself can be used. But in the presence of discrete video cards, there are much more customization options, not to mention some advanced features. Problems are resolved solely through the actions described for the drivers or accompanying software. It may, though not always, need to be updated on the respective platforms. In particular, this may concern the installation of updates for DirectX in the form of the latest version and its most recent updates, but this, as they say, just in case.
Windows itself chooses the optimal screen resolution based on: the size of the monitor (display), video adapter, installed drivers... The article will tell you how to change the screen resolution in Windows 10, 7, 8, if you notice any deviation in the display (fuzziness, inconsistency in size, the appearance of black bars on the sides).
Screen resolution is measured in horizontal and vertical pixels. At low resolutions of LCD monitors (displays), for example, 800 by 600 objects on the screen will fit less and they will appear larger. At higher resolutions, such as 1920 x 1080, the objects will appear smaller, thus you will see a larger amount of displayed items. Modern monitors (displays) allow you to set a resolution lower than native without loss of quality. Follow the guidelines below to customize the picture as good as possible.
Changing the screen resolution manually
To change the screen resolution to Windows 7, 8, press the right button on the free space of the desktop. In the pop-up menu, select "screen resolution" to open display settings (they helped in the last article).
There is another way to get to the settings for changing the resolution. ... Set small or large icons in the preview area. Find "screen" from the list of options, click it.

Note: if all screens are not displayed, click "find", if you are not sure which display you need to change the resolution, click "define". This will briefly show a large serial number screen for its unambiguous identification.
In the settings of the screen you click on which the vertical slider will become available. To decrease, increase the screen resolution in Windows, drag the slider. The native resolution is marked as "recommended" and is the highest, it is this that is optimal.

Click OK, then you will see a preview of the selected resolution and a message, if you are sure click save change.
You can change the screen resolution in Windows 7, 8 from the list of ready-made options. In the screen settings, click " Extra options". Next, on the "adapter" tab, click "list of all modes". Modes consist of 3 elements: resolution, color depth, refresh rate (in Hz). Select the mode, press OK, OK, confirm the changes.

In Windows 10, the screen resolution changes in a slightly different way. When you open the menu, by right-clicking (on an empty place on the desktop), you need to select "screen parameters".


Click on the current resolution, then set your own. Don't forget, the optimal one is the one with the “recommended” mark next to it. Click "apply" and then "save changes." This way, you can change the screen resolution in Windows 10. If you have problems, read on.

I present a program for changing the screen resolution - Carroll. She also allows you to ask each account your permission. Download the zip archive, unzip it. Install Carroll on your computer.
After launching the program, many resolution options (other parameters) will be available in its interface, select the optimal one. To change the screen resolution to Windows and save it every time you start your PC, click on the first link and in the "yes" message.

Enabling screen settings
Sometimes when trying to adjust the screen resolution on Windows 10, 7, 8, the options become pale and cannot be changed. There are 2 ways to enable these settings.
1. Download the archive with the reg-file, unpack it. Run vkl-razresh.reg, when prompted by user account control, click "yes", then "yes", OK. Restart your computer to apply the changes.
2. Open the editor group policy... To call it, enter gpedit.msc, click OK. In the editor, get to the "screen properties window" section (see screenshot). On the right side, double-click on the display setting option. In the next window that opens, mark one of two states: "not set", "disable". Then click OK, close the windows. At the same time, you can change the screen resolution without restarting your computer.

Troubleshooting problems when changing resolution
Users are faced with the problem that the screen resolution does not change in Windows, or changes, but before the first restart or exit. It is recommended to first restart the system, if the problem persists, try using these tips:
- Recently installed programs may well interfere with the resolution setting in Windows. You will need.
- Make sure there are no problems with your graphics drivers. Check if the drivers are installed in general, and also make sure that they are latest versions.
- , see if it helps or not.
- Press Win + R, enter msconfig, press enter. In the system configuration options, navigate to the "boot" tab. Make sure Base Video is unchecked. If unchecked, click OK, restart your PC.

As you can see, changing the screen resolution in Windows 10, 7, 8 is quite simple, especially in most situations it is not worth it, because by default the OS already selects the optimal settings. Following the recommendations, you can easily calculate and eliminate any problems with the display of the monitor (display).