When a woman comes to the store for shampoo, it is difficult for her to immediately decide on a purchase, and she wanders along the shelves for hours, going through dozens of options. So many radio amateurs, taking on the assembly of a homemade UMZCH, can choose for a long time among a wide variety of circuits and microcircuits. These are the weak TDA2282, and simple TDA1557, and serious TDA7294, and dear STK40... The choice provided by manufacturers of specialized audio integrated circuits very large. Which one to stop at? We offer an option that is rightfully considered the golden mean in amplifier construction - the TDA2050 () microcircuit, which, at a price of a couple of tens of rubles, will provide us with honest 30 watts of power. That in the stereo version there are already 60 - for an apartment quite.
Notifications about news, promotions, presentations. If your home is not one of the largest, and you are not satisfied with the sound quality of the built-in speakers of your TV or laptop, this article is for you. Many of you dear readers probably know what it means to live in a block. Small apartments, rooms that look more dwarf-like than adults, and - especially in an old building - walls that give off more decibels than the one that accompanies everyday conversation.
Small apartment = big compromises
Mom, dad, teenage son and four-year-old daughter. As is usually the case, there is a neighbor who lives in the wall who bursts into the wall as soon as someone dares to laugh louder. Even more of the coin lives downstairs, ready to call the police every time he hears the music that appears after 22 hours.
DIY amplifier circuit
A printed circuit board has been developed for this device, which is suitable for the TDA2050 or LM1875 and has all the necessary components - power, speaker protection, turn-on and quick turn-off delay. This is achieved with the help of a convenient, but not very popular in domestic markets, the UPC1237 microcircuit. If it is not possible to buy it, simply remove from the circuit all the elements of its strapping, starting from the resistors R12, R13. Then, in the matter of protection, you will rely on the UMZCH microcircuits themselves, which have thermal and short circuit protection. The truth is not very reliable. Yes, and clicks when turning on from the speakers are possible. The parameters of the amplifier itself are described in detail in the documentation.
Mom and Dad often spend time in the living room. He is a player and he likes to listen to skull crushing bass music. The smallest daughter has her own room, and sometimes a small room, according to a building plan that is almost economically adapted for a room for a toddler.
Under such conditions, the usual methods of setting up and selecting audio equipment simply do not apply. In addition, there is no chance that such equipment will be sound enough to sound satisfactory and justify the purchase route. The same problem comes with a young computer speaker - it's best to turn parents into speakers 1 with the largest subwoofer included, but that's also pointless. The room is elongated and 1.5 meters behind the opposite wall. Not only can the speakers not hang in the right places, but the bass from the subwoofer is washed out and pleasant - and no wonder!

M / s TDA2050 and LM1875 are completely interchangeable, the differences in their circuits are only in the values of a pair of resistors and one capacitor.
Low sound waves reach 17 meters in length, and although we can certainly hear this frequency, unfortunately, before the sound wave reaches its nominal length, it will bounce off the opposite wall towards the source. And instead of pure, selective bass, the rhythm will be heard from the desk.
Not to mention how loud it has to be played by such a set to sound, and yet a small child and parents are asleep behind the wall. About the upper neighbors from the same sex and gender, not to mention below. So what to do in this situation? Look at 0 solutions that can often surprise you with sound, often cheaper than typical computer kits or speakers, and when we are short on space and cannot listen to music too loud, they turn out to be the best solution.
All this makes it possible to make a universal printed circuit board suitable for either of these two microcircuits.
Supply voltage source
The UMZCH itself is 2x30 W, but the power depends on the supply voltage and the resistance of the speakers connected to the output. If you have not found a transformer capable of providing the specified bipolar nutrition(2 to 17 V) - it doesn't matter. The circuit can also operate from a reduced voltage, for example, 2 to 12 V. In this case, the power will simply drop proportionally. But such a transformer is easier to find - you can even take two standard ones, 12 V each, and connect their output windings in series.
What is the sound in a small apartment?
Many of these solutions are small enough to fit on any desk and next to any TV. You don't need an external amplifier for this, which needs extra space - they have a built-in amplifier, and often even two, driving the mid, low and high tones separately.
It is a set consisting of one active speaker, which also provides another, passive one. Equipped with a 5 '' mid-range speaker, and their output power is 60 W for each speaker. And yet, in a small apartment! The combination of relatively low power with a small aperture in the mid-range allows satisfactory sound even with very small volumes.

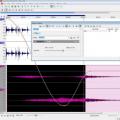
As for all kinds of timbre blocks, as practice has shown, this is an unnecessary complication of the circuit, which is fraught with unnecessary noise. You can also change the frequency response on a computer (phone). The usual volume control is enough here. And, as an option, the balance of the channels.
They also don't require exaggerated finesse to be set at the right distance from each other at right angles. In general, the principle is that the speakers should either be at the height of our ears, or at least point to them. The loudspeakers and our head must together create a certain triangle.
We are then confident that we are not reducing hearing loss by mis-tuning audio equipment. 
In this versatility, they have basically one drawback - they do not have a built-in radio. And then we come to the second solution, which can be a great set of audio for a small living room, especially if it's in the kitchen where we spend a lot of time, washing dishes, cooking, or other less inspiring things.
DIY amplifier box

The case in our case is plastic, with front and back walls in the form of 1 mm metal plates. You can take absolutely any box that is suitable in size and design, even plastic (easier to handle and drill), or metal (anti-interference and strength).
Today's mini is a better lineup than their predecessors, where we could listen to the radio, insert a cassette or at most a disc. They offered the same sound quality and usually placed housewives in the kitchens, giving them time to complete their daily chores.
Today, this mini or micro tower is a very versatile audio solution that combines the benefits of a speaker configuration 0 with a board input connector, multiple line connectors, and often even with wireless... The first is a module with preamplifier, communication, information panel and all navigation buttons and radio receiver. The other is an amplifier with volume and volume controls for high and low tones.

All connectors are standard - 220 V network, RCA inputs and pedal outputs for acoustic systems... Pay particular attention to the resistor for the volume control. Before putting it in the ULF, just plug it in and listen to see if there are any rustles and crackles from the speakers when you turn the knob.
It's really one-stop solution... There is also a stylish remote remote control which allows you to adjust volume, sound source and other parameters from a comfortable position on the couch or work in the kitchen. However, in principle, the use of a tube on the preamplifier or in the amplifier section greatly improves the sound selectivity. This "warms" them up so that it is difficult to name them, but when you listen to two devices, one with a lamp and the other without you, you know right away.
The dynamics of depth, clarity and tone have been greatly improved. What should be considered when deciding on a lamp solution? Without getting into technical details, it is important to consider that in order to take full advantage of the benefits tube amplifier, it should play pretty loud.
Discuss the article HOW TO MAKE AN AMPLIFIER WITH YOUR OWN HANDS
In this article, we will talk about amplifiers. They are ULF (low frequency amplifiers), they are also UMZCH (audio frequency power amplifiers). These devices can be made both on transistors and on microcircuits. Although some radio amateurs, paying tribute to the vintage fashion, make them the old fashioned way - on lamps. Here we advise you to take a look. I want to pay special attention of beginners to microcircuits car amplifiers with 12 volt power supply. Using them you can get pretty high quality sound at the exit, and for the assembly of practically enough knowledge of the school physics course. Sometimes from the body kit, or in other words, those parts on the diagram, without which the microcircuit will not work, there are literally 5 pieces on the diagram. One of these, an amplifier on a microcircuit TDA1557Q shown in the figure:
The bass may be too humming if we place the speakers too close to the wall, but this applies to most models where the air outlet is located on the back wall. And both the tube and the non-tubular tower have one thing in common that you'll definitely see in the photos - the simple removal of the front panel, or at least dust removal.
Good sound in a small apartment? No problem
Works best with good amplifier headphone or audio interface. it perfect solution for enjoyment excellent quality sound that does not bother neighbors or other family members, although it is known - this is the solution for listening to solo music.
Such an amplifier was once assembled by me, I have been using it for several years with Soviet acoustics 8 Ohm 8 W, shared with a computer. The sound quality is much higher than that of Chinese plastic speakers. However, in order to feel a significant difference, I had to buy sound card creative, the difference was negligible on embedded audio.
However, if you don't want to have keyless headphones and still want to enjoy good sound quality, take a look at the above solutions. Do not treat it under any circumstances as the truth of the disclosed and only correct audio solution - it does not exist. Everyone should choose the best way out for themselves, looking at their own needs, capabilities, and portfolio.
Due to the relatively small amount of money you can have in a small apartment equipment that does not take up enough space, satisfactory sound quality will be offered, and at the same time, its volume will not get us into trouble. No, there is still a very important question.

The amplifier can be assembled by surface mounting
Also, the amplifier can be assembled by mounting, right on the pins of the parts, but I would not recommend assembling this method. It is better to spend a little more time, find a wired printed circuit board (or dissolve it yourself), transfer the drawing to textolite, etch it and end up with an amplifier that will work for many years. All these technologies have been described many times on the Internet, so I will not dwell on them in more detail.
It is not easy. When choosing a TV, we often forget about other important issues such as source or sound. The second question is the speakers. These built-in TVs are not particularly suitable for flying. We can stay with the speakers on the TV, but we can also buy a soundbar, a home theater system, or an entire home theater system.
Which one is the best? It all depends on our needs and requirements. In short, we present the advantages and disadvantages of each solution. The cheapest, the easiest and I would like to say - worst decision... Rarely does a TV surprise us, for example, there is no question of good bass. However, TVs are average and high class offer a fairly clear sound, and this a good choice when you occasionally use a TV and watch mostly TV channels, rarely focusing on films.

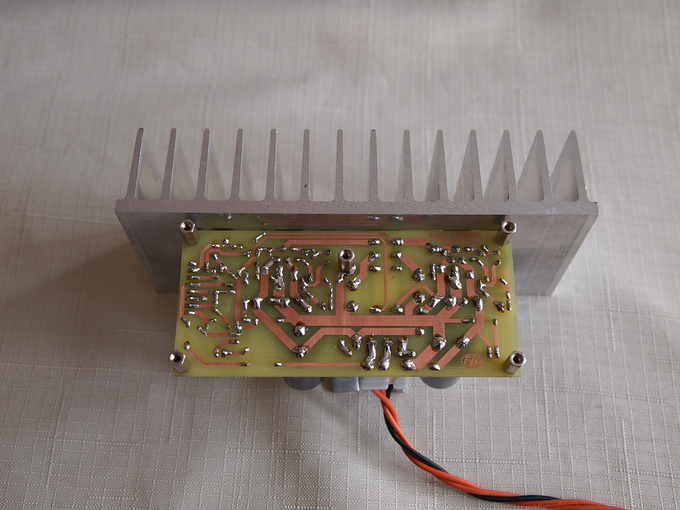
Amplifier attached to the radiator
I must say right away that the amplifier microcircuits get very hot during operation and must be fixed by applying thermal paste to the radiator. For those who just want to assemble one amplifier and have no time or desire to study programs for PCB layout, LUT technology and etching, I can suggest using special breadboards with solder holes. One of them is shown in the photo below:
Plus, this solution doesn't have to pull cables all over the room. With external subwoofer soundbar seems ideal for small rooms, especially in blocks. The room will sound decent, but we will not annoy our neighbors. Unfortunately, a quality soundbar is around 2 thousand. zlotys.
We go to the store, come back with one box, and we have a whole set, often with wireless rear speakers. In addition, such equipment does not take up too much space and fits perfectly into the TV. So we have one purchase dedicated to the picture and sound source. Unfortunately, these kits tend to be disappointing in sound. Even if the equipment is suitable for watching movies, it leaves a lot to be desired during concerts or discs. This is, of course, not a one-size-fits-all solution.

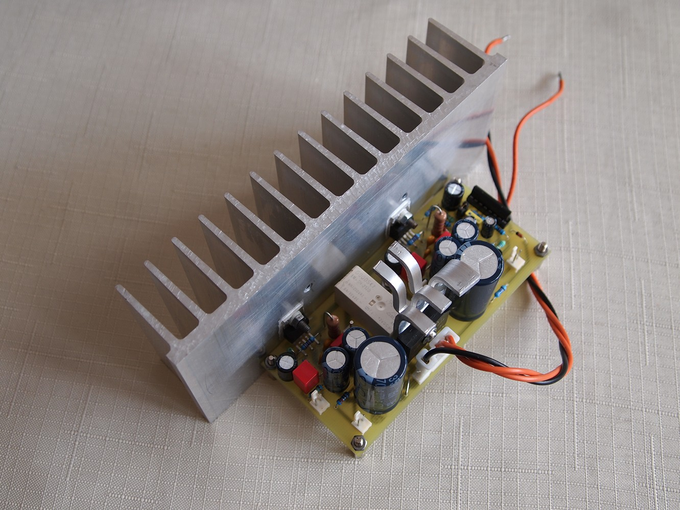
As you can see in the photo, connections are not made by tracks on printed circuit board, as is the case with printed wiring, but with flexible wires soldered to the contacts on the board. The only problem when assembling such amplifiers is the power supply, which produces a voltage of 12-16 volts, with a current consumption of the amplifier up to 5 amperes. Of course, such a transformer (5 amperes) will have rather large dimensions, so some people use switching power supplies.
From my point of view, this equipment is slowly going away. In any case, the manufacturers themselves talk about poor sales of such sets. Those who want something neat will pick up audio tracks, and those who are tuned in to best quality will be tempted by advanced kits.
Home theater amplifier plus speakers plus subwoofer
The kits are designed to have at least two loudspeakers on the ceiling. The first major disadvantage of this kit is the price. Below 2000. We can search for used equipment. A good home theater system costs several thousand zlotys. Plus, the speakers take up a lot of space, sometimes requiring a stand or wall mount and a few cables. Home theater receivers don't belong. Apart from the full power of the kit, we would prefer not to use it in a residential block without risking our neighbors.

Transformer for amplifier - photo
Many, I think, have computer power supplies at home, which are now morally outdated, and are no longer used as part of system units, so such power supplies are capable of delivering +12 volts through circuits, currents much higher than 4 amperes. Of course, such a power supply is considered worse among sound connoisseurs than a standard transformer power supply, but I connected a switching power supply to power my amplifier, after which I changed it to a transformer power supply - the difference in sound can be said to be imperceptible.
Home theater is the only solution for truly high quality surround sound. If we really want to enjoy the fullness of the film, then this kit can guarantee it. The high initial costs offset the long service life of the equipment. Speakers can serve us for decades. In addition, the receiver does not require frequent replacement.
Sound and image
The film is a complex piece of art. There are many factors at the reception - from the script, directing, acting, to the quality of the picture and sound during the show. When watching a movie at home, let's not forget about sound. It plays a significant role, and by using external speakers, we will discover a variety of flavors. We will not catch them using only the speakers built into the TV.

After leaving the transformer, of course, a diode bridge must be installed to rectify the current, which must be designed to work with high currents consumed by the amplifier.

After the diode bridge, there is a filter on an electrolytic capacitor, which must be designed for a noticeably higher voltage than we have in the circuit. For example, if we have 16 volts in the circuit, the capacitor should be 25 volts. Moreover, this capacitor should be as large as possible, I have 2 2200 microfarad capacitors connected in parallel, and this is not the limit. In parallel with the power supply (shunt), you need to connect a ceramic capacitor with a capacity of 100 nF. At the amplifier, at the input, film decoupling capacitors with a capacity of 0.22 to 1 microfarad are installed.

Film capacitors
The signal connection to the amplifier, in order to reduce the level of induced interference, should be carried out with a shielded cable, for this purpose it is convenient to use a cable Jack 3.5- 2 Tulips, with matching sockets on the amplifier.

Jack cable 3.5 - 2 tulips
The signal level (volume on the amplifier) is adjusted using a potentiometer, if the amplifier is stereo, then double. The variable resistor connection diagram is shown in the figure below:

Of course, amplifiers can also be made on transistors, while power, connection and volume control are used in them in the same way as in amplifiers on microcircuits. Consider, for example, a single transistor amplifier circuit:

There is also a blocking capacitor here, and the minus of the signal is connected to the minus of the power supply. Below is the diagram push-pull amplifier power on two transistors:

The next circuit is also on two transistors, but assembled from two stages. Indeed, if you look closely, it consists, as it were, of 2 almost identical parts. The first stage includes: C1, R1, R2, V1. In the second stage C2, R3, V2, and load the headphones B1.

Two-stage transistor amplifier - circuit
If we want to do stereo amplifier, we will need to collect two identical channels. In the same way, we can collect two schemes of any mono amplifier, turn it into stereo. Below is a diagram of a three-stage transistor power amplifier:

Three-stage transistor amplifier - schematic
Amplifier circuits also differ in supply voltage, some need 3-5 volts to work, others need 20 or more. Some amplifiers require a bipolar power supply to operate. Below are 2 amplifier circuits on a chip TDA2822, first stereo connection:

In the diagram, the speaker connections are indicated in the form of resistors RL. The amplifier operates normally from a voltage of 4 volts. The following figure shows a bridged circuit, it uses one speaker, but it delivers more power than the stereo version:

The following figure shows the amplifier circuits on, both circuits are taken from the datasheet. Power supply 18 volts, power 14 watts:

![]()
The acoustics connected to the amplifier can have different impedances, most often 4-8 ohms, sometimes there are speakers with 16 ohms. You can find out the impedance of the speaker by turning it over with its back to you, the nominal power and impedance of the speaker are usually written there. In our case, this is 8 ohms, 15 watts.

If the speaker is inside the column and there is no way to see what is written on it, then the speaker can be called by the tester in ohmmeter mode by choosing the measurement limit of 200 Ohm.

The speakers are polarized. The cables used to connect the acoustics are usually marked in red, for the wire that is connected to the speaker plus.

If the wires do not have marks, you can check the correctness of the connection by connecting the battery plus with a plus, a minus with a minus speaker (conventionally), if the speaker diffuser moves out, then we guessed right with the polarity. More different schemes ULF, including tube ones, can be viewed in. It contains, we think, the largest selection of circuits on the Internet.