Hello everyone! Recently a friend asked me how to connect a second hard drive to a computer or laptop. In general, without hesitation, I decided to write an article about this for you. I say in advance that if something does not work out for you, write about it in the comments, I will help. Now let's get started.
How to find out what hard drive is in the computer
In general, initially, those who have a lot of information stored and no longer have enough disk space to connect a second hard drive to a laptop or computer. Personally, I store all the data I need on removable media, be it a flash drive or a pocket. But in our case, we will figure out how to connect a second hard drive to a computer without a specialist.
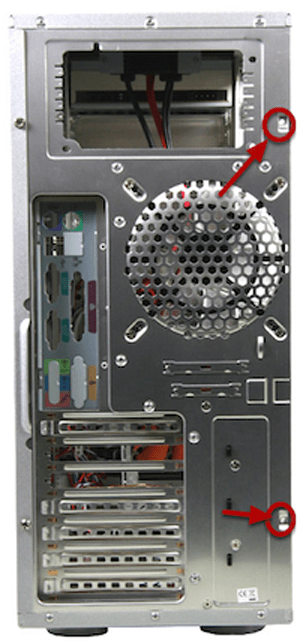
First, let's disconnect all power cables from the computer and unscrew the side cover, you can do this by taking a screwdriver and unscrewing the four bolts. We look in the picture where they are located and how the side cover of the system unit is removed.
note that hard drives in the system unit can be located on a special shelf or cell, in the center or at the bottom of the unit. Install the second hard drive not side by side, but through the cell, this must be done in order to have good cooling.
Before purchasing a hard drive, it is important to know what kind of connection interface your drive has. It can be an IDE connector with a wide ribbon cable and a plug, or it can be SATA, it is not difficult to distinguish it, the cable itself is narrow and the plug is small. Sata connectors are now the most popular and it will not be difficult to buy such discs.
If your motherboard and hard drive has a SATA connector, then you can connect it in a couple of minutes. To begin with, we fix our hard drive in the cell and connect the sat wire from the disk to the motherboard to it.
Now we take our Sata cable and connect this wire from either side, you can't go wrong, don't worry. We connect the other end of the wire with motherboard.

So that you know, all metrics have at least two sata connectors, you can see them in different places and they look like this.

Now let's connect the power cable from the hard drive to the power supply.
Please note that SATA and IDE connectors are also different, and if your plugs do not converge, then you should buy an adapter that looks like this.
Now we connect the power cable to the hard drive.
Now we have everything ready, the second drive is connected. You can safely close the lid, tighten the bolts and download igruhi to your computer, there is enough memory for everyone.
Related Videos
If something did not work out for you, then write to me in the comments, I will gladly help everyone. Bye!
When you're running out of hard drive space, you can either remove or add more space. While an external USB hard drive is easy to plug in and as an option for additional storage, this is not entirely suitable - they take up disk space, perhaps an additional power connector, you need to use a valuable USB port, and they tend to be slower than internal drives. Let's take a look at a more complicated option today for adding a second internal storage.
It's time to get familiar with the basics of your computer. Today we will focus only on the hard drive, but the guide will give you excellent overview for all random connectors and ports that you see on motherboard after you open the computer case.
Step 1: Determine if you can add another internal drive or not
Unfortunately, not all computers are built the same. If you have a laptop, or an all-in-one machine, where the internal systems are hidden in a monitor, then your only option is to go to a USB stick, and you do not need to open it. If you have system unit then read on as there is a chance that you will have enough space to install a second disc. If you have a full tower size, then you can easily add a second disc, or 2, or 3! But, if you are not sure, refer to the table below.
Step 2: backup
Although we do not anticipate any problems, but this good practice, to create backup important data before making any hardware changes. Here we have looked at some options for Reserve copy.
The best software backup for Windows.
The best backup software for Windows.
Your data is fragile - and just one small crash is enough to lose all your data. The more copies you make, the better. Here we present the best free programs backup for Windows.
Step 3: open the case
Disconnect power from the system unit and all peripheral devices before proceeding.
In most cases, the system unit may have a cover on each side that needs to be removed with just two screws. You need to remove the side cover that does not have the motherboard, so look at the back of the system, find USB ports/ mouse and remove the cover, so look at the back of the system, find the USB / mouse ports and remove the opposite side.
Step 4: get rid of static electricity
When touching the inside of a computer, technicians use a grounded wrist strap to reduce the risk of damage to any sensitive component from static electricity that is stored in the human body. For our purposes, touching the radiator will suffice.
Step 5: Find your hard drive and connectors
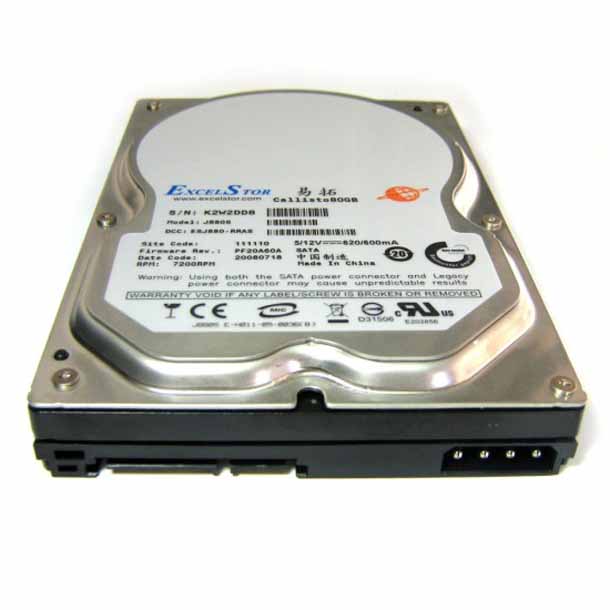
The insides of all computers are very similar. A hard drive is a fairly large piece of metal like this:
You have to find it, it is usually found in some kind of metal box. Check now to see if you have a box to fit another hard drive. An enclosure tower usually has room for 3 or 4 drives, but a small desktop system might only have room for one drive, in which case you are out of luck and have to consider either upgrading the enclosure or using external USB disk.
Step 6: Determine if you have a SATA or IDE drive
Take a look at the following image and compare it to your disk. If you have the type of drive at the top, wide ribbon cable, then this is a very old type of connection called IDE. Ideally, your new disc will be with SATA interface. If it turns out that you have an IDE drive, then you are completely out of luck, but that is beyond the scope of this article. IDE drives are getting harder and harder to buy, which is a sign that your PC is really getting old.

Check ALL connected devices. There are two possible types of power cables, and you will of course need to find a spare in your system that you can use. It may be hidden somewhere, so keep an eye on other power cables carefully and try to find a spare.
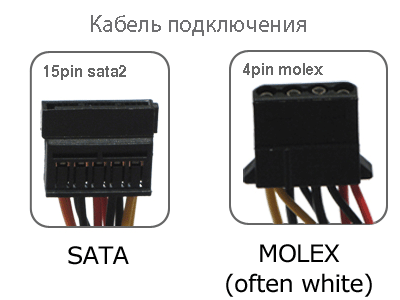
Some hard drives can accept any kind of cable, but the SATA type is easier to connect, so I use those when available. If you have a spare power cable, but it's not SATA, then you can still install a second drive, but you need to make sure that it can accept the Molex type of power cable, or you can buy a Molex to SATA adapter.
Next, connect the cable SATA data on the motherboard and see where it is connected. Different motherboards have different SATA port numbers, and older machines may even have only one. Obviously, if you can only find one SATA port, then you can only connect one SATA drive. If you can see some of the spare connectors, then congratulations - you can now go and buy a second drive!
Step 7: buy a disc
There is very little difference between manufacturers hard drives... On the technical side, you should look for a “3.5” SATA hard drive, and make sure you pick up a different “SATA cable” while you're at the store, the seller should be able to help you with this if you can't find the right one. hard drive ”and make sure you pick up a different“ SATA cable ”while you're in the store and the seller should be able to help you with this if you can't find one.
Step 8: Installation
Installation hard disk boxing is the hardest part as it can sometimes be blocked by the video card or other cables. You need to identify the cables before you actually go any further by noting the side of the cable facing up (the SATA data cable and power cables all have a notch on one end, which means it's nearly impossible to insert it incorrectly).
Once the disc is in place, use the screws that came with the disc to secure it — you need to align the holes on the disc with the holes in the box or tray. Next, find the spare power cables and SATA cable and connect them.
In my next article, I will cover software and configuration settings when adding a second drive - so stay tuned. As always, feel free to ask any questions in the comments and I'll try to answer them quickly.
Every day in the modern world there are more and more laptops, which, in turn, are improved and modernized. However, this does not mean at all that users are actively abandoning the stationary computers we are used to.
Undoubtedly, the main advantage of a laptop is its portability and small size. However, even more important is the advantage of a stationary computer over a laptop - it is the possibility of upgrading and upgrading.
Perhaps the most common form of improving the "iron horse" is increasing physical memory. That is why in this article we will try to figure out how to connect a second hard drive to a computer.
Types of hard drives
There are two main types of internal hard drives, which differ in connection connectors, namely SATA and IDE.
The first connection interface is considered more modern and is used today on all motherboards. As for the IDE connector, this technology somewhat outdated and, accordingly, hard drives and motherboards with these connectors can only be found on outdated stationary computers.
Laptop and additional hard drive
There are several ways to connect a second hard drive to your laptop. By far the easiest is to purchase an external USB drive. There is a huge selection of these devices in stores today. The size of memory on external hard drives is in no way inferior to internal hard drives. Having bought such a device, you can easily connect it to your laptop yourself at any time.
The advantage of such a hard drive is that before connecting a second hard drive to a computer, Windows 7, like any other operating system, does not have to be turned off, since this device has a hot plug function.
In the event that it is not possible to purchase an external drive, you can get a special adapter that allows you to connect an ordinary hard drive via the USB port. Also for more convenient use such an adapter, there are special containers that are used as a box for the disc.
You just need to plug this container into a USB port and put a hard drive into it, after which an additional device in the form of a hard drive will appear on your laptop.
Connecting an additional hard drive to the computer
Sometimes it happens that connecting a second hard drive to a computer is not necessary in order to increase the size of the device's memory, but only in order to transfer any information from one computer to another. It would seem that it is much easier to do this using a flash drive, but when the size of this information exceeds 80-100 GB, it becomes much more convenient to perform the transfer using the connection of two hard drives to one computer.
Before connecting a second hard drive to the computer, you need to make sure that the motherboard has free ports for connection. Be sure to turn off the power to the computer and unplug it before performing any of these work.
Hard drive and IDE connector

In order to understand how to connect a second hard drive with an IDE connector to a computer, let's see what this type of connection is.
As a rule, on modern motherboards, this type of connection is established less and less. The ribbon cable used to connect the hard drive to the motherboard is quite thin. Its main feature is the ability to connect multiple devices to one motherboard connector. That is, there are only 3 IDE connectors on such a cable, one of which connects to the motherboard, and the other two to devices - a hard drive and a CD-ROM.
Connect a second hard drive. SATA connector
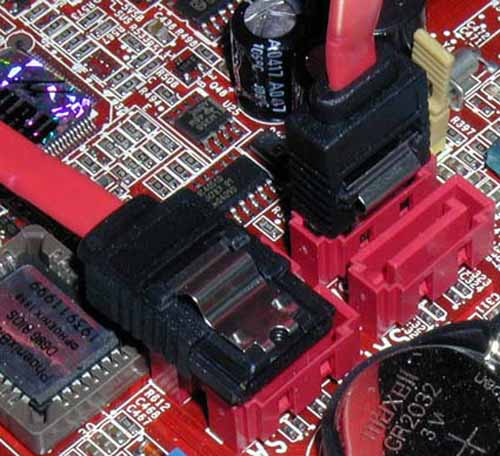
If it becomes necessary to connect a second hard drive to the computer, first of all pay attention to the type of hard drive connector. If it is a SATA connector, check right away that your motherboard supports these interfaces.

Then prepare a wire with SATA connectors at both ends. Connect one side to the hard drive, and the other to a free SATA port on the motherboard. Even on the simplest boards of these interfaces, at least two pieces are installed.
When installing a loop into the connector, you do not have to worry, since a special key has been developed on the plug, thanks to which the possibility of incorrect connection is excluded. That is why you can replace the hard drive or add it yourself.
Connecting the power connector
In addition to data transfer cables, be it SATA or IDE, the hard drive needs power, which it receives through a separate connector and a separate wire.
When the IDE hard drive is connected, the power cable looks like this.

It has 4 contacts. There is also a key on the connector so you never go wrong with the connection position. This connector has rectangular shape, and the key is 2 rounded corners on one longitudinal side.
The power bus for SATA hard drives looks a little different.

It has a flatter shape, but it is also equipped with a special key, therefore wrong connection completely excluded.
Choosing a hard drive
Today there are a huge number of manufacturers computer technology and accessories for it. The same goes for hard drives. In order to make the right choice in favor of a particular hard drive, you need to decide what you need it for.
There are several main parameters of the hard drive that you should pay attention to. The first is definitely the volume of the media. By far the largest is the 4TB disk. However, this figure is constantly growing, and within a year it may become 2 or even 3 times higher.
The second value is the speed of its work. Namely - the speed of access to the disk and writing to it. Today there are hard drives working on SSD technology, in another way they are called "solid-state media". The speed of their work significantly exceeds the speed of conventional rigid ones, but their volume is several times less. The price of such discs is very high today.
Based on these parameters and your personal preferences, you can competently and most importantly - it is practical to choose the hard disk you need.
Many do not know how to connect a second hard drive to a computer, and therefore hand over their system units to the service. However, after reading this article, it becomes clear that this is not difficult at all.
We connect the second hard drive to the computer.The time has come when one hard drive in a computer is no longer enough. More and more users decide to connect second HDD to their PC, but not everyone knows how to do it right yourself in order to avoid mistakes. In fact, the procedure for adding a second disc is simple and does not require special skills. It is not even necessary to mount a hard drive - it can be connected as external device if there is a free USB port.
Connecting a second HDD to a PC or laptop
Connection options second hard disk are as simple as possible:
- Connecting the HDD to the computer system unit.
Suitable for owners of ordinary stationary PCs who do not want to have external connected devices.
- Connecting hard disk as an external drive.
The easiest way to connect the HDD, and the only one possible for the laptop owner.
Option 1. Installation in the system unit
Determining the type of HDD
Before connecting, you need to determine the type of interface with which the hard drive works - SATA or IDE. Almost all modern computers are equipped with a SATA interface, respectively, it is best if the hard drive is of the same type. The IDE bus is considered obsolete and may simply not be present on the motherboard. Therefore, there may be some difficulties with connecting such a disk.
The easiest way to recognize a standard is by its contacts. This is how they look for SATA drives:
And like this for the IDE:
Connecting a second SATA drive in the system unit
The process of connecting a disk itself is very easy and takes place in several stages:
SATA Boot Priority
The motherboard usually has 4 connectors for connecting SATA drives. They are designated as SATA0 - the first, SATA1 - the second, etc. The priority of the hard drive is directly related to the numbering of the connector. If you need to manually set the priority, you will need to enter the BIOS. Depending on the type of BIOS, the interface and control will be different.
In older versions, go to the section Advanced BIOS Features and work with parameters First Boot Device and Second Boot Device... In newer BIOS versions, look for the section Boot or Boot Sequence and parameter 1st / 2nd Boot Priority.
Connecting a second IDE drive
In rare cases, there is a need to install a disc with an outdated IDE interface. In this case, the connection process will be slightly different.
Connecting a second IDE drive to the first SATA drive
When you need to connect an IDE drive to an already working SATA HDD, use a special IDE-SATA adapter.
The connection diagram is as follows:
- The jumper on the adapter is set to Master mode.
- The IDE plug connects to the hard drive itself.
- The red SATA cable connects one side to the adapter and the other to the motherboard.
- The power cable connects one side to the adapter, and the other to the power supply.
You may need to purchase a 4-pin (4 pin) power to SATA adapter.
Disk initialization in OS
In both cases, after connecting, the system may not see the connected drive. This does not mean that you did something wrong, on the contrary, it is normal when the new HDD is not visible in the system. To use it, the hard disk must be initialized. Read about how this is done in our other article.
Option 2. Connecting an external hard drive
Often, users choose to connect an external HDD. It is much easier and more convenient if some of the files stored on the disk are sometimes needed outside the home. And in the situation with laptops, this method will be especially relevant, since there is no separate slot for the second HDD there.
An external hard drive is connected via USB in exactly the same way as another device with the same interface (flash drive, mouse, keyboard).
The hard drive intended for installation in the system unit can also be connected via USB. To do this, you need to use either an adapter / adapter or a special outer case for the hard drive. The essence of the operation of such devices is similar - the required voltage is supplied to the HDD through the adapter, and the connection to the PC is carried out via USB. Hard drives of different form factors have their own cables, so when buying, you should always pay attention to the standard that sets dimensions your HDD.
If you decide to connect the disk using the second method, then follow literally 2 rules: do not neglect safe extraction devices and do not disconnect the disk while using a PC to avoid errors.
We talked about ways to connect a second hard drive to a computer or laptop. As you can see, there is nothing complicated in this procedure and it is absolutely not necessary to use the services of computer masters.


When the first computers appeared, all programs, games and other files practically did not take up disk space. Now things are quite different, and it is often necessary to install an additional storage medium. Therefore, every user should know how to connect a second hard drive to a computer. In fact, this is not difficult to do, you just need to follow simple instructions.
The device must first be purchased from a store. Please note that the hard disk has several connection interfaces. After purchasing the purchase, you can proceed with the installation of the device.
Preparing for installation
- How many hard drives are already connected to the motherboard? Most often, a computer has only one hard drive, so installing a second drive is not difficult. In most cases, the HDD is located directly under the DVD-ROM, so it won't be difficult to find it;
- Is there extra space for installing a second hard drive? In the event that it is not possible to install a second or third disk, then you will have to purchase a USB drive;
- What type of cable is used to connect the hard drive to the computer? If the purchased device does not have the same interface as on a PC, it will be difficult to install.
Please note that you need a 3.5-inch hard drive. You don't need to buy small drives designed for laptops.
Physical disk connection
If the system unit has not yet been disassembled, disassemble it. It is now recommended to get rid of static electricity. This is done by any means known to you. If you wish, you can purchase a special grounding wristband in the store.

After small manipulations, the hard drive will be fixed in the case, now all that remains is to connect the hard drive. Before plugging in the power cable and ribbon cable, it should be noted that the procedure is slightly different for the IDE and SATA interface.
IDE interface
When connecting a disk with an IDE interface, it is recommended to pay attention to such a nuance as setting the operating mode:
- Master (main).
- Slave (slave).
If an additional hard disk is installed, then you need to enable the Slave mode. To do this, you need to use a jumper (jumper), which is installed in the second place. The first row turns on the Master mode. It is important to note that on modern computers, the jumper can be removed completely. The system will automatically determine how hard the master is.

At the next step, you need to connect the second or third hard disk to the "mother". For this, the IDE interface is connected to a ribbon cable (wide, thin wire). The other end of the cable is connected to the IDE 1 Secondary socket (the main drive is connected to the zero connector).

The final stage of connection is power supply. To do this, a white chip with four wires is connected to the corresponding connector. The wires go directly from the power supply (box with wires and fan).
SATA interface
Unlike IDE, a SATA drive has two L-shaped connectors. One is for power connection and the other is for data cable. It should be noted that such a hard drive lacks a jumper.

The data cable plugs into a narrow connector. The other end connects to a special connector. Most often there are 4 such ports on the motherboard, but there are only 2 ports with an exception. One of the slots can be occupied by a DVD drive.
There are times when a SATA disk was purchased, but no such connectors were found on the motherboard. In this case, it is recommended to additionally purchase a SATA controller, which is installed in the PCI slot.
The next step is to connect the power. The L-shaped wide cable is connected to the corresponding connector. If the drive has an additional power connector (IDE interface), just use one of the connectors. On this physical connection hard disk is completed.
BIOS setup
When all manipulations with the hard disk are completed, turn on the computer, and then enter the BIOS. It is important to note that the BIOS is launched on each computer in its own way. To do this, use the key:
- Delete;

After entering the BIOS, you need to go to the configuration setting. It is important to assign boot from the disk where the operating system is installed. If the priority is set incorrectly, the system simply will not boot.
If one of the disks is not displayed in the BIOS, it means that the hard drive was connected incorrectly or the ribbon cable was damaged. It is recommended that you inspect all wires and reconnect (remember to turn off your computer).
As soon as the BIOS setup is completed, you can boot with the operating system. After that, all that remains is to assign a letter to the disk.
The final stage
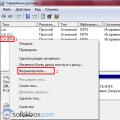
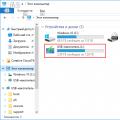
Since connecting a hard drive to a computer is not enough, you need to make the final settings directly from under Windows. On some computers, a similar procedure is carried out in automatic mode... To check this, you should open "My Computer" and then see if a new disk appears.
If nothing happens, you need to start the control panel. Then select "Administration". As soon as a new window opens, you will need to select "Computer Management". In the left column, you need to find the "Disk Management" tab (on some computers "Disk Manager").

- At the bottom of the window, select disk 1 (if more than 2 hard drives are connected, select the disk with the highest number). This will be the new hard drive;
- You must assign a letter to the logical volume. To do this, right-click on the disk, and then select "Assign letter";
- As soon as a new drive letter is assigned, it needs to be formatted. The procedure can take a long time, it all depends on the size of the hard drive. When formatting, it is important to choose file system NTFS.
When the formatting process is complete, a new disk will appear in the root directory "My Computer". If for some reason it is not possible to connect the HDD using the built-in manager, it is recommended to use third-party programs.
Partition Manager is an excellent tool for working with hard drives. In addition, such a utility allows you to partition a disk into several logical volumes.
Conclusion
Attaching a hard drive takes no more than 15 minutes. If you follow the instructions, difficulties should not arise. Modern computers do not need additional BIOS setup, of course, if the disks are not installed in absolutely new computer... Also don't forget that from operating system depends on how voluminous the plug-in hard drive can be.
Video review: connecting a hard drive